•  

    Welcome! You are currently logged out of the forum. Some forum content will be hidden from you if you remain logged out. If you want to view all content, please LOG IN!

    If you are not an MOA member, why not take the time to join the club, so you can enjoy posting on the forum, the BMW Owners News magazine, and all of the benefits of membership? If you click here, you have the opportunity to take us for a test ride at our expense. Enter the code 'FORUM25' in the activation code box to try the first year of the MOA on us!


My First Airhead

pacsman

New member
Hello,

A short background. I owned a 2003 LT, that was totaled when I was rear-ended a few years back. I replaced that with a 2005 LT. I also have a 2011 RT and my wife upgraded this spring from her 1999 RT to a 2014 RT.

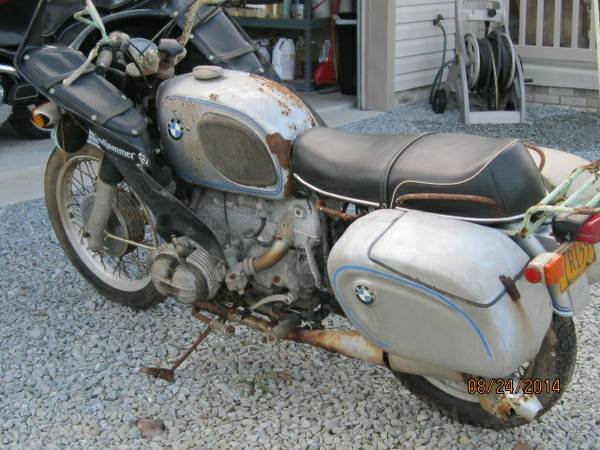
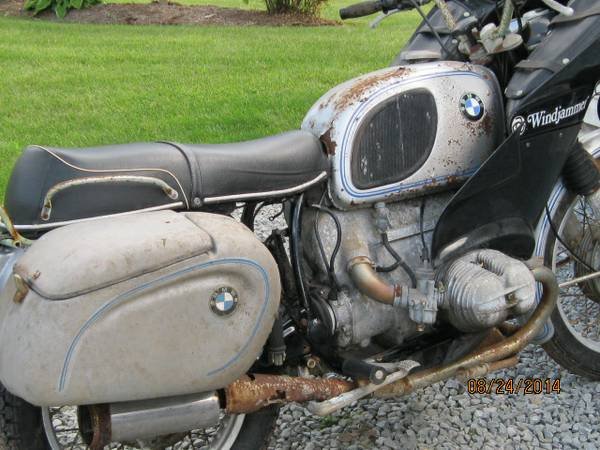
Since I started riding I wanted to restore a BMW from my birth year (1971). Well I finally took the plunge into the airheads. I found a 1971 R60/5 locally. It was built in January 1971. The original owner purchased it in August 1971. He rode it till 1979, at that point he parked it in a garage and that is where it has been sitting till this past Monday when I bought it. Admitting it is a little more work than I wanted for my first restoration project, but I think its a good bike to start with. Everything is their, even the original tool kit and tire pump. The Windjammer fairing is in nice shape and the endure bags are solid. The motor is frozen. The trany shifts through the gears, clutch and brakes are free as is the final drive. The tires even hold air. I do not see any rust inside the tank.

Here is where all my questions start. Since it has been sitting for the last 35 years I am planning to strip it down to the frame and start rebuilding from their. I know I wont really know what the motor looks like till I get it free and tore down, but I am planning on replacing all the seals.

So, depending on how the crank and rods look do I plan on replacing all the bearings too or see how it looks?

Trany and final drive just seals to replace?

Honestly, the electrical system has me the most concerned. Points and condenser, diode board predate anything I have ever owned or worked on....

I am sure I will have lots of questions. I already bought the Clymer manual and booked marked a bunch of web sites. I just wanted to myself and my new bike.

Troy
 

Attachments

  • IMG_0906.JPG
    IMG_0906.JPG
    67.3 KB · Views: 313
  • IMG_0905.JPG
    IMG_0905.JPG
    61.4 KB · Views: 316
  • IMG_0904.JPG
    IMG_0904.JPG
    68.9 KB · Views: 313
Troy -

Welcome the forum! And welcome to the world of Airheads! It looks like you've jumped into the deep end... :laugh We're here for you and hope we can help along the way.

As for bearings in the engine and tranny, I think you're going to have to get there and see what you think. Obviously, you really only want to do this once, so if there's any doubt along the way, you'd better replace at that time. Pulling a crankshaft/camshaft or opening a transmission takes some special skills and knowledge, so depending on your wrenching levels, you may want to send things out to some of the known experts so you can concentrate in other areas.

A few other links to consider. First, check out the link in my signature line. A few other links are:

- a small collection of other rebuilds some with pictures - http://forums.bmwmoa.org/showthread.php?50991-Rebuild-Sites-with-Photos

- you really should follow Brook Reams blog on rebuilding a /5 - http://brook.reams.me/bmw-motorcyle-rebuilds/1973-bmw-r755-rebuild-project/

Have fun and let us know how it goes!
 
Welcome aboard BUD.............LOTS of work and love there in front of you......Glad you have a kick starter to help you get the engine turning over...........to me, that is the first thing to concentrate on....Leave the trans on and use the kick starter to rotate the engine.........Some put oil and yes, Marvel Mystery oil or some type of stuff that will break loose the rings from the cylinder.........

PERHAPS.........you can even get the old war horse running before you tear it down........That's just me and what I would first concentrate on..........God bless.......Dennis
 
Welcome!!!

I've done a couple airhead resto's - since you've got a running modern bike, I agree you should take her completely apart, taking pictures along the way as you go.

Join Airheads.org and get to know fellow airheads. I'd take an inventory of everything you need and break everything down component by component. The local airhead group can help you with your inventory.

Good news is parts are available & several good resources - I had good luck getting parts from Motobins, benchmark, hucky & BMW.

The 4 speed transmission is pretty bulletproof and my guess is bottom end of engine is good too - if you're lucky you'll just need rings, a valve job, pushrood seals. I didn't see you mention mileage but pistons should be okay ( I own a 73 r60/5 ) - a great engine.

Suggest a ultrasonic cleaner for carbs - jets are most likely gummed up. You'll want to replace clutch, rear seal & lube clutch splines. It's going to take time but you'll be pleased with finished product.

Looks like a great one or two winter project - keep us posted!!!
 
If you can get the motor to turn over with some penetrating oil, that would be great before removing engine from the frame. 41K on that engine is mid-time - my R60/5 has about 80k and I believe it's original engine.

You've got a project ahead of you but all good as you'll learn a lot an have a lot of Pride of Ownership when she's all spruced up!

I love this engine and the carbs, once dialed in, are very tried and true.
 
+1 on the penetrating oil. Pull the plugs and fill 'er up. Drain the oil remove the pan and take a peek then remove valve covers and see what you see. That gas tank is a shaky deal, wonder what the inside is like?

Kind of looks like somebody took it to the beach and rode it in the surf.:laugh
 
Inside of the tank is very good no rust visible. You can still see the red liner in it. I pulled the plugs out the day after I brought it home and filled the cylinder up and letting them soak. I figure after this weekend I will pull the oil pan and have a look. The valves are pretty rusty looking but free. Looking forward to starting the year down.
 
Forgot to suggest when you get ready to remove the head pipes just go directly to the hack saw on those exhaust nuts. Do not try and un-screw them or you will , I'm sure, get an expensive surprise just buy a couple new.
 
Forgot to suggest when you get ready to remove the head pipes just go directly to the hack saw on those exhaust nuts. Do not try and un-screw them or you will , I'm sure, get an expensive surprise just buy a couple new.

Definitely cut off the exhaust nuts - if you try removing you'll most definitely strip the threads on your heads!!!
 
Congratulations Troy. It looks like you found a good project bike. I'm sort of a sucker for barn bikes myself, and have my first airhead apart right now as well. I like your idea of finding your birth year bike. Enjoy the build.

Ray
 
One suggestion that I found out the hard way.

Be sure to check and grease the wheel bearings before you trust riding much. On my "well taken care of" bike purchase ('78 R100) the front bearings were DRY and I mean DRY. Cost me, but luckily I was able to fix quickly before any damage. If these bearings sit for a long time, the grease drys out, and then the upper part of the bearing races and rollers will actually get rusty and then watch out!!

Another area I would suggest you look at would be the jets in the carbs. If dried out and full of gunk, and maybe even spiders or bees, you could do some damage. Look for rubber deterioriation ane even air leaks around carbs.
 
Here are a few suggestions -
1) Take your time on the re-do of your bike (you can decide which you have more of, time or money - if more money then you can pay folks to do some parts, if it is time, the you definitely should take your time).
2) Understand that education can be expensive, but ignorance is usually much more costly. If you do much of the work yourself, there will be education - you likely won't do everything right; you may need to replace / repair some of the things that you break during the education process - don't get too worked up by the mishaps (remember that education can be expensive).
3) Join the ABC (or Airheads BMW Club) - there may be some airheads proximate to you (Cleveland?) that can lend a hand a key times.
http://www.airheads.org/
4) Google is your friend - there is a lot of information in the "cloud"; some of the information is good - one place that has a lot of good information is Snowbum's website (it can take a while to dig through everything to find and absorb the information that is being sought). Snowbum's website isn't the only place with good information (join the ABC and you will find much more info)
http://bmwmotorcycletech.info/
5) Plan on taking a road trip with your car/truck to central Ohio - there is a place called Re-Psycle BMW that has lots and lots of used parts. (Used parts are MUCH less expensive than new parts!!!)
http://www.re-psycle.com/

Good Luck! (and take your time)
 
In the first picture, it looks like the bike has the original, Everbest, petcocks on the fuel tank. A more appropriate name would be "Everworst". It would nick you on points on a concourse restoration, but later Karkoma taps are much better parts and easily rebuildable. The everbest can be rebuilt, but you still have a weak component that is doomed to fail again and again.
 
get it running and ride!

to the closest rat-bike competition.


ps, that is a joke, not to be taken seriously. I am anxious to see the final product!
 
Troy, you have what appears to be an original Windjammer there. If it is fiberglass (you will see the glass fibers inside the pockets) you might want to drop a line to Craig Vetter at: www.craigvetter.com YoIf you want to check the serial number (it is scratched into the fiberglass); the highest known serial number surviving is #9161 (note: that it is simply a "Windjammer", not the later Windjammer II, III, or SS models (which were all thermoformed ABS plastic))

The "lowers" are a pre-production version, I'm not even sure how many we many, but not a lot. Production BMW lowers were trimmed short of the top of the cylinder head; BMW volumes just didn't warrant making separate molds and tooling.

1972-BMW-lowers.jpg


"Original" Windjammer

22-9161-Friesen-BMW.jpg


Windjammer #1 > http://craigvetter.com/pages/Owners bikes/First Windjammer.html

1971-George-Monroe.jpg


Windjammer Serial Numbers
The first Windjammers began in September, 1971 with hand scratched in serial numbers. Beginning November, 1971, aluminum plates with serial numbers were attached with pop rivits. None of the fairings after that first Windjammer began with any kind of recognizable beginning number. This may seem odd, but at least twenty other companies made copies of my designs. Had they known how many I was making, there would have been hundreds of copy fairings!
Source:

http://craigvetter.com/pages/Vetter_Fairings/Every_Vetter_Fairing_made.html.
 
I sent him am email. He said it was an early first generation windjammer. He also said the lowered are pretty special said he only made 4 or 5 sets of them
 
So Pacsman, was your serial number scratched into the fiberglass, or did you have an aluminum S/N plate? The Vetter Fairing on my old R90/6 has the six pin connector, and the aluminum plate. I'm a little confused by this "highest serial number" business. My number is 9873. That's well above 9161, but yet if I am reading all this correctly, the six pin connector makes it a first generation unit?

Do you mind telling what your S/N is?
 
Last edited:
Back
Top