• Welcome, Guest! We hope you enjoy the excellent technical knowledge, event information and discussions that the BMW MOA forum provides. Some forum content will be hidden from you if you remain logged out. If you want to view all content, please click the 'Log in' button above and enter your BMW MOA username and password.

    If you are not an MOA member, why not take the time to join the club, so you can enjoy posting on the forum, the BMW Owners News magazine, and all of the discounts and benefits the BMW MOA offers?

  • Beginning April 1st, and running through April 30th, there is a new 2024 BMW MOA Election discussion area within The Club section of the forum. Within this forum area is also a sticky post that provides the ground rules for participating in the Election forum area. Also, the candidates statements are provided. Please read before joining the conversation, because the rules are very specific to maintain civility.

    The Election forum is here: Election Forum

1971 Airhead R75/5 help

bigvic54

Member
Once again I need help.

I got my 1971 Airhead R/75 with Bing carburetor started last week then tried to make some adjustments. My mistake.

I wanted to adjust my idle/mixture and lower the idle speed. I turned the screw all the way in then backed it out 1/2 turn. The bike wouldn't start. I continued, 1/2 turn at a time and the bike wouldn't start. I thought there might be some kind of blockage in the line so I sprayed in carb cleaner. I pushed the starter button and the bike started.

Where am going wrong? I've tried every setting on the adjustment and they don't work.
 
You might want to check the throttle cables and make sure there is some slack in them. If they are tight, this may be causing your issue.

Good luck!
 
All carb adjustments need to be made when the engine/carbs are warm. Usually one takes a ride of say 20-30 miles and then return to your driveway. I try to have some fans set up so I can blow air across the engine while making adjustments.

Likely you need to return all the settings to their nominal starting point before the ride, then adjust when you get back. For the R75/5 (I assume) the idle mixture screw should be about 1 turn out from lightly seated. Note that this screw controls a fuel circuit, so screwing it out allows more fuel so is a richer change. The idle speed screw should be turned so that once it makes contact with the slide (have to remove the air horns to see this), you turn the screw one more turn. The throttle cables should have some slack in them, about 1-1.5mm.

To properly do a carb setup up or synch, you need to be able to temporarily shut off the spark energy to each carb. For that you need spark plug cap extenders. These screw on to the exposed threads on the end of the plug and let you slip the spark plug cap back on but you can short out the spark using a plastic handle screwdriver. The way to do this is to first put the screwdriver blade onto the engine, and then smartly swivel the shank of the screwdriver onto that exposed extender. After adjustments, smartly move the shank away. One does this on one side and make adjustments on the running side.

First step, doesn't involve the extender. With the engine idling with the fans blowing, turn the idle mixture screw in until you hear the engine begin to stumble. Then turn the screw out until you again hear the engine stumble. Finally turn the screw to the mid point between these two points then turn it about 1/8th turn out to ensure some slight richness. Do this on both sides separately to get each cylinder to idle at the highest RPM.

Second, set idle speed. This is where you will need to short the spark out. With say the left side shorted, note the idle RPM. Remove the short to let things clear up. Then short the other side, note the RPM. Is the RPM the same? If not, I'd suggest increasing the RPM on the slow cylinder. Retry the shorting and see if the RPM is the same. With both cylinders running, is that the RPM you want? I shoot for 1100-1200...best for low end lubrication...below 1000 just doesn't get things properly lubricated. At this point, if you want to change the idle RPM, you could probably just tweak each screw the same direction without doing the shorting.

Last, set throttle cable tension. Manually hold the throttle open to get about 1500-2000 RPM...maybe you need an assistant now. Now throttle perches have a knurled knob underneath it that you can use to lock the throttle into position. Be sure to remove the tension once your done. At the increased RPM, short one cylinder...note the RPM it drops to. Remove the short, wait a few seconds, short the other cylinder...note the RPM. Are they the same? If not then adjust the cable tension at the top of the carb. Slow down the fast cylinder...do not speed up the slow cylinder. Do that could create a situation where there is no free movement of the cable once you turn the throttle to zero.

A lengthy discussion...those are the steps for general carb synching.
 
Once again I need help.

I got my 1971 Airhead R/75 with Bing carburetor started last week then tried to make some adjustments. My mistake.

I wanted to adjust my idle/mixture and lower the idle speed. I turned the screw all the way in then backed it out 1/2 turn. The bike wouldn't start. I continued, 1/2 turn at a time and the bike wouldn't start. I thought there might be some kind of blockage in the line so I sprayed in carb cleaner. I pushed the starter button and the bike started.

Where am going wrong? I've tried every setting on the adjustment and they don't work.
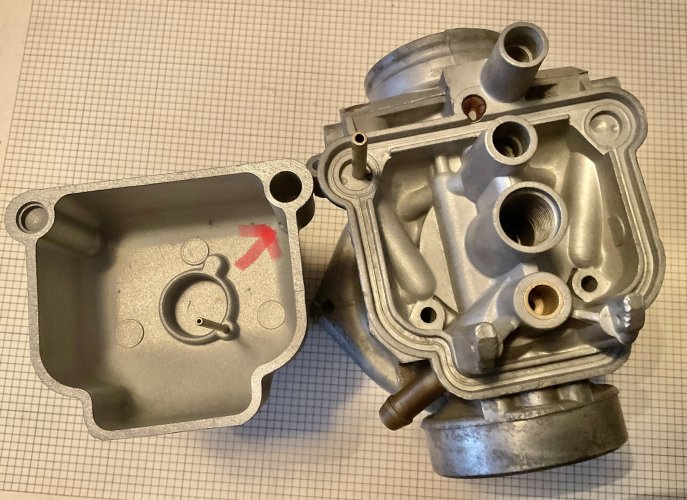
Sounds to me like you've got a fuel supply issue, since it feels like it ran on the carb cleaner. That tells me that you probably need to pull them off and clean them. It's not terrible to do. I've seen this when the o-rings in the carb have completely croaked (thanks, ethanol) which allows mad vacuum leaks or when the jets are just plugged with varnish.

If none of the adjustments are working, it's because the things they regulate are all plugged or there are so many vacuum leaks around the various rubber bits that the carb can't generate enough vacuum to pull fuel up for atomization.

If you do wind up pulling them to either rebuild or clean them, once the bike starts, Kurts Most Excellent Doc above will get you to a smoothly running bike.
Before installing I disassembled and cleaned both carbs in a ultrasonic cleaner. I replaced all jets with the manufacturer suggestions and replaced all rubber bits.

I agree with you that its a fuel supply issue but only on the idle. Once the bike is started it runs well. Why wouldn't I be getting fuel on the idle circuit?
 
One thing to remember on an airhead is to make sure the valves are adjusted. Tight valves will cause stalling at idle and poor performance. St.
 
When you disassembled, did you remove the butterflies in the carbs? Did they get reinstalled correctly? What about the o-rings on the butterfly shaft...hopefully they didn't get damaged during the installation or during the ultrasonic cleaning.
 
Before installing I disassembled and cleaned both carbs in a ultrasonic cleaner. I replaced all jets with the manufacturer suggestions and replaced all rubber bits.

I agree with you that its a fuel supply issue but only on the idle. Once the bike is started it runs well. Why wouldn't I be getting fuel on the idle circuit?

Pull the pilot/idle jet and make sure it's clear. It doesn't take much to clog it up.

And yes, it's a significant jump when it gets on the main jet and the cylinder starts to fire!
 
When you disassembled, did you remove the butterflies in the carbs? Did they get reinstalled correctly? What about the o-rings on the butterfly shaft...hopefully they didn't get damaged during the installation or during the ultrasonic cleaning.
I replaced the o rings.
 
How many miles when the carbs were rebuilt? If over 30-40K, did you also replace the needles and needle jets?

Did you remove the gas tank, stand it on the nose, remove the petcock, and clean the filter? Change the fuel line?

As posted above, always adjust valves first before carb work..and you're doing all the right things
 
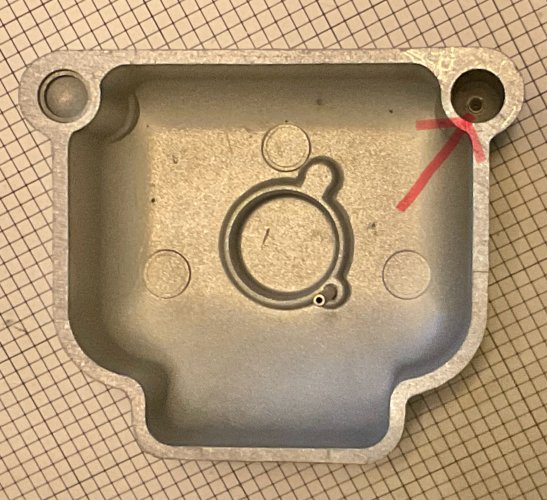
I keep thinking about your starting, idle issue. Here’s something I’ve not seen mentioned…

IMG_4079.jpeg

Idle Fuel is metered from the bottom of the Float Bowl; through an orfice which restricts total fuel available for the idle circuit. There is a brass plug in the bottom of the well, drilled to a very small size: Idle Jet. Often, corrosion, fuel debris obstructs the inlet to the well as well as, the brass Idle Jet… reduced/no idle fuel.

The Stand-pipe in the Carburetor Body draws fuel from that well; up into the outlet (engine) side of the carburetor. If you look closely at the carburetor outlet (engine) side, very bottom of the throat diameter, where the Throttle Plate closes, there are two (2) very small holes.

When the throttle plate is closed, pressure and vacuum are on either side of the plate; each above the corresponding holes; which is what draws idle fuel into the engine. The Idle Mixture adjustment screw, an air regulating device (base setting on 64/32/9-10 carbs: 0.75 turns out) controls the balance and idle fuel. Clockwise from base setting results in a leaner idle mixture, counter-clockwise to a richer mixture. I have never seen more than a half-turn either way from base setting, needed for a smooth idle on a clean, serviced carburetor.

More than a barely visible “wink” of light showing at the top & bottom of the correctly installed Throttle Plate, is nominal; established by the Idle Speed screw. Another important setting is, insuring that the throttle plate is on the idle speed screw and not falsely held in position by the throttle cable… 1.5 x 2.0mm slack.

More often than not, operators tend to “blip” the throttle during start-up, assuming incorrectly that an accelerator pump is in the carb, therefore bypassing the idle fuel circuit and, transitioning into the main fuel circuit.
 
… here’s an image, down the Idle Fuel well of the Float Bowl, of the Idle Jet

IMG_4081.jpeg

You may have to ‘expand’ the image to see the Idle Jet (both the iPad and I were getting a headache trying to get this shot !)
 
I wanted to adjust my idle/mixture and lower the idle speed.
I learned that to adjust the idle speed you adjust the idle screws first. Then you fine tune the idle by 'playing' with the mixture screws. Maybe the minimum butterfly position is set too tight?
 
When you disassembled, did you remove the butterflies in the carbs? Did they get reinstalled correctly? What about the o-rings on the butterfly shaft...hopefully they didn't get damaged during the installation or during the ultrasonic cleaning.
Came here to ask this exact question. If you get the butterflies in backwards, you're going to have these kind of issues. If you look at them, they have a tapered face on the circumference of the butterfly and they're easy to get in backwards.
 
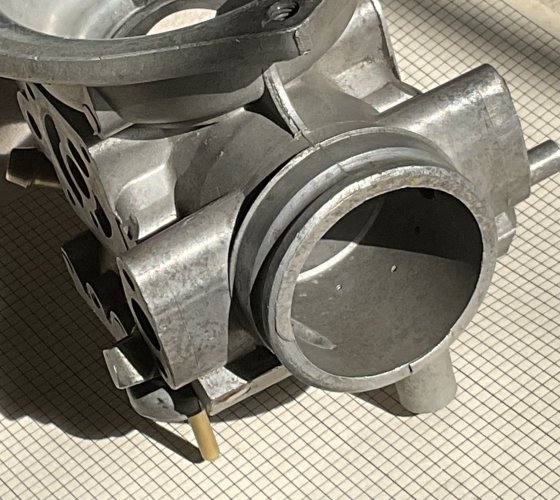
While I had the carburetor body on the workbench, I took a picture of the outlet (engine) side at the two(2) micro holes of the idle mixture circuit…

IMG_4084.jpeg

… the hole to the right, as viewed, relates to the Idle Mixture screw; the other to the Idle Jet. Barely visible in the left wall of the outlet throat, is the diagonal outlet of the Starting Enricher outlet. The small cylindrical tube on the right, exterior of the carb body, parallel to the Throttle Shaft, is the vacuum take-off for pneumatic balancing (syncing) of the carbs.

The micro hole of the Idle Mixture screw can be viewed for being open, not obstructed. Sadly, there are quite a bit of cross-drilled, then plugged, passages involved in fuel flow from the idle fuel stand-pipe, to the micro hole… one of the “problem” areas for inspecting blockages ?

The Throttle Plate and Idle Speed screw establish the “just right” opening between these micro holes, for pressure/vacuum to flow idle fuel to the engine. Guenner is correct in setting idle speed (1000 RPM ?) first for a smooth running engine then, after gaining a good idle mixture setting, the idle speed can be lower to a setting of choice.
 
I keep thinking about your starting, idle issue. Here’s something I’ve not seen mentioned…

View attachment 97094

Idle Fuel is metered from the bottom of the Float Bowl; through an orfice which restricts total fuel available for the idle circuit. There is a brass plug in the bottom of the well, drilled to a very small size: Idle Jet. Often, corrosion, fuel debris obstructs the inlet to the well as well as, the brass Idle Jet… reduced/no idle fuel.

The Stand-pipe in the Carburetor Body draws fuel from that well; up into the outlet (engine) side of the carburetor. If you look closely at the carburetor outlet (engine) side, very bottom of the throat diameter, where the Throttle Plate closes, there are two (2) very small holes.

When the throttle plate is closed, pressure and vacuum are on either side of the plate; each above the corresponding holes; which is what draws idle fuel into the engine. The Idle Mixture adjustment screw, an air regulating device (base setting on 64/32/9-10 carbs: 0.75 turns out) controls the balance and idle fuel. Clockwise from base setting results in a leaner idle mixture, counter-clockwise to a richer mixture. I have never seen more than a half-turn either way from base setting, needed for a smooth idle on a clean, serviced carburetor.

More than a barely visible “wink” of light showing at the top & bottom of the correctly installed Throttle Plate, is nominal; established by the Idle Speed screw. Another important setting is, insuring that the throttle plate is on the idle speed screw and not falsely held in position by the throttle cable… 1.5 x 2.0mm slack.

More often than not, operators tend to “blip” the throttle during start-up, assuming incorrectly that an accelerator pump is in the carb, therefore bypassing the idle fuel circuit and, transitioning into the main fuel circuit.
This is the problem but further down the line.

I spoke with the man from Bing and he gave me five or six scenarios to investigate. The first one he said I should check was the stand pipe. I removed the pipe and shot compressed air into the hole and it didn't come out of the valve hole. This tells me there is a blockage between the pipe and the valve.

I shot carb cleaner, MEK and Naphtha into it with no results. I have tried to inset a wire into it but the line is small and the wire can't navigate the bends to get into it. I'm going to try heat next.

Any thoughts on other ways to clear the line? There aren't even ball bearing access holes to get in.
 
Goin’ way down the Rabbit Hole !

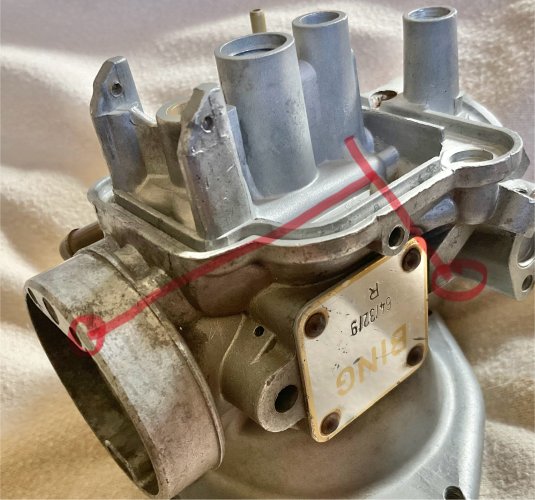
Took a look at the Idle Jet and Idle Mixture drilling, of course… more pictures ! I may have do to this in two posts ?

Follow the red markings: inlet airflow impacts a small brass orifice at the bottom/off-center of the inlet; travels a drilled passage straight back, under the floor of the carb; connects with a diagonally drilled passage above/outside the float bowl; into the bore that mounts the Idle Mixture Jet; it will be a combination of fuel & air.

Intersecting the Idle Mixture Jet area from the engine side, there is a drilled passage (plugged with a brass plug) at the bottom of the rim on the carb outlet; drilled a short distance under the floor of carb to where the Throttle Plate is positioned. Viewed from the Float Bowl mounting flange; centered mid-way across the gasket groove but, outside it, there is a larger drilled hole (plugged); which is where the micro hole is then drilled through the floor, at the very bottom where the Throttle Plate contacts… providing un-metered fuel.

IMG_4094.jpeg

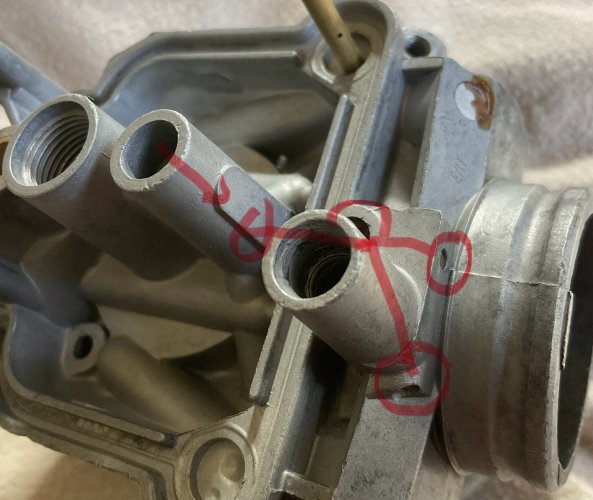
I’ll post another picture of the drilling of the outlet (engine) side and how the Idle Mixture screw regulates the idle fuel…
 
… on the outlet (engine) side of the carb, there is a drilled & plugged passage through the aft wall of the Idle Mixture screw bore; and the other micro hole, that the needle end of the Idle Mixture screw engages, is drilled into the floor. These are the two ports for the fuel mixture, shown in #17 above.

IMG_4093.jpeg

Now, the question on how to insure the passages from the carb inlet; thru the Idle Mixture Jet; out the micro hole in the floor of the outlet, are clear ? Gotta think on this a bit but, I believe it must be done, backwards ?
 
Back
Top