gtgt_bangbang
New member
I dont want any balancing weights to show on the rear wheel for reasons (un?)apparent later.
The hub cone / cavity on a snowflake wheel, usually hidden by the final drive , is a uncluttered & sheltered - the only safe space I'll ever need to maintain balance.
I am going to put balancing weights in the cavity.
Balance weights in the hub cavity, being further inboard from the typical locations, will render added weights less effective as balancers,
requiring more total weight than if conventionally located on the perimeter,
since after all; while Centrifugal Force is a convenient fiction, F=mω^2r is still The Law , from the very Second you know it .
I ended up with 4oz of weight required for a good static balance wheel, double the 2 oz guestimated from preliminary checks using temporary clamps & weights out near the rim.
On a 40 lb rear wheel assembly, 4oz vs. 2oz is OK with me. I should go on a diet anyway.
After the work was done, lightly resting the tip of an pen on a horizontal spoke is enough to set the wheel in motion,
and its almost impossible to turn wheel lightly enough that it stops in less than one rotation, and it stops at random orientations.
I can release wheel from stopped, at any "oclock" , and it stays there,
and I gave it little baby spins maybe 30 times one day just walking by it one day , and the resting point was all over the dial.
No telling if higher order imbalances exist from locating the weight OFF-center plane,
until hearing what my butt says when I finally get to ride this \Nhite Mare project.
Inside the wheel cone are ~dozen nubs left by mold-filling, (actually nubs = 'gates' or 'wells' depending on exactly what what, at least at the foundry) .
After the casting operation, those nubs are boar-nipple-useless except for dating . Dating the wheel. Not the boar.
The raw wheel ( optional pop quiz- WHY ARE 10 OF THOSE NUBS RECESSED ( funnel shaped) , while the other 2 with numbers are flush ? )
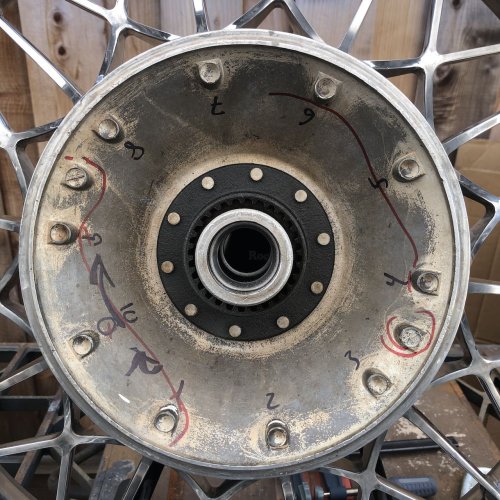
While possible to start wheel balancing by removing just the heavy-side nubs ,
the light-side nubs were obstructing weight placement , preventing the weights being clustered closely & as far outboard as possible,
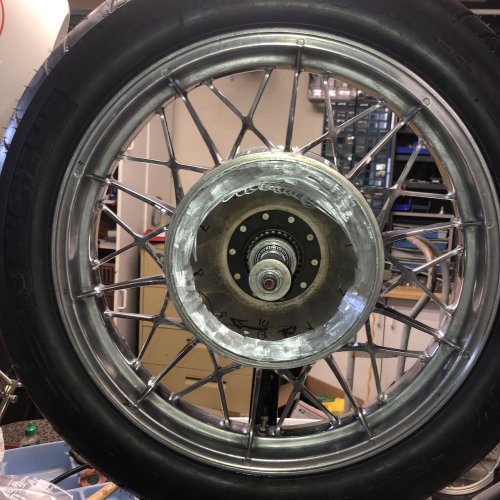
so I ground all them off, de-nubbin da hubbing, or so said buckwheat.
Used a die grinder / 3" cut-off wheel to speed things up & finished with dremel sanding bobs.
I was careful to grind off only the nubs plus a wee bit of surface clean-up/ roughening all around.
The wheel / conical web is decently thick there , and the cone wall isn't an blatant weak spot , but no call for going too deep into the cone surface.
I bet about 15~20 gm total of metal removed, so the excess unsprung wheel weighting is already a bit negated from the get-go.
The resulting static balance / rest point of the prepped wheel was identical to where it was prior to de-nubbin.
The prepped wheel.
I will use only actual Lead (oddly'nuph, abbreviated 'Pb') wheel weights.
On the off-chance weights become detached, I figure the soft lead will bounce around & get chewed up or at worst wipe out some the glued weights,
while the wheel & final drive structure should not be significantly damaged. I bet I hear a loose weight & scary fast .
Real steel weights popping free might cause some real wheel damage if they get lodged in a tight spot, so no iron weights.
Pb weights are also ~50% denser, so smaller sized / equivalent weight can be grouped tighter & further outboard.
I got dreads & doubts about trusting the sticky foam tape on weights,
so I used Dap Rapid-Fuse to bond most of the weights, face down, foam left alone (too hard to remove plus who cares ? cant see em .... )
Rapid Fuse has good specs for the job imo -
1200 psi stength seems plenty ,
more water resistant than super glues ,
Easy working, viscous & tacky & fast-setting but repositions for a few minutes,
and most importantly has a 180F service limit, high enough to survive in a road-hot wheel,
but I still can remove/ adjust an individual weight or few by heating the weight w/ solder iron to break the glue down, and just underneath that weight.
I looked over some epoxies for higher strength, but with mess / mixing, plus service temperature limits usually higher, thus could be harder to remove down road.
Regular superglue ; no, water thins are useless for filling gaps & gels lack durable water resistance.
Various gorilla snots; maybe OK, why bother.
Modest prying checks of weights glued to chunk of scrap aluminum after curing didnt break any off .
Used a fresh bottle of glue , clean weights & the roughened, cleaned aluminum.
I decided to use the foam tape for a few weights to see if concerns about durability are unrealistic.
Outlines of the finished array were inked, to remember exactly which & where failed, should they ever fling off.
I started with 2oz of weights spread out in line, glued on the light side,
and added weights during repeated lights spins and 'Catch & Release' ( C&R - stop wheel at various orientations & let loose with no spin) tests from multiple position.
Once the balance started getting really close, I was doing C&R from 10 orientations, using the spokes as fiducials, numbered for reference,
making it easier to see "the break-over point" ; when the wheel would self-start turning the opposite direction , as the light spot went past the top.
I would add a weight right at the break-over point and begin again.
I got a "best case" static balance before resorting to cutting a single 7gm weight in half for fine tune.
I assume imbalances are spread out rather than "single point" source , so guessed that the almost symmetrical line of weights was best array.
There is room to stack weights for better efficiency, but I didn't bother getting fancy
It tums out that 1 of those little HF plastic spring clamps weigh pretty close to ONE 7gm wheel weight,
so I was clamping weights where catch & release showed them needed, or just used a clamp , to test arrays.
Then replacing the clamp with another glued weight when it seemed correct.
Finshed array, The outline of the weights were inked to try show what/where failed if any ever do.
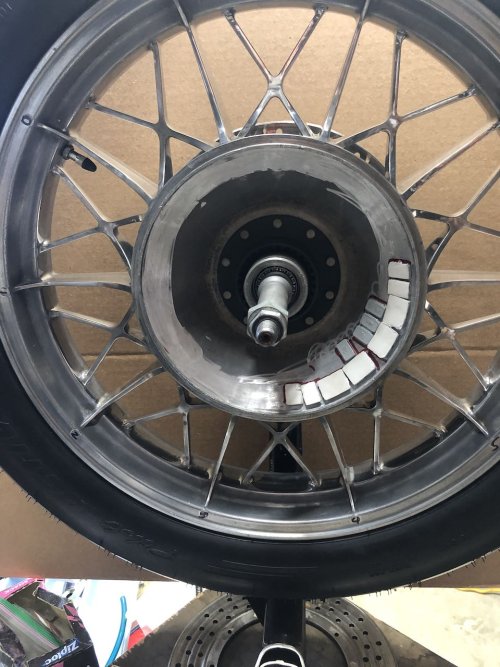
A note on my balancer set up.
I made a wheel work / life balance stand from a discarded swing arm and use the stock axle & entire spacer stack inside the wheel to hang it.
I set up my wheel bearings using LINEAR MEASUREMENTS to determine the wedding ring (used a depth micrometer, but a cheap caliper would do just as well)
I aim for my finished wheel to have ZERO.ZERO spacing , (ie, zero crush, zero slop) but for balancing , I used ~0.001" wider ring,
to eliminate nearly all the minuscule static friction that will exist in my final set up.
This makes for a ludicrious low "pre-load" or break-free force suitable for balance work.
The bearing are new, with just a drop of air tool oil to lube them during the set up job.
now my wheel looks as clean as it ever will
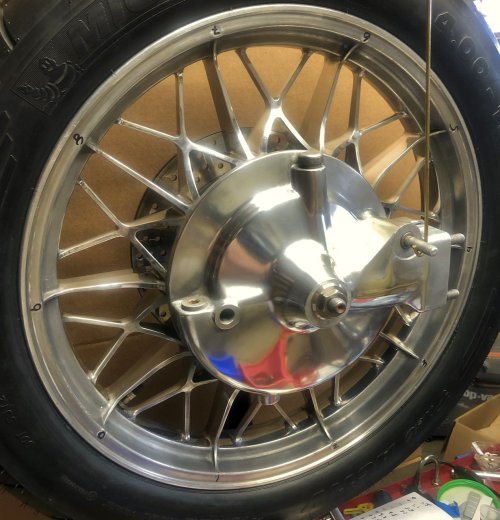
hopefully I spock clearly enough above;
so gentlemen poopoo'rs ... ... start your poopoo'er'ings !

Lead weights are getting slightly hard to find. I ordered up what/where I thought offered 1 STRIP, hoping that was enough without blowing the Bank up for a minor part.
Well the vendor of surplus auto stuff decided an order of "1" was actually 1 LOT of them, as in a LOT of about 30 strips.
Im an optimist but that seems to be at least a couple life time supply for my plans. PM for deets, postage is the beech.
The hub cone / cavity on a snowflake wheel, usually hidden by the final drive , is a uncluttered & sheltered - the only safe space I'll ever need to maintain balance.
I am going to put balancing weights in the cavity.
Balance weights in the hub cavity, being further inboard from the typical locations, will render added weights less effective as balancers,
requiring more total weight than if conventionally located on the perimeter,
since after all; while Centrifugal Force is a convenient fiction, F=mω^2r is still The Law , from the very Second you know it .
I ended up with 4oz of weight required for a good static balance wheel, double the 2 oz guestimated from preliminary checks using temporary clamps & weights out near the rim.
On a 40 lb rear wheel assembly, 4oz vs. 2oz is OK with me. I should go on a diet anyway.
After the work was done, lightly resting the tip of an pen on a horizontal spoke is enough to set the wheel in motion,
and its almost impossible to turn wheel lightly enough that it stops in less than one rotation, and it stops at random orientations.
I can release wheel from stopped, at any "oclock" , and it stays there,
and I gave it little baby spins maybe 30 times one day just walking by it one day , and the resting point was all over the dial.
No telling if higher order imbalances exist from locating the weight OFF-center plane,
until hearing what my butt says when I finally get to ride this \Nhite Mare project.
Inside the wheel cone are ~dozen nubs left by mold-filling, (actually nubs = 'gates' or 'wells' depending on exactly what what, at least at the foundry) .
After the casting operation, those nubs are boar-nipple-useless except for dating . Dating the wheel. Not the boar.
The raw wheel ( optional pop quiz- WHY ARE 10 OF THOSE NUBS RECESSED ( funnel shaped) , while the other 2 with numbers are flush ? )

While possible to start wheel balancing by removing just the heavy-side nubs ,
the light-side nubs were obstructing weight placement , preventing the weights being clustered closely & as far outboard as possible,
so I ground all them off, de-nubbin da hubbing, or so said buckwheat.
Used a die grinder / 3" cut-off wheel to speed things up & finished with dremel sanding bobs.
I was careful to grind off only the nubs plus a wee bit of surface clean-up/ roughening all around.
The wheel / conical web is decently thick there , and the cone wall isn't an blatant weak spot , but no call for going too deep into the cone surface.
I bet about 15~20 gm total of metal removed, so the excess unsprung wheel weighting is already a bit negated from the get-go.
The resulting static balance / rest point of the prepped wheel was identical to where it was prior to de-nubbin.
The prepped wheel.

I will use only actual Lead (oddly'nuph, abbreviated 'Pb') wheel weights.
On the off-chance weights become detached, I figure the soft lead will bounce around & get chewed up or at worst wipe out some the glued weights,
while the wheel & final drive structure should not be significantly damaged. I bet I hear a loose weight & scary fast .
Real steel weights popping free might cause some real wheel damage if they get lodged in a tight spot, so no iron weights.
Pb weights are also ~50% denser, so smaller sized / equivalent weight can be grouped tighter & further outboard.
I got dreads & doubts about trusting the sticky foam tape on weights,
so I used Dap Rapid-Fuse to bond most of the weights, face down, foam left alone (too hard to remove plus who cares ? cant see em .... )
Rapid Fuse has good specs for the job imo -
1200 psi stength seems plenty ,
more water resistant than super glues ,
Easy working, viscous & tacky & fast-setting but repositions for a few minutes,
and most importantly has a 180F service limit, high enough to survive in a road-hot wheel,
but I still can remove/ adjust an individual weight or few by heating the weight w/ solder iron to break the glue down, and just underneath that weight.
I looked over some epoxies for higher strength, but with mess / mixing, plus service temperature limits usually higher, thus could be harder to remove down road.
Regular superglue ; no, water thins are useless for filling gaps & gels lack durable water resistance.
Various gorilla snots; maybe OK, why bother.
Modest prying checks of weights glued to chunk of scrap aluminum after curing didnt break any off .
Used a fresh bottle of glue , clean weights & the roughened, cleaned aluminum.
I decided to use the foam tape for a few weights to see if concerns about durability are unrealistic.
Outlines of the finished array were inked, to remember exactly which & where failed, should they ever fling off.
I started with 2oz of weights spread out in line, glued on the light side,
and added weights during repeated lights spins and 'Catch & Release' ( C&R - stop wheel at various orientations & let loose with no spin) tests from multiple position.
Once the balance started getting really close, I was doing C&R from 10 orientations, using the spokes as fiducials, numbered for reference,
making it easier to see "the break-over point" ; when the wheel would self-start turning the opposite direction , as the light spot went past the top.
I would add a weight right at the break-over point and begin again.
I got a "best case" static balance before resorting to cutting a single 7gm weight in half for fine tune.
I assume imbalances are spread out rather than "single point" source , so guessed that the almost symmetrical line of weights was best array.
There is room to stack weights for better efficiency, but I didn't bother getting fancy
It tums out that 1 of those little HF plastic spring clamps weigh pretty close to ONE 7gm wheel weight,
so I was clamping weights where catch & release showed them needed, or just used a clamp , to test arrays.
Then replacing the clamp with another glued weight when it seemed correct.
Finshed array, The outline of the weights were inked to try show what/where failed if any ever do.

A note on my balancer set up.
I made a wheel work / life balance stand from a discarded swing arm and use the stock axle & entire spacer stack inside the wheel to hang it.
I set up my wheel bearings using LINEAR MEASUREMENTS to determine the wedding ring (used a depth micrometer, but a cheap caliper would do just as well)
I aim for my finished wheel to have ZERO.ZERO spacing , (ie, zero crush, zero slop) but for balancing , I used ~0.001" wider ring,
to eliminate nearly all the minuscule static friction that will exist in my final set up.
This makes for a ludicrious low "pre-load" or break-free force suitable for balance work.
The bearing are new, with just a drop of air tool oil to lube them during the set up job.
now my wheel looks as clean as it ever will

hopefully I spock clearly enough above;
so gentlemen poopoo'rs ... ... start your poopoo'er'ings !


Lead weights are getting slightly hard to find. I ordered up what/where I thought offered 1 STRIP, hoping that was enough without blowing the Bank up for a minor part.
Well the vendor of surplus auto stuff decided an order of "1" was actually 1 LOT of them, as in a LOT of about 30 strips.
Im an optimist but that seems to be at least a couple life time supply for my plans. PM for deets, postage is the beech.

