• Welcome, Guest! We hope you enjoy the excellent technical knowledge, event information and discussions that the BMW MOA forum provides. Some forum content will be hidden from you if you remain logged out. If you want to view all content, please click the 'Log in' button above and enter your BMW MOA username and password.

    If you are not an MOA member, why not take the time to join the club, so you can enjoy posting on the forum, the BMW Owners News magazine, and all of the discounts and benefits the BMW MOA offers?

  • Beginning April 1st, and running through April 30th, there is a new 2024 BMW MOA Election discussion area within The Club section of the forum. Within this forum area is also a sticky post that provides the ground rules for participating in the Election forum area. Also, the candidates statements are provided. Please read before joining the conversation, because the rules are very specific to maintain civility.

    The Election forum is here: Election Forum

Race Tech Cartridge Emulators "gold valves". Reading list & my set up (78 R100 )

gtgt_bangbang

New member
Race Tech Cartridge Emulators "gold valves". Reading list & my set up (78 R100 )

Race Tech site has a bit of good material, worksheets, install and tuning instructions scattered about.
Below are links to pages there I found useful.

in a 78 R100 (36mm tube), I'm installing a FEGV 3301 kit from ebay vendor , with .95 kg/mm main springs from RT, and 15wt oil.

RT lists their x-3308 kit for this BMW app while the 3301 kit was listed for 6 pages of smallish dirt bikes, however all parts are identical &or included.
I suspect the only differences between the kits are
1) ~1" tube spacers tossed in the box,
2) different factory pre set ( easily checked and commonly changed + all the possible swap parts included with 3301.)
3) 80 bucks

Kit came with
a pair cartridge emulators (aka gold valves.) I was big sad to discover Gold Valves are actually made of brass. & RT KNOWS this is a BEEMER, TOO !
4 sets of valve springs for tuning,
a "low speed valve plate" installed, drilled with 3 ports (RT's pre-set for dirt bike).
plus a set of spare, un-drilled valve plates,
and enough stickers to paper over a small bathroom or large tool box.
There is a worksheet with basic info & a nuclear-football-length code to access a Set Up calculator at RT.

RE 'low speed valve plate PORTS" .
RT lit says in one place that "4 ports is common for vintage" and elsewhere says 2 ports are usually best for street / this bike weight / fork tube diameter.
So obviously a little wiggle room exists in the variable.
The plates are dimpled for drill starting, and a dot of solder would plug any unwanted/excess holes.
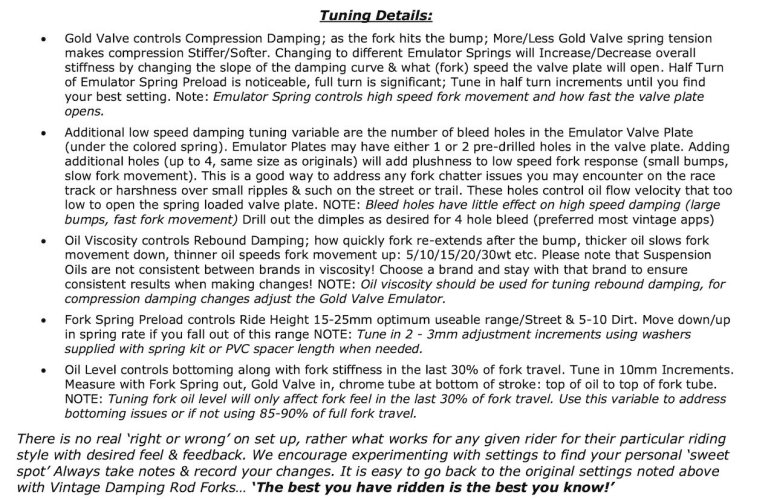
The low speed ports modulate relatively slow movements like brake-dive and road undulations.
RT tech said the 3301 kit is probably just fine , as-is, for my install, and " tune'em if you wanna".

Stock BMW main springs were ~ .6 rate, but that rate is apparently a (low) compromise to make original orifice-controlled dampening functional.
(desirable , higher rate main springs cause higher rebound rates, which is more prone to rebound cavitation with original, orifice-control system)
The .95 rate , a fairly high spec from RT's calculators, were picked to cover all my expected situations,
I might end up with a set of .85 springs to swap in for solo, lightly loaded, easy-going putt putts on real life roads , if the ride is too stiff.
RT springs are muy shorter than stock, NON-progressive (RT says DONT use progressive), hardened/peened , of some alloy / source which RT is quite proud of.
Mainspring "preload" will be calculated and on the order of a few mm.
Massive preloads are neither necessary nor useful; high preload was another 'fix' for weak-springed, touchy orifice systems.
Shorter springs ( than stock) are required due to the added length of the spacer & GV.

Springs came with a foot of ABS spacer tube
and enough stickers to cover the GV kit's stickers .


model specific products
https://racetech.com/ProductSearch/12/BMW/R100S/1978

RACE TECH EMULATOR FITTING REQUIREMENTS
https://racetech.com/download/IP_FEGV_FIT_web.pdf

GOLD VALVE CARTRIDGE EMULATOR TUNING GUIDE Dirt and Street
https://www.racetech.com/page/title/...Tuning Guide

EMULATOR FITTING REQUIREMENTS FOR UNLISTED MODELS
https://racetech.com/page/title/Emulator Fitting

Vintage & Damping Rod Style Fork: Set Up & Tuning Guide
https://racetech.com/download/IP F...AGE v3.0.pdf

Fork Seals stock list
https://racetech.com/page/title/FK Seals

ALL DOWNLOADS PAGE
https://www.racetech.com/page/id/100
 
damper rod mods for GV emulator install, and wish I knew thens ...

The BMW damper rod is modified in a gold valve install , to eliminate the oil-flow restrictions that orifices & rod top tip present.
(the GV will modulate fast dampening, the restrictive orifices are now 'bad' and should be enlarged, to remove as choke points on the oil flow path.)

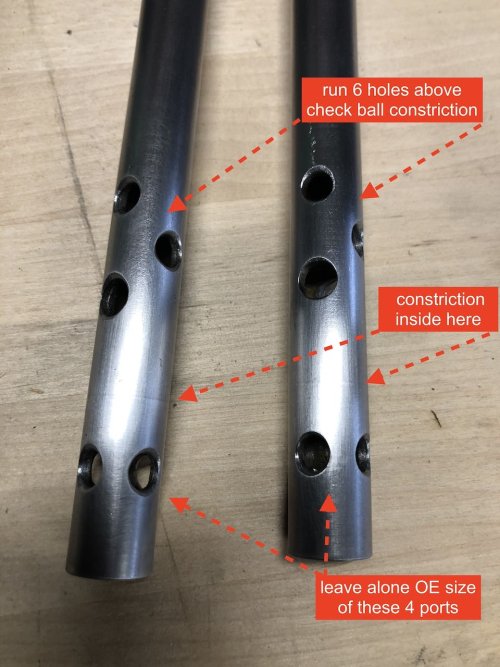
The rod mod removes the top ~1cm (cut just below the 4 ports up top ), removes the internal check ball /spring, and all ports/ orifices enlarged & maybe added.


The damper rod in my 78 R100 (S version) had 4 smallish ports in the rod's bottom tip ( below check ball 's internal constriction ),
and had only 2 more, larger ports ( = 1 thru-drill) above ball,
plus a dimple for starting a drill if a 2nd pair of ports was to be added down the road.
Some rods may come factory with 4 ports above ball, a stock rod would probably never have 6 orifices above ball, as dampening would insufficient.

RT instructions says enlarge all the holes to ~1/4" , add 2 holes if necessary, that 6 per rod total ought to be good enough,
but its not possible to have too many ports except if the rod is weakened.

I barreled ahead & enlarged the 4 holes at rod bottom tip, but now I really dont like the reduced amount of metal remaining there ,
(tip that keeps the rod / slider from snapping off during wheelie parades & airborne events / canyon jumps)

There is also an apparent flow restriction supplying these bottom-tip ports, the 31 42 1 232 045 RING, usually trapped between the retaining rings,
where all oil headed back UP rod must flow past first, so I think the mods suggested by RT overlooked that particular choke point ...

If I could re-do the mod, I would leave the bottom tip ports alone for more rod strength,
and just end up with a total of 6 ports arrayed ABOVE the ball valve constriction , like pictured.
The bottom tip ports would then only add to the "too much is just enough" flow .


~~~~~


The last time I assembled the front end, I really had to hulk on the bottom bolts ( aka 31 42 1 232 060 SCREW PLUG ) to get the crush washer to seal.
Felt like the bolt were yielding, just about to snap, by the time the sloooow seep out of leg (1 droplet after a couple days) closed off.

I replaced those old & abused hollow bolts with new parts as cheap insurance. Loctite the bolt / plugs, heat to remove.

I had used a copper / fiber filled crush washer before,
but will try solid / flat / annealed copper washers this 'final' time ( euro only offers aluminum crush washers for this spot)

I anneal copper washers (even new) by threading onto a bit of wire, heating to a good red glow (propane is hot enough)
and dropping the washer immediately into water. De-scale the little bit of crud produced.
Annealing softens and / or restores washers to seal with less crush.


bmw r100s damper rod mod - 1.jpeg
 
Last edited:
I did this year before last. Be very careful about measuring the internal depth to the top of the spring, as well as the length of the shoulder of the top fork bolt. A few folks have not taken those factors into account and didn't set their spacer depth correctly. They complained about harsh ride, which makes sense as they had WAY too much preload.

While you have it apart, I can highly recommend the SJ alloy top plate.

With those mods and a set of Conti Classic Attack radials, my R100 finally feels attached to the road.

Let me know if anything seems weird while you're putting it together. I'm happy to help. You're gonna love the results.
 
what does "as well as the length of the shoulder of the top fork bolt. ' refer to ? I dont quite understand the phrase . thanks in advance

appreciate the comment, I definitely follow the rules, even if I have to dig up (suss out ?) a few along the route.
Like mentioned above, excessive pre-load is a poor mans solution to the basic orifice -controlled compromise.

The RT springs for this build are on the barely high end @ .95 kg/mm, but allows for loading up ample luggage and slim-ish lover.
Then again this inst supposed to be an all-day bike .
If its annoyingly harsh, I'll get some lower rate for daily use. Everthing else can stay the same during a swap

I have a toastertan top yoke and dead- flat/ parallel set up with straight (new) legs.

I think I'll omit the Tarozzi brace for now, I figured out the binding issue but its an easy add later .
My OE stainless / fender mount -combo- fork brace needs a little more fitting ( thin shims to mount strain -free ) but it will do for now .


I had to insert the fork legs 162 mm (or so, I forget at this moment . 160 is the norm) above the lower yoke to get the proper fitting tube exposure up top( for TT's top "crush ring" style ,
but my neck bearings checkout as fully seated & seem to be correct parts.

I dont have the removed races to verify a match in every aspect. Nothing up there was tweaked, bent, broken or wrecked. That bothered my awhile but not enough to scrub the plan.
I have some old but NIB Koni shock for rear , that are slightly shorter than stock , will be trying those pending fender clearance checks
 
Last edited:
mixing springs ; ok ( 90+100) /2 = 95 , but ....

I ordered racetech springs to go with emulators , and opted for a .95 kg/mm rate.

The springs have part numbers etched on them; one of mine ends in 90, the other 100.
Yep turns out they make that .95 rate by averaging the pair, shipping a 90 and a 100 .... lol

Tech dept say a "split rate" pair is common deal, but if I had known, I would have probably opted for a rate on the zeros, (ie , .90 , or 1.00, and not an x.x5 rate)
Tech said they would sometimes go further separate, to make, say a .92 pair ( Im still trying to make THAT math work , assuming they only bin springs into 0.1 increments , but what do I know ?) .

RT offers spring sets from .80 to 1.0 , every x.x5 in this length , so I presume they have 3 different spring wire diameters in this diameter coil .

This difference in rate is visible , as there is a ~0.005" difference in spring wire diameter.


one " hmmmm" is cos the springs are also 3~4 mm different free length, and with a recommended 15mm preload, its borders on significant in my mind.
Remain wondering if I should tweak L & R preload length to make the static force the same .... o I have questions

yeah yeah the front suspension is a unitized at the axles and any brace, but I just took a lot of pains to even out every thing else and these springs are gonna be trying to twist that , subtly but with every stroke. ( get your hand on the sliders sometimes if you get a chance / or dare - driving down a normal road, the sliders feel like they are vibrating , which makes sense


I'll probably ask them for a 80 / 100 pair if I calm down about the Trade Secret & decide to experiment further.
just for maximum flexibility , then I can make a .mixed bag of .85, .90, .95 and a pure 1.00

I can already hear you mono shock guys saying " whats the big deal? " but just so you know ....


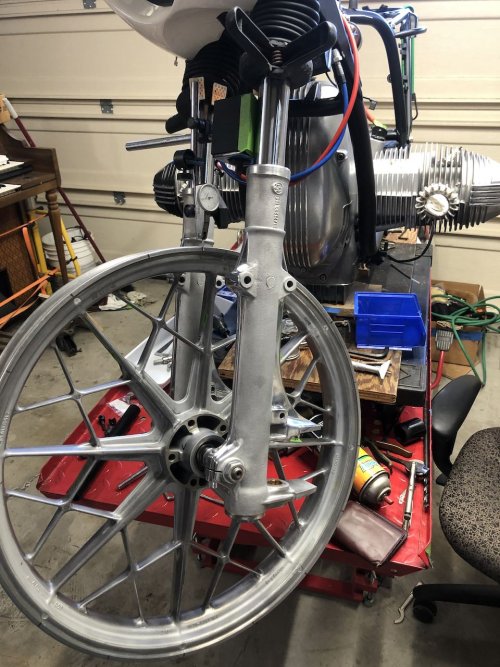
getting close enough to feel the chuff chuff of the idle , me buckos, gettin close !
bmw r100s front work - 1 (1).jpeg
notice I got my wallet out with the tools, just in case this ol'mouse hasn't torn a hole in it already !
 
Last edited:
I drew a diagram like Brook on Brook’s Garage on the YouTubes with all the measurements so I could calculate the spacer length.

You need the measurement of how far the fork bolt actually protrudes into the fork leg, so as you measure the length of the bolt you’ll need to account for the thickness of the top plate.

You’ll also need to measure the distance from the top of the fork leg at full extension to the top of the spring so you know the gap. Add the desired preload to the gap distance to calculate the spacer. Some folks have complained about harsh forks afterwards, but it turned out their spacer was made too long.

I hope that’s helpful. Looking good, man.
 
oh ok the big honking bolts plugging the fork leg top. gotcha yep, thanks .

My fork plugs seat with 10mm exposed @ 0 turns of thread engagement , so them sitting another 5mm higher , on top of spring stack / spacer, is a good start.

Preload is the relatively easy-to-measure variable , but pre-load is actually set to achieve a proper static sag.

Sag being the difference between full extension (forks hanging free off ground) and the average stopping point for the forks when raised and lowered and gently released ( ie no bouncing), with bike wet& loaded and with pilot in usual position.
RT worksheet called for 35mm sag on this bike, their other docs say 25~35 is typical for street.

More preload = more static support and harder ride

Instructions call out to measure from slider top to lower yoke bottom but with bellows or body in the way, naturally any accessible points; fender top, slider bottom, OAL, etc. become the base number. Got to hold the bike freely but vertical to measure static height; I'm so lonely I'll probably strap it to eyelets on a door frame unless the wife agrees to sit on the bike with 120# backpack so I can do the ,um, hard work. Also as good as time as any to make sure bike fits out the kitchen door !

The RT springs came with a stack of washers to dial in the sag, with out tossing away too- short spacers.

Also came with some non-plumbing plastic tube that seems pretty robust, but Metals Supermarket will rough cut enough pieces as needed (figure two 1" spacers between damper rod & valve, and two " longer " TBD spacers for spring top) for $12, so what the heck. I 'll probably do all the set up with the plastic tube to get the lengths close for those tube whackers & sand aluminum to size as little as possible.


Correct Oil Fill is determined as a "dry length " (from oil surface -to- fork tube top) with suspension bottomed (no springs , to allow full bottom out AND to eliminate any volume occupied by the spring wire.)

Which makes for another PITA; the fork bellows prevent the sliders from topping out (bottoming out ?), but working the bellows way far down on the slider to get them out of the way should do , avoiding overfill (already puckered the bellows trying to hulk slider up, glad they didn't crack )
 
Last edited:
oh ok the big honking bolts plugging the fork leg top. gotcha yep, thanks .

My fork plugs seat with 10mm exposed @ 0 turns of thread engagement , so them sitting another 5mm higher , on top of spring stack / spacer, is a good start.

Preload is the relatively easy-to-measure variable , but pre-load is actually set to achieve a proper static sag.

Sag being the difference between full extension (forks hanging free off ground) and the average stopping point for the forks when raised and lowered and gently released ( ie no bouncing), with bike wet& loaded and with pilot in usual position.
RT worksheet called for 35mm sag on this bike, their other docs say 25~35 is typical for street.

More preload = more static support and harder ride

Instructions call out to measure from slider top to lower yoke bottom but with bellows or body in the way, naturally any accessible points; fender top, slider bottom, OAL, etc. become the base number. Got to hold the bike freely but vertical to measure static height; I'm so lonely I'll probably strap it to eyelets on a door frame unless the wife agrees to sit on the bike with 120# backpack so I can do the ,um, hard work. Also as good as time as any to make sure bike fits out the kitchen door !

The RT springs came with a stack of washers to dial in the sag, with out tossing away too- short spacers.

Also came with some non-plumbing plastic tube that seems pretty robust, but Metals Supermarket will rough cut enough pieces as needed (figure two 1" spacers between damper rod & valve, and two " longer " TBD spacers for spring top) for $12, so what the heck. I 'll probably do all the set up with the plastic tube to get the lengths close for those tube whackers & sand aluminum to size as little as possible.


Correct Oil Fill is determined as a "dry length " (from oil surface -to- fork tube top) with suspension bottomed (no springs , to allow full bottom out AND to eliminate any volume occupied by the spring wire.)

Which makes for another PITA; the fork bellows prevent the sliders from topping out (bottoming out ?), but working the bellows way far down on the slider to get them out of the way should do , avoiding overfill (already puckered the bellows trying to hulk slider up, glad they didn't crack )
I bent a coat hanger and set the depth, then shined a flashlight in there while I was adding the fork oil.

I put a little L shaped bend at the bottom so I could see when the oil reached the depth I wanted and put another bend at the top so I could hang it in position, leaving one hand for the light and one hand for the fork oil.
 
I'll just use a chopstick or BBQ skewer as a dip stick, easy to measure the dry over wet length & the Right Oil tastes great with the kabobs later :eek

Also might measure / keep good track of the oil volume AS it is being added ( ie fill a grad. cylinder / measuring cup to known level & dispense from there)

If you know the correct volume added, it makes it easier to re-fill the forks if ever drained for service or oil WT tests,
without re-doing the rigamarole of dip sticking . ( but then, so would measuring the drain amount if pre-measure was neglected )

The fill amount will remain be accurate unless the spring rate is changed
( for instance , higher rate springs are thicker wire diameter., which will raise the resulting fill LEVEL with the same cc's of oil , & vise versa)

Fill volume accuracy of a few cc's is close enough.

"Fill level affects mainly the final 30% of suspension travel"
need to assure adequate air space over the fluid to not produce excessive air back-pressure when nearing full compression ,
plus apparently there is an "air spring" effect over the oil at higher fork compressions requiring correct air gap.

and overfill may also force seepage upward through top plugs.
If the top yoke is oily, probably a sign of over-fill or poor pizza control while riding

.
As long as the gold valve is ALWAYS submerged at any particular compression extent, the valve itself doesn't know the difference .


bmw r100s rt variables - 1.jpeg

https://racetech.com/download/IP FEGV TUNE.SETUP VINTAGE v3.0.pdf
 
Last edited:
My primary thought was that after the cartridge emulators, the forks felt like modern folks and were at least as compliant as the big USD Showas on my 916 or the Showas on my late 90s VFR.

You're going to like them.
 
Back
Top