Navigation
Install the app
How to install the app on iOS
Follow along with the video below to see how to install our site as a web app on your home screen.
Note: This feature may not be available in some browsers.
More options
-

Welcome! You are currently logged out of the forum. Some forum content will be hidden from you if you remain logged out. If you want to view all content, please LOG IN!If you are not an MOA member, why not take the time to join the club, so you can enjoy posting on the forum, the BMW Owners News magazine, and all of the benefits of membership? If you click here, you have the opportunity to take us for a test ride at our expense. Enter the code 'FORUM25' in the activation code box to try the first year of the MOA on us!
You are using an out of date browser. It may not display this or other websites correctly.
You should upgrade or use an alternative browser.
You should upgrade or use an alternative browser.
mounting tires comments
- Thread starter gtgt_bangbang
- Start date
gtgt_bangbang
New member
trying to light spot a tire in the wild
below is a basic jig / idea , to find the light side of a tire for quickest / least weight balance when mounting.
I'm sure the implementation can be improved on , but just this gave some useful results.
I'm resting one side of tire on 1 teeter totter ( here ) or two fixed rest-points (in other attempts ... sockets /round stock in those table slots showed some promise for a Q&D set up )
and weigh whats resting on the scale as the 2nd or 3rd rest point.
The C clamps behind the jig are intended to locate the tire consistently & quickly while pick&place'ing the tire during rotations.
Its not impossible the clamps were affecting up the tire balance in the jig, maybe introducing error.
This 2point set-up rested 100~odd ounces on the scale.
I was seeing 3~5 oz hi-lo range in the numbers and pretty consistent upon repeated checks.
I pick & place'd the tire to read ~8 equally spaced points on the scale, keeping track of the readings just w/ sharpie writing on the bead.
The essential factors are a freely suspended tire , placed repeatedly in a consistent location w/r/t everything else.
Consistency matters for repeatable & comparable numbers. If the set-up moves around, expect to see non-comparable numbers.
These scales are cheap , so if you got 3 cheap buddies having scales , borrow them and just weigh the tire out right.
Thats probably a better way than pictured, but for this round I didn't want to take the time to accurately jig the scales & tire ( plus one dead scale. I said cheap , right?)
Symmetry and consistency of placement are key to a 3 scale test too,
If this idea doesn't excite you, you could always fire up the table saw to increase the challenge level.

.jpeg")
.jpeg")
below is a basic jig / idea , to find the light side of a tire for quickest / least weight balance when mounting.
I'm sure the implementation can be improved on , but just this gave some useful results.
I'm resting one side of tire on 1 teeter totter ( here ) or two fixed rest-points (in other attempts ... sockets /round stock in those table slots showed some promise for a Q&D set up )
and weigh whats resting on the scale as the 2nd or 3rd rest point.
The C clamps behind the jig are intended to locate the tire consistently & quickly while pick&place'ing the tire during rotations.
Its not impossible the clamps were affecting up the tire balance in the jig, maybe introducing error.
This 2point set-up rested 100~odd ounces on the scale.
I was seeing 3~5 oz hi-lo range in the numbers and pretty consistent upon repeated checks.
I pick & place'd the tire to read ~8 equally spaced points on the scale, keeping track of the readings just w/ sharpie writing on the bead.
The essential factors are a freely suspended tire , placed repeatedly in a consistent location w/r/t everything else.
Consistency matters for repeatable & comparable numbers. If the set-up moves around, expect to see non-comparable numbers.
These scales are cheap , so if you got 3 cheap buddies having scales , borrow them and just weigh the tire out right.
Thats probably a better way than pictured, but for this round I didn't want to take the time to accurately jig the scales & tire ( plus one dead scale. I said cheap , right?)
Symmetry and consistency of placement are key to a 3 scale test too,
If this idea doesn't excite you, you could always fire up the table saw to increase the challenge level.
gtgt_bangbang
New member
I’m not familiar with trying to dampen balance from the center of a spinning object.
OM
I'm so sad if you feel strange, but that may be because you dont recognize those wheel weights are NOT ACTUALLY ON THE CENTER.
Dead center is the axle of course, and it would be technically difficult not to mention PD stupid to stick weights AT the center of rotation ,
so that would be outside of my abiliites
But I do appreciate the observation , so I posted an improved but still fake pix below of a mock-up of a final & more efficient arrangement .
Exact weight location , all of which are OFF center and counter balancing ,
is mostly a matter of MAG'nitude (sorry if wheel fitter's humor tires you)
True, it will require a little MORE weight to get a similar balance with the counter weights inboard like this ( r^2 effects being what they are...),
but my purty polished wheel is probably not perfected with an ugly clump of stick-on, or GASP HAMMER-ON
 weights
 located more conventionally , further out on the hoop, where they would be much more effective & minimized.
PS just between you and me, my 1st picture above was also a mock up just to get the wheel chatter started... Yeah ITS A FAKE !
When the (much smaller) lead weights show up on the stoop, I'll array them ~90 degrees to previous view , better pictured below,
aligned & close as possible to the circumference of the hub cavity, nestled between those nubs.
PS, those nubs in the hubs are the mold-fill sprues & outlived their usefulness after the casting is cooled.
If one was dremel adept, those nubs can be removed -where helpful- to balance the bare wheel a little bit better. Not much for sure, but free.
Work not done yet , but I was clamping 2 ounces on the outboard end of the "light" spoke , to get a near- ( and of course static) balance.
It took a whole 3+change Oz INSIDE the hub to achieve a 'similar' static rest.
I'll just scrimp somewhere else to afford the extra ~OZ of lead weight, though I figure a 40 lb wheel / 440 lb bike maybe not appreciate that kind of sacrifice.
I'll go on a diet if the bike bogs down from that extra mass, both me and bike will live longer.
FWIW, the IMbalances that exist in the assembly arise from all over; the massive central casting area of the hub, the perimeter/ hoop/rim of wheel and the tire.
That is to say; imbalances exist in everywhere in the wheel , spinning together in some head-swooning combination.
OT, a single location of counter weights is very unlikely to make a great dynamic balance, because there isn't just one single point of IMbalance.
Its a static balance; this wont be able to get rid of secondary, tertiary or orthogonal (wobble / off plane) imbalances, but such is my dummy life without a dynamic balance machine.
( PS & even further OT, I think those "in the tire" , liquid/particle balances are bogus - but only cos I cant figure out how the fluid balance media knows where to go , except as far out as it can, which may or not be the ideal point of counter balance)
Want to REALLY tick off some people ?
Propose drilling out / enlarging some number of the brake rotor holes to produce a light side , disc now doing double duty as a cheap & mostly harmless but hidden balancer

Last edited:
gtgt_bangbang
New member
Hidden weights
It was looking like 2 oz required to ~almost ~ static balance this rear wheel , with all the weight temporarily clipped to the outboard tip of the single "lightest" spoke.
It took 4.25 oz to achieve final static balance , with the weights temporarily taped at the perimeter of the spline drive cavity as pictured.
Wheel weighs 39lb. , so , well, ... so. one less tapper pull / per trip and no bud is wiser.
These are steel weights , and lead weights may require slightly less mass, as it will be possible to concentrate more weight closer to cavity edge and between each nubbin..
I got to say, it was easier to stack the weights inside the cavity, than to the wheel edge, look a heck lot prettier when done,
and I can epoxy them there out of reach, to keep the squirrels from eating the sweet sweet metal.
There is plenty of room in there for this array.
So long as the weight are stacked no taller + some tiny bit , than those casting nubbins, they can't hit anything.
I am using lead ,only , cos if they ever came off, they'd get chewed up a bit but wont break anything like a steel weight could.
The Hoi Oligoi of Golf & Tennis Society has made a market for LEAD TAPE, used to add weight to clubs & racquets, in case you're interested in nothing but the finest.
You might even consider that type lead tape, wrapped cleanly around the spokes as a less obtrusive wheel weight.
IF it wasnt so much weight, I'd consider trying auto body lead to do the balancing act, as it would be easy to use the lip right there to keep it in place.
.jpeg") ,
,
It was looking like 2 oz required to ~almost ~ static balance this rear wheel , with all the weight temporarily clipped to the outboard tip of the single "lightest" spoke.
It took 4.25 oz to achieve final static balance , with the weights temporarily taped at the perimeter of the spline drive cavity as pictured.
Wheel weighs 39lb. , so , well, ... so. one less tapper pull / per trip and no bud is wiser.
These are steel weights , and lead weights may require slightly less mass, as it will be possible to concentrate more weight closer to cavity edge and between each nubbin..
I got to say, it was easier to stack the weights inside the cavity, than to the wheel edge, look a heck lot prettier when done,
and I can epoxy them there out of reach, to keep the squirrels from eating the sweet sweet metal.
There is plenty of room in there for this array.
So long as the weight are stacked no taller + some tiny bit , than those casting nubbins, they can't hit anything.
I am using lead ,only , cos if they ever came off, they'd get chewed up a bit but wont break anything like a steel weight could.
The Hoi Oligoi of Golf & Tennis Society has made a market for LEAD TAPE, used to add weight to clubs & racquets, in case you're interested in nothing but the finest.
You might even consider that type lead tape, wrapped cleanly around the spokes as a less obtrusive wheel weight.
IF it wasnt so much weight, I'd consider trying auto body lead to do the balancing act, as it would be easy to use the lip right there to keep it in place.
,
Last edited:
gtgt_bangbang
New member
michelin tire marking
These are the Czech Marks found inside a Pilot Activ.
( yup, tire made somewhere outside Prague )
I think the dot is the center of the light side , according to measurements .

Dunno the significance of the yellow & red marks but red & yellow mean something to Dunlop !

These are the Czech Marks found inside a Pilot Activ.
( yup, tire made somewhere outside Prague )
I think the dot is the center of the light side , according to measurements .
Dunno the significance of the yellow & red marks but red & yellow mean something to Dunlop !
Last edited:
gtgt_bangbang
New member
seems the only way I am getting these Pilot Activ beads to seat all-the-way around
is to air em up to 60 (scared & from behind a barrier) , put them in the sun & run away 'til late afternoon and add lots o'lube.
Even then its taking about 25 fill/vent cycles to finally seat the bead.
Eventually it works
I have a air/tire chuck that will flow air without the valve core installed,
which allows venting just by lifting the chuck off,
which been a real work saver during that process.
Mighty tighty tires, there, Michelin man .
You think anybody THIS fat would appreciate a loose waist band

what is this???? a "Buy a Tire , Get a FREE Kid " Promo?
is to air em up to 60 (scared & from behind a barrier) , put them in the sun & run away 'til late afternoon and add lots o'lube.
Even then its taking about 25 fill/vent cycles to finally seat the bead.
Eventually it works
I have a air/tire chuck that will flow air without the valve core installed,
which allows venting just by lifting the chuck off,
which been a real work saver during that process.
Mighty tighty tires, there, Michelin man .
You think anybody THIS fat would appreciate a loose waist band
what is this???? a "Buy a Tire , Get a FREE Kid " Promo?
Last edited:
m_stock10506
Well-known member
seems the only way I am getting these Pilot Activ beads to seat all-the-way around
is to air em up to 60 (from behind a barrier) , put them in the sun til late afternoon and add lots o'lube.
Even then its taking about 15 fill/vent cycles to finally seat the bead.
I have a air/tire chuck that will flow air without the valve core installed,
which allows venting just by lifting the chuck off,
which been a real work saver during that process.
]
The secret to getting the Pilot Active bead to seat is to clean the wheel inside scrupulously clean. Then all of the lube and air without the core should get you there. My tire guy was having so much trouble with them I gave up and switched to other tires.
melville
Member
Yes, Pilot Activs and snowflakes are a tough combo to mount. I had a set powdercoated and took them to my tire guy to have some 3000 mile USED PAs mounted. He said 100 psi to get them to seat and nervous the whole time. They'd been on some /6 spoke wheels before.
Yesterday I had a flat fixed on that same rear wheel, now with Road Classics. The tire guy let me hang out and chat (he was genuinely curious) and he had absolutely no issues getting the tire to seat.
Yesterday I had a flat fixed on that same rear wheel, now with Road Classics. The tire guy let me hang out and chat (he was genuinely curious) and he had absolutely no issues getting the tire to seat.
gtgt_bangbang
New member
The secret to getting the ... clean wheel
Pilot Activs and snowflakes are a tough .. mount. powdercoated 3000 mile USED PAs ... 100 psi ... been on some /6 spoke wheels before.
Yesterday... Road Classics. .. no issues getting the tire to seat.
and the secret to getting a wheel THIS clean ...... is to de-corkscrew my neck & back every few hours , whether I need to or not,
and relax by scotchbrite-ing the scruples right out out of the flanges inside the rim ! (You could eat off these wheels, if you dont mind a little jeweler's rouge seasoning. )
Definitely , polishing the round-over corner of the bead flange is a good move for install.
Even so , hanging the PA is a PITA. I think there is something useful in the "OVERinflate and let tire warm & stretch awhile" routine;
but 100psi would pucker my butt , even if I was watching from the coffee-side of a cinder-block wall away from the work, never mind from a perch just over the young & fearless Tech's shoulder !
I did notice while working these wheels; it gets damnnear irresistable to resist the urge to probe the ill-seating section with a couple thoughtful finger tips ...
However, Murphy teaches us that sticking some of your very own guitarpickin flesh in that gap is exactly how to cause the tire to seat itself with a loud SNNNNAAAAPPP .... followed by a long scream.
You think its hard to MOUNT this tire ???
well, just try DISmounting one , with the whole wheel hanging from one hand by your fingertips. sheeeeeeees
Yeah steel rims are definitely a different profile , at the seat. Thinner sections for same outward dimensions. Or vise versa
Speaking of profiles, below are some mug shots (cross section cuts ) of a used PilotA , removed from a wheel the Right Way ; with plenty of razor blades & and a cut-off disc.
Note the proximity of the embedded wire wraps to the actual bead face.
On my new tire, I used a fine sanding drum to remove the mold-flash, any odd burrs and to ease just a smidge of rubber off the inner / seating lip prior to install.
But now I see there is precious little excess rubber to remove at the exact point of the hang-up .


hmmm , maybe we got time for a TIRE TREAD THREAD , to pump up our favorites....
I'l go first;
I LIKE THE PILOT ACTIV ..... because I had a pair in the dining room for a couple years
, and I'm saving the Avons for the Bonneville , next year (fingers crossed !) for my next Last Bike .
That's all.
An epiphany : If the wheel is first balanced, then it matters not where one mount the yellow dot, nor does it matter if there is no yellow dot. The wheel is precisely balanced, just mount the tire anywhere (correct directional rotation, of course). Now balance the tire; i.e., tire balance is more precise than attempting to balance a wheel/tire combo.Method 2. Balance wheel first: again, assume valve stem is heavy side but verify with static balancer and mark the heavy spot. Then place weight 180 degrees opposite the heavy mark until wheel is precisely balanced. This separates and negates the wheel imbalance from the tire imbalance Next, mount the tire with yellow dot at the valve stem (or heavy mark) to be consistent.
PGlaves
#13338
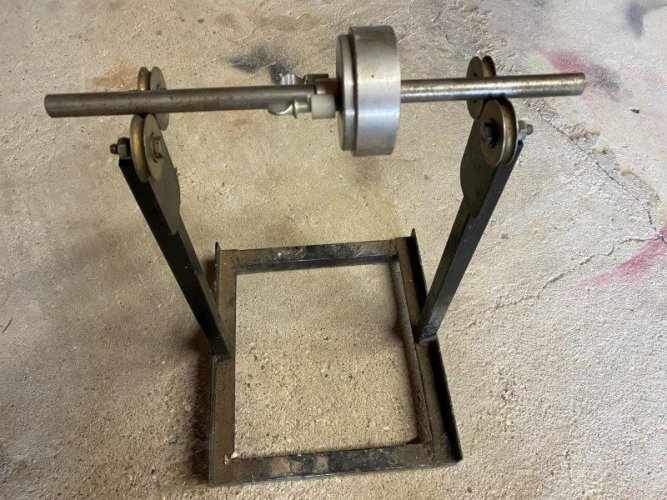
Here is the photo of the balance stand I made using patio door rollers at two bucks and change each pair. The adaptor on the shaft is for F800S rear wheels. I also have a four-bolt adaptor for classic K bike and Oilhead rear wheels. I use the axles for wheels with paired wheel bearings like most front wheels.
So I have about $5 and some scrap steel stock invested in this. I have used it at least 100 times.
So I have about $5 and some scrap steel stock invested in this. I have used it at least 100 times.
Attachments
gtgt_bangbang
New member
An epiphany : If the wheel is first balanced, then it matters not where one mount the yellow dot.
when the rubber meets the road nyuk nyuk nyuk ,its the ASSEMBLY balance that matters.
Balanced wheels ( the bare metal part) sound like a hoot, but you still have to hang a non-symetrical tire on it...
Both bare wheels on this bike were very slightly out of "balance" but only needed a few grams to make for a static balance ,
meanwhile adding the tire required dozens of grams to static balance.
I was able to find an orientation on the front wheel that eliminated ANY added weight required for static bal, but I gave up on the rear and just followed the dots and hid the weights.
The idea of orienting the heavy part of the wheel with the light part of the tire is a Good Thing but not a non-negotiable , since adding enough bob weights will mask any STATIC imbalance, at the expense of adding ever MORE weight which adds to dynamic issues.
I keep saying static as opposed to a dynamic balance, since adding weights to one or few locations will always cause higher order imbalances , since any non-symmetry is not likely to arise from a single point,
its from the sum total of all the non-symmetries
A tire wont have a light SPOT, the mass will vary all over the object , so thinking of a light SIDE makes more sense to me,
but a light SPOT is the best / only way to simplify the idea or stamp it on the tire.
One of these days I have to actually shell out at a shop with a dynamic balance machine that can suss out out all the deeper issues with a few clicks, but only if the bike is jumping out from under me.
Meanwhile me and harbor freight got this
PGlaves
#13338
when the rubber meets the road nyuk nyuk nyuk ,its the ASSEMBLY balance that matters.
So I will repeat what I have already posted twice in this thread. After starting with a balanced wheel and name-brand quality tires, most of the time no additional weight is required when the tire is mounted, and if any is required it is a very small amount of weight.
I started doing this after I got tired of removing weights and gluing new weights back in almost the exact same spots. The imbalance was coming from the wheels, not the tires.
gtgt_bangbang
New member
So I will repeat what I have already posted twice in this thread. .
ok but now I'm prompted to wonder why do you feel the need to post same thing 3X on s/one else's thread, as if they didnt chew over & up the point as stated the first twice ?
I thought that I thought repeating myself was my job ~ at least on my threads.
MY wheels were off kilter by grams and the tires off by ounces.
Weird, ja? now, I aint a mathapetican but seems confusing that that my wheels are metric and my tires are British Imperial.
I'll mull over THAT & have another pint cos , I don't think can finish a 1/2 liter just now .

Your wheels are probably different wheels than mine, cos mine are sitting over there in the corner with perfect bearing clearances and a decent static balance.
I get that you dont appreciate my methods and have 1/4 million miles to show for it ( and almost exactly 1000X as many comments as lil ol me - good job BTW
 !)
!) and I try my best to back up my harebrained claims, but now it feels like these contributions are more like territorial pissings and less like a wheel balanced commentary.
Honest Paul, no hard feelings; If I can ever help you out in roadside distress, ........ ........ ........ just wave, .............. ........ ........ ........ and I'll wave right back!
Speaking of Pauls, I better hit the John & Get Back to some regularly scheduled Work Musak , cos this top clamp sure wont re-polish itself !
https://www.youtube.com/watch?v=Qyclqo_AV2M
.jpeg")
one & done & over & out is my best idea yet
Last edited:
gtgt_bangbang
New member
LIt's open season for posting, no real rules on who can/can't post. As far as I know.
huh? whadIsay? whaddidIsay ? ??
Somebody posts, cool beans, but I 'll only make the effort to reply if I got something new or useful to add.
and I would NEVER ever say 'dont post', thats just UNAmericanny , even if I may ask why , why , why ? each time time time
and pretty sure I always add color between the lines.
anyway back on my Chosun topic, THAT is solid commentary gold up there ^_^ ; the tension; the harmonies; the call & refrain, the point / counter-point ohhh , the ultimate resolution ,
feels like a come to Church moment, or a "to get to the other side" reply.
I really cant help it if someone comes to a battle of wits bareass-handed.
and I do this all for free , for benefit & amusement of the regular visitor & casual passerby (well , its true, that I paid to be here, but thats besides the point).
I shouldn't need to point out for anyone hoggin the rightmost lane, that any unintended insults are strictly complimentary.
It does get frustrating sometimes; but almost always when some 50(~60~70?) year-old calls out a mere 63 year-old for "whippersnapper"-isms.
I can deal with it. Are we here for a thought-provoking-Board, or just a place for the fought/provocating/bored ?
But I already got two many friends , and three's a crowd,
and I'm all fianlly set up to buff this clamp out but I need a new loop so ;
https://www.youtube.com/watch?v=IKJqecxswCA
gtgt_bangbang
New member
Here is the photo of the balance stand I made using patio door rollers at two bucks and change each pair. The adaptor on the shaft is for F800S rear wheels. I also have a four-bolt adaptor for classic K bike and Oilhead rear wheels. I use the axles for wheels with paired wheel bearings like most front wheels.
So I have about $5 and some scrap steel stock invested in this. I have used it at least 100 times.
I really like your wheel stand , and just figured out why my patio door was sitting on blocks 99 tires ago
Last edited:
gtgt_bangbang
New member
I was responding to what you posted, but you edited it. So I guess it's moot now.
my first drafts are usually all wet
but thanks for the Help
its always good to know when some one has got my back
https://www.youtube.com/watch?v=2Q_ZzBGPdqE
.jpeg")
PGlaves
#13338
I really like your wheel stand , and just figured out why my patio door was sitting on blocks
I didn't know that was your door. Darn!!
")
Similar threads
- Replies
- 7
- Views
- 3K
- Replies
- 5
- Views
- 2K