testinglogin
Hogaan!
This was the big year of camping, for me. For many years I had been camping with a rather large Coleman tent I picked up at a local store. It was nothing fancy - 4 poles, very large, and just high enough that I could stand up if I bent way over. Nice for putting pants on, but not very good for motorcycle camping. It was heavy, took me a bit to setup (especially in the wind) and it was getting old (though it had never leaked, even in the rain at the '06 MOA rally). Early in the year I started to plan a trip far into the Northern Quebec wilderness, and I was going to need a tent that was rated for 3 seasons, very sturdy, a bit smaller, and easier to setup. After lots and LOTS of searching, I settled on another Coleman. I know many people swear by their uber-expensive mountaineering tents, but I have yet to have a single problem with a Coleman product. I went with their "exponent" product line; designed for the more serious backpacker/tenting person. They are designed to be sturdy but light, which completely fit the bill for motorcycle camping. The specific model was the Coleman Phad x3 It was a good bit more expensive than their other tents, so was it worth it?
Before I go on, it's worth noting that I still went with a "larger" tent. If I was just riding my bike from campground to campground I would have probably chosen a smaller model. Since I was going to be using this tent at rallies, I wanted some extra space inside so I could spread out a bit. The model I chose is sold as a 3 person tent. In reality that would be horrible unless your other two friends are Oompa-Loompas. It WOULD work very well for two people, as long as you aren't taller than 6' or so. I'll get to that in a minute. it also has a large covered vestibule area at the front, so you can store your gear and it's out of the weather but not inside your tent. This is great for saddlebags, riding gear, or just your shoes.
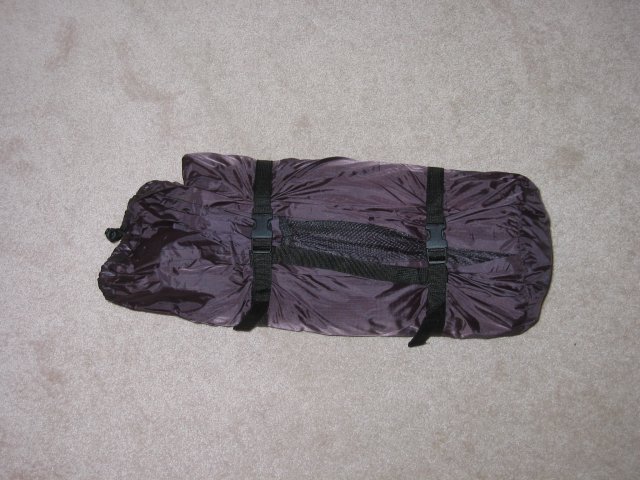
The first thing I noticed when I received the tent was it's light weight compared to the other one, and it's smaller pack size. Advertised pack weight is still 8lbs 10oz. At this point, many of you may be wondering why it's so terribly heavy, and how could I carry that on my bike. My old tent weighed almost 12 pound, so I'm already saving weight. The Phad x3 is also a 3 season (maybe even 3.5) tent, and it offers substantial weather protection. As for pack size, it comes in at about 17" long by 7" in diameter. It fits easily into my Ortlieb duffel bag with no wrestling required, and leaving space for much of my other camping gear. The pack bag is sturdy, and has compression straps on it, which makes packing a snap. Finally no wrestling to get the tent back into it's bag.
So now it was time to set the tent up. This tent is rather unique in the fact that it's a "fly first" design, which was a huge selling point for me. To set this up, get the rain fly out and spread it out on the ground. Grab your three poles. Two are long and identical in length. The other is shorter and had one red section for identification. All three are lightweight aluminum, but plenty strong. The first long two poles insert from the front and go all the way to the back corners in an "X" shape. Also insert the third pole which runs side to side towards the front 1/3 of the tent. There will be no struggling to get the poles into the "pins" on both sides (always fun if you're alone) because that isn't how this tent is designed. On the "back" of the tent the tips of the poles fit into heavy-duty "pockets". In the front there is a part of the pole that fits into a grommet. This works out great because you push the pole into the "pocket" and it stays there. No worrying about it popping out, and no need for any help. From there you can put pressure on the pole and get everything into shape (bending the pole to form the familiar "arch" of a tent pole), and then pop in into the grommet. At this point the tent will stand on it's own. If it's windy I hope you put a few stakes in to hold it down. Now take the last pole and get it into position in the same way, seating the pole tip into the sleeve on on side, and into the grommet on the other. The rain fly is now up. Go around and put your stakes in (there are a LOT, and sometimes I didn't use them all) and string out the guy lines if you think it's necessary. There are LOTS of guy lines as well, and I hardly used all of them, but you can be sure this thing isn't going anywhere in a storm.
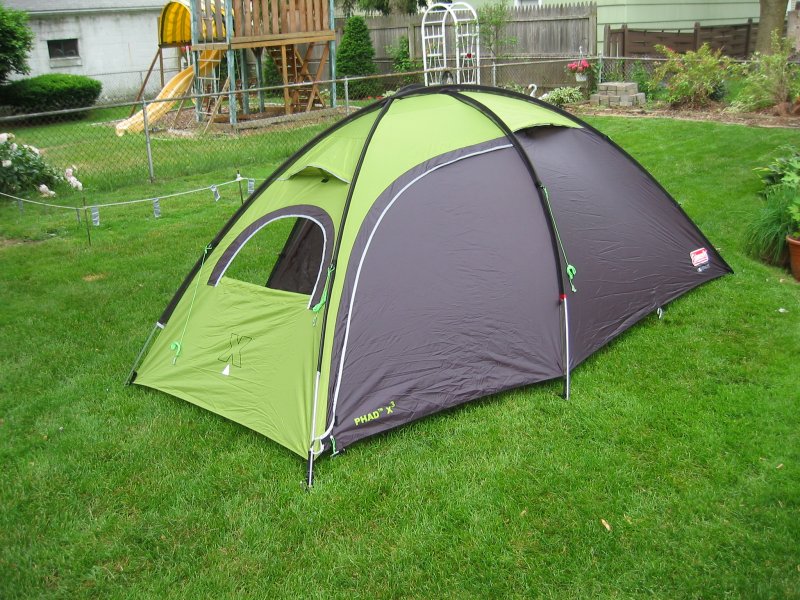
Here is your free-standing rain fly set up completely. You can see the two "x" poles, the third pole running across from side to side:
And with one door open, looking in (there is one on each side in the front):
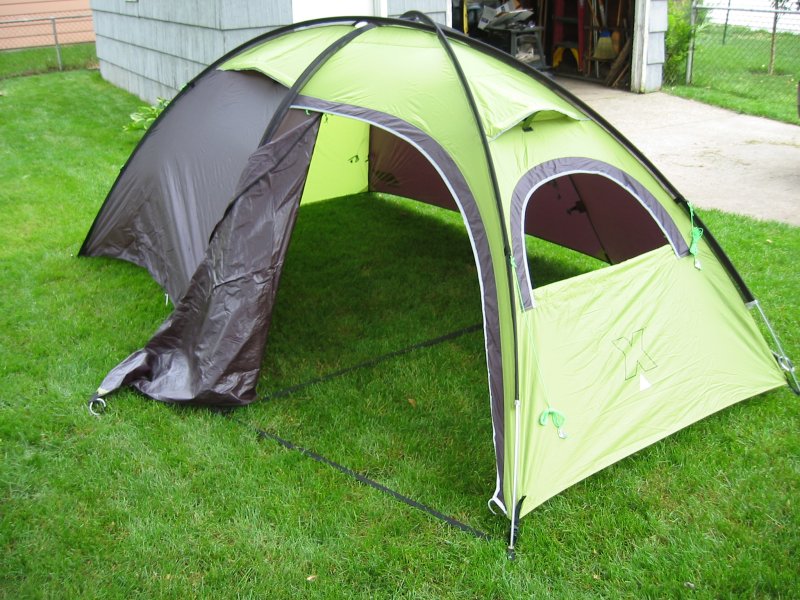
Looks a lot like a tent with no floor, doesn't it? Well that's the great part about this. Imagine it's raining, and you have to get your tent setup. Normally you put the tent up while rain pours in through the screening at the top. In the meantime, you've tracked mud into the tent trying to get the poles all situated. How about setting up in black fly territory and hundreds of your little friends get in while you're setting the tent up. Sound like no fun? That's where this design shines. Put up the fly, then you just grab the tent (a separate piece), get under the rain fly, unroll it (keep the door zipped up), and "hang" it from the fly. The floor of the tent is held in place at 4 corners by the very common side-release plastic buckles (snap into place, squeeze the sides to release). The rest of the tent literally hangs from the rain fly. The fly has "toggles" hanging inside (basically plastic "pins" hanging from a loop of tent material). The tent has plastic "loops" attached to it. Put the pin through the loop and you're done. Work your way from back to front. You tent is now attached. If you want to get fancier, there is also a floor section that can be zipped/clipped into place for the vestibule area. Here is everything all together with a term-a-rest thrown in:
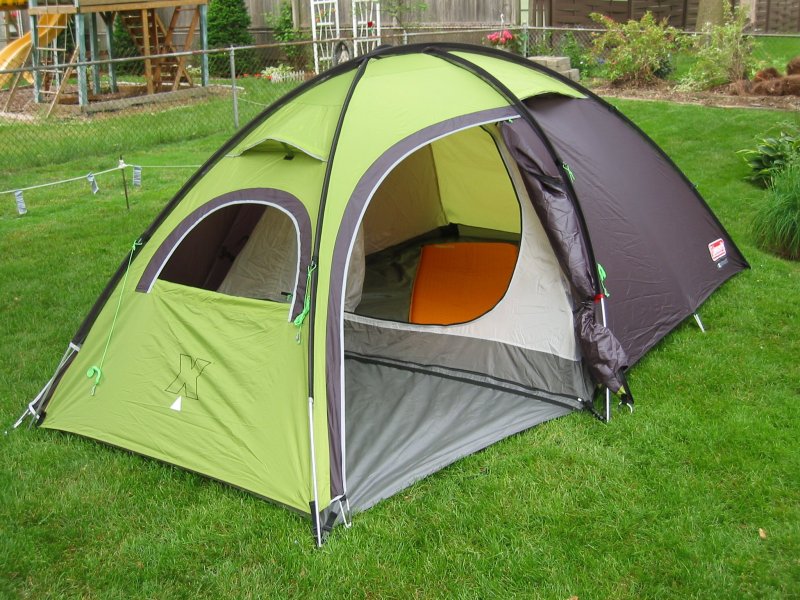
So the tent hangs off of the rain fly (a few inches away). The top is mostly a mesh material for venting. As for the fly, there are three vents (two on each side, one over the vestibule) that you can either open or close for more or less airflow. There are stiff pieces inside the vents that use hook and loop to keep the vent in the open position. In a "normal" rainstorm I've found water still does not get into the vents if they are open. If it was a wind-driven rain, I'd suggest closing them. The rainfly comes very close to the ground. I never had problems with rain blowing in, and the waterproof bottom of the tent extends up the side enough that even with blowing rain, water wouldn't get it.
As for windows, there is only one, at the front of the tent, in the vestibule (clearly visible in the photos). There are two doors, one on each side of the tent. Both the window and doors have two-way zippers, so you can unzip from either end. The doors have the usual pieces to hold them open by unzipping and rolling them up that most tents have.
The height of the tent is 41". At 6' I can sit up or kneel comfortably. The interior is shaped trapezoidally. At the "back" it's 67" wide, while the front (door leading to the vestibule) is 75". Length is 83". Due to the tent's design the walls come down fairly steeply, which is nice since you don't lose TOO much useful space where the wall meets the floor. Still, at 6' I found it best to sleep with my head towards the door (a perfectly flat "wall") and put my feet towards the back. There was just enough space that my feet didn't touch the tent wall. Sleeping diagonally gives me even more space, of course. As for the vestibule, it's 75" at the back (towards the door of the tent), 67" at the front, and 47" deep. This is ample space for saddlebags and riding gear, and will still leave one door open for access to the tent. If you're my height, you can also get your kermit chair under the vestibule and sit in there (JUST enough headroom) and stay mostly out of the sun.
So how did it work? Very well. I camped in all sorts of conditions; a hot rally in NC, the '07 MOA rally, and all over Canada, in mostly cold (and occasionally rainy) weather. I also experienced some good wind. There were no leaks, I wasn't afraid the tent was going to blow away at any time, and it's as comfortable as a tent can be when it's in the 90's. I loved the fly-first design, and I'm not sure I could deal with a "normal" tent ever again. I DID set up and take down in the rain, and it was nice being able to pack the tent in a dry environment (in these cases I packed the rainfly separately). I DID set up where there were thousands of black flies, as well. When I was done and went to bed, there was only one little flying friend for me to hunt down in the tent. The vestibule design helped with that as well - I could get into the vestibule, zip up, make sure there were no flies on me, and then get into the tent. A nice "air lock". Even with the top of the tent being a mesh material, I did not find the tent to be drafty in cold weather (it got down to freezing on a night or two), so it lives up to the 3-season standard. The materials and workmanship appear excellent. All seams are strong, and after many months of camping, everything is still holding up. I DID manage to get gasoline on my rain fly at one point. I spilled gas out of a can filling up the bike in a VERY remote area (I didn't run out, this was planned), and then put the gas-covered can back on the rear rack of the bike without thinking about the wet rainfly I had packed in a mesh carrying bag adjacent to the gas can. It sat for two days with gas on it, and I was sure the fly was ruined. I eventually rinsed it off and was surprised to see the material LOOKED fine, and even held it's waterproof properties (tested in another rainstorm). Very impressive!
One nice added feature are reflective area on the tent, and reflective material in the guy lines. As motorcyclists we know the importance to being seen, and how well reflective material work. It's the same for this tent. No more tripping on guy lines walking to the bathroom, because even the smallest flashlight makes them light up. My friends also liked this feature because it's reflective properties made our camping area easy to find in the sea of tents at a rally.
As for problems, there are only two worth mentioning. I liked traveling without the floor for the vestibule. This way I could sit in the tent and leave my muddy shoes and dirty/wet saddlebags under the vestibule on the ground. The downside is that having exposed ground under your rainfly lets a LOT of moisture collect on the fly when the temperature drops, at night. Each morning the rainfly would be very wet on the inside. I didn't have problems with it dripping on anything, but I had to be careful getting out of the test so I didn't get my shirt soaked brushing against the fly. The fix is to use the vestibule floor. On days I wasn't leaving early, just a little bit of morning sun would quickly dry the rainfly.
The other issue is the tent stakes. They are square aluminum stakes. I found them to be rather flimsy. After bending one or two I went out and purchased some stronger stakes at Cabelas. I still bent one or two of those, but I was camping in rocky areas. Better stakes from the factory would be nice.
One other thing worth noting, I used some heavy-gauge plastic sheeting (like you would use when painting the inside of your house) as a ground sheet. It protects the tent floor well, packs small, and it doesn't bother me to toss it out when I get home. I wish the floor was heavier duty, but all manufacturers suggest using a groundsheet. I don't consider this any sort of design issue, but I'll still complain. The floor IS waterproof, but the tent is expensive and I want to protect it the best I can.
Overall, it's been a great tent. At the last rally I went to, I really drew a crowd as they looked at the fly-first design. It's really simple, and works quite well. I'm not sure about other manufacturers, but Coleman has a few other models in their Exponent line that set up the same way. It might be worth it to go check them out!
Before I go on, it's worth noting that I still went with a "larger" tent. If I was just riding my bike from campground to campground I would have probably chosen a smaller model. Since I was going to be using this tent at rallies, I wanted some extra space inside so I could spread out a bit. The model I chose is sold as a 3 person tent. In reality that would be horrible unless your other two friends are Oompa-Loompas. It WOULD work very well for two people, as long as you aren't taller than 6' or so. I'll get to that in a minute. it also has a large covered vestibule area at the front, so you can store your gear and it's out of the weather but not inside your tent. This is great for saddlebags, riding gear, or just your shoes.
The first thing I noticed when I received the tent was it's light weight compared to the other one, and it's smaller pack size. Advertised pack weight is still 8lbs 10oz. At this point, many of you may be wondering why it's so terribly heavy, and how could I carry that on my bike. My old tent weighed almost 12 pound, so I'm already saving weight. The Phad x3 is also a 3 season (maybe even 3.5) tent, and it offers substantial weather protection. As for pack size, it comes in at about 17" long by 7" in diameter. It fits easily into my Ortlieb duffel bag with no wrestling required, and leaving space for much of my other camping gear. The pack bag is sturdy, and has compression straps on it, which makes packing a snap. Finally no wrestling to get the tent back into it's bag.
So now it was time to set the tent up. This tent is rather unique in the fact that it's a "fly first" design, which was a huge selling point for me. To set this up, get the rain fly out and spread it out on the ground. Grab your three poles. Two are long and identical in length. The other is shorter and had one red section for identification. All three are lightweight aluminum, but plenty strong. The first long two poles insert from the front and go all the way to the back corners in an "X" shape. Also insert the third pole which runs side to side towards the front 1/3 of the tent. There will be no struggling to get the poles into the "pins" on both sides (always fun if you're alone) because that isn't how this tent is designed. On the "back" of the tent the tips of the poles fit into heavy-duty "pockets". In the front there is a part of the pole that fits into a grommet. This works out great because you push the pole into the "pocket" and it stays there. No worrying about it popping out, and no need for any help. From there you can put pressure on the pole and get everything into shape (bending the pole to form the familiar "arch" of a tent pole), and then pop in into the grommet. At this point the tent will stand on it's own. If it's windy I hope you put a few stakes in to hold it down. Now take the last pole and get it into position in the same way, seating the pole tip into the sleeve on on side, and into the grommet on the other. The rain fly is now up. Go around and put your stakes in (there are a LOT, and sometimes I didn't use them all) and string out the guy lines if you think it's necessary. There are LOTS of guy lines as well, and I hardly used all of them, but you can be sure this thing isn't going anywhere in a storm.
Here is your free-standing rain fly set up completely. You can see the two "x" poles, the third pole running across from side to side:
And with one door open, looking in (there is one on each side in the front):
Looks a lot like a tent with no floor, doesn't it? Well that's the great part about this. Imagine it's raining, and you have to get your tent setup. Normally you put the tent up while rain pours in through the screening at the top. In the meantime, you've tracked mud into the tent trying to get the poles all situated. How about setting up in black fly territory and hundreds of your little friends get in while you're setting the tent up. Sound like no fun? That's where this design shines. Put up the fly, then you just grab the tent (a separate piece), get under the rain fly, unroll it (keep the door zipped up), and "hang" it from the fly. The floor of the tent is held in place at 4 corners by the very common side-release plastic buckles (snap into place, squeeze the sides to release). The rest of the tent literally hangs from the rain fly. The fly has "toggles" hanging inside (basically plastic "pins" hanging from a loop of tent material). The tent has plastic "loops" attached to it. Put the pin through the loop and you're done. Work your way from back to front. You tent is now attached. If you want to get fancier, there is also a floor section that can be zipped/clipped into place for the vestibule area. Here is everything all together with a term-a-rest thrown in:
So the tent hangs off of the rain fly (a few inches away). The top is mostly a mesh material for venting. As for the fly, there are three vents (two on each side, one over the vestibule) that you can either open or close for more or less airflow. There are stiff pieces inside the vents that use hook and loop to keep the vent in the open position. In a "normal" rainstorm I've found water still does not get into the vents if they are open. If it was a wind-driven rain, I'd suggest closing them. The rainfly comes very close to the ground. I never had problems with rain blowing in, and the waterproof bottom of the tent extends up the side enough that even with blowing rain, water wouldn't get it.
As for windows, there is only one, at the front of the tent, in the vestibule (clearly visible in the photos). There are two doors, one on each side of the tent. Both the window and doors have two-way zippers, so you can unzip from either end. The doors have the usual pieces to hold them open by unzipping and rolling them up that most tents have.
The height of the tent is 41". At 6' I can sit up or kneel comfortably. The interior is shaped trapezoidally. At the "back" it's 67" wide, while the front (door leading to the vestibule) is 75". Length is 83". Due to the tent's design the walls come down fairly steeply, which is nice since you don't lose TOO much useful space where the wall meets the floor. Still, at 6' I found it best to sleep with my head towards the door (a perfectly flat "wall") and put my feet towards the back. There was just enough space that my feet didn't touch the tent wall. Sleeping diagonally gives me even more space, of course. As for the vestibule, it's 75" at the back (towards the door of the tent), 67" at the front, and 47" deep. This is ample space for saddlebags and riding gear, and will still leave one door open for access to the tent. If you're my height, you can also get your kermit chair under the vestibule and sit in there (JUST enough headroom) and stay mostly out of the sun.
So how did it work? Very well. I camped in all sorts of conditions; a hot rally in NC, the '07 MOA rally, and all over Canada, in mostly cold (and occasionally rainy) weather. I also experienced some good wind. There were no leaks, I wasn't afraid the tent was going to blow away at any time, and it's as comfortable as a tent can be when it's in the 90's. I loved the fly-first design, and I'm not sure I could deal with a "normal" tent ever again. I DID set up and take down in the rain, and it was nice being able to pack the tent in a dry environment (in these cases I packed the rainfly separately). I DID set up where there were thousands of black flies, as well. When I was done and went to bed, there was only one little flying friend for me to hunt down in the tent. The vestibule design helped with that as well - I could get into the vestibule, zip up, make sure there were no flies on me, and then get into the tent. A nice "air lock". Even with the top of the tent being a mesh material, I did not find the tent to be drafty in cold weather (it got down to freezing on a night or two), so it lives up to the 3-season standard. The materials and workmanship appear excellent. All seams are strong, and after many months of camping, everything is still holding up. I DID manage to get gasoline on my rain fly at one point. I spilled gas out of a can filling up the bike in a VERY remote area (I didn't run out, this was planned), and then put the gas-covered can back on the rear rack of the bike without thinking about the wet rainfly I had packed in a mesh carrying bag adjacent to the gas can. It sat for two days with gas on it, and I was sure the fly was ruined. I eventually rinsed it off and was surprised to see the material LOOKED fine, and even held it's waterproof properties (tested in another rainstorm). Very impressive!
One nice added feature are reflective area on the tent, and reflective material in the guy lines. As motorcyclists we know the importance to being seen, and how well reflective material work. It's the same for this tent. No more tripping on guy lines walking to the bathroom, because even the smallest flashlight makes them light up. My friends also liked this feature because it's reflective properties made our camping area easy to find in the sea of tents at a rally.
As for problems, there are only two worth mentioning. I liked traveling without the floor for the vestibule. This way I could sit in the tent and leave my muddy shoes and dirty/wet saddlebags under the vestibule on the ground. The downside is that having exposed ground under your rainfly lets a LOT of moisture collect on the fly when the temperature drops, at night. Each morning the rainfly would be very wet on the inside. I didn't have problems with it dripping on anything, but I had to be careful getting out of the test so I didn't get my shirt soaked brushing against the fly. The fix is to use the vestibule floor. On days I wasn't leaving early, just a little bit of morning sun would quickly dry the rainfly.
The other issue is the tent stakes. They are square aluminum stakes. I found them to be rather flimsy. After bending one or two I went out and purchased some stronger stakes at Cabelas. I still bent one or two of those, but I was camping in rocky areas. Better stakes from the factory would be nice.
One other thing worth noting, I used some heavy-gauge plastic sheeting (like you would use when painting the inside of your house) as a ground sheet. It protects the tent floor well, packs small, and it doesn't bother me to toss it out when I get home. I wish the floor was heavier duty, but all manufacturers suggest using a groundsheet. I don't consider this any sort of design issue, but I'll still complain. The floor IS waterproof, but the tent is expensive and I want to protect it the best I can.
Overall, it's been a great tent. At the last rally I went to, I really drew a crowd as they looked at the fly-first design. It's really simple, and works quite well. I'm not sure about other manufacturers, but Coleman has a few other models in their Exponent line that set up the same way. It might be worth it to go check them out!