olironrider
Active member
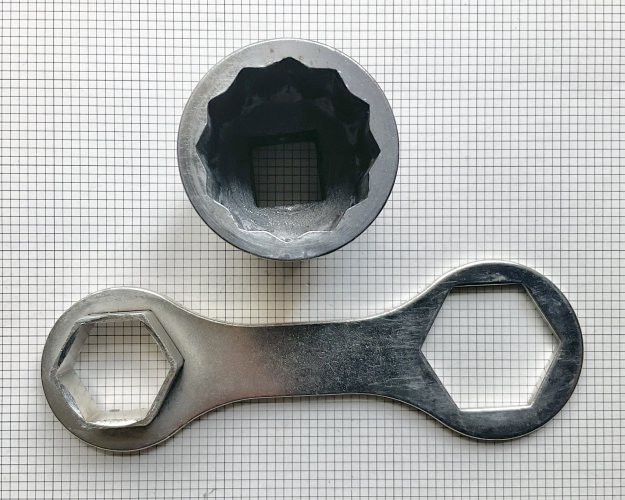
… a couple items to consider: both the top spring retainer and bottom cap require a 36mm wrench; your tool roll came with one.

It is inadequate for the job. I use a 1 7/16” x 3/4” drive socket, shown above the OEM tool. The face of the socket you see, has been machined flat and smooth; to get a maximum grip on the bottom cap minimal wrenching faces; also minimizes scarring of the triple-tree top plate when removing the spring retainer, which is shallow also.
Equally important is that, both those items are torqued to 70 FTLB ! I have an inline adapter for my 1/2” drive torque wrench to the 3/4” drive of the socket. Care must be taken to counter-hold the fork/triple-tree assembly while applying that 70 FTLB… you can cause misalignment of the front suspension, otherwise.
Both the top spring retainer and bottom cap will “sweat” the thin fork oil through their threads. I apply a skim coat of LOCTITE 565 Sealant to their threads at assembly; this application also backs-up the large crush washer at the bottom cap. Doing the same to the top cap will help the crush washer involved, too.
Considering the torque involved, removing the bottom cap to access the bumper for replacement, requires the same care.
Attempts to “flush” old fork oil and debris out of the assembly by pouring liquid in from the top, has marginal effect. There are several parts in the damper rod head, more in the bottom of the stanchion itself that do not fully flush. These control compression and rebound of the forks; involve very fine “piston rings”; hair-fine springs with check balls.
Study this link to understand…
It might help by removing the suspension springs; refastening the bottom cap to the damper rod and, using the now floating slider as a “toilet bowl un-clogger” to surge repeated volumes of cleaning liquids throughout the fork ?
When ready for fork oil, it is not just, “fill with new fluid”; measured 280ml per fork is the specification for a fully disassembled fork. Considering you intend to do less, I might suggest 265ml ?
How often have I seen, “Not Enough Time to Do it Right the First Time However, Plenty of Time to Do it Right the Second Time” ?

It is inadequate for the job. I use a 1 7/16” x 3/4” drive socket, shown above the OEM tool. The face of the socket you see, has been machined flat and smooth; to get a maximum grip on the bottom cap minimal wrenching faces; also minimizes scarring of the triple-tree top plate when removing the spring retainer, which is shallow also.
Equally important is that, both those items are torqued to 70 FTLB ! I have an inline adapter for my 1/2” drive torque wrench to the 3/4” drive of the socket. Care must be taken to counter-hold the fork/triple-tree assembly while applying that 70 FTLB… you can cause misalignment of the front suspension, otherwise.
Both the top spring retainer and bottom cap will “sweat” the thin fork oil through their threads. I apply a skim coat of LOCTITE 565 Sealant to their threads at assembly; this application also backs-up the large crush washer at the bottom cap. Doing the same to the top cap will help the crush washer involved, too.
Considering the torque involved, removing the bottom cap to access the bumper for replacement, requires the same care.
Attempts to “flush” old fork oil and debris out of the assembly by pouring liquid in from the top, has marginal effect. There are several parts in the damper rod head, more in the bottom of the stanchion itself that do not fully flush. These control compression and rebound of the forks; involve very fine “piston rings”; hair-fine springs with check balls.
Study this link to understand…
MAX BMW Motorcycles - BMW Parts & Technical Diagrams - R75/5 (2476)
BMW Parts for your R75/5 (2476) Production: 08/69-07/80 ECE
shop.maxbmw.com
It might help by removing the suspension springs; refastening the bottom cap to the damper rod and, using the now floating slider as a “toilet bowl un-clogger” to surge repeated volumes of cleaning liquids throughout the fork ?
When ready for fork oil, it is not just, “fill with new fluid”; measured 280ml per fork is the specification for a fully disassembled fork. Considering you intend to do less, I might suggest 265ml ?
How often have I seen, “Not Enough Time to Do it Right the First Time However, Plenty of Time to Do it Right the Second Time” ?
Last edited:


