•  

    Welcome! You are currently logged out of the forum. Some forum content will be hidden from you if you remain logged out. If you want to view all content, please LOG IN!

    If you are not an MOA member, why not take the time to join the club, so you can enjoy posting on the forum, the BMW Owners News magazine, and all of the benefits of membership? If you click here, you have the opportunity to take us for a test ride at our expense. Enter the code 'FORUM25' in the activation code box to try the first year of the MOA on us!


Intro and 2004 R1150RT Service Questions

Fuel QD Installation

The Beemerboneyard fuel QDs and clamps will arrive today or tomorrow. My understanding is that the fuel system is under pressure so I've searched for a procedure to do the install and can't find one. My Clymer manual suggests that the line pressure has to be relieved by clamping and then disconnecting the fuel supply/return lines at the tank(?).

On the R1150RT, the QDs are accessible once the right-side fairing has been removed. Can this be as simple a job as carefully clamping the fuel lines on the tank side of the QDs, disconnecting the QDs, pulling out the old ones and installing the new ones to the same hoses (mine look good)? Or, do I need to disconnect the battery, empty the tank, get new hose material, etc.?


You'll need to remove the Oetiker Clamps. A diagonal cutter can be carefully used here. You'll need properly sized fuel injection clamps to reinstall. (No worm clamps allowed) No worries on depressurizing, just disconnect. Re-use same hose. Be careful on the plastic tubing going rearward toward the pressure regulator, it's fragile, don't torque on the rear rubber hose too much, else the plastic tube leading to the regulator can be broken. Replacing the regulator involves more disassembly than you want to know...
 
You'll need to remove the Oetiker Clamps. A diagonal cutter can be carefully used here. You'll need properly sized fuel injection clamps to reinstall. (No worm clamps allowed) No worries on depressurizing, just disconnect. Re-use same hose. Be careful on the plastic tubing going rearward toward the pressure regulator, it's fragile, don't torque on the rear rubber hose too much, else the plastic tube leading to the regulator can be broken. Replacing the regulator involves more disassembly than you want to know...

Thanks for the tips. I hadn't realized that the tubes to the regulator were plastic. Sounds like if I were to damage them I'd be moving up the spline lube ...
 
Starter Notes

For the starter lubrication procedure, I followed the information from Anton Largiader's site: Valeo Starter Overhaul

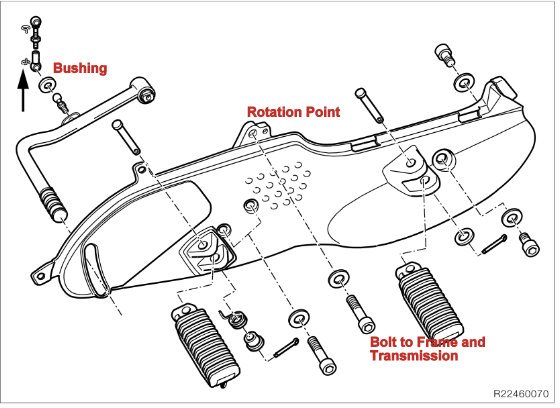
I want to note a step for others who are planning to clean/lube the starter on an R1150RT. It is much easier to access to the starter if the Left Footpeg Assembly (LFA) is rotated out of the way but not removed.

I had to pull the starter twice, the first time I removed the LFA. When I did, the rear frame dropped a few millimeters below where it and the LFA bolt to the transmission (photo below). I had a very hard time aligning the largest of the three bolts near the Left Footpeg and getting it back in. So the second time I pulled the starter (to look again at the transmission spline) I left that bolt in and rotated the plate counterclockwise. That provided enough room to remove the starter.

The steps for rotating the plate are: Remove the clip on the lower transmission shift linkage (arrow below), remove the shift linkage from the shift pedal (pops off). Then remove four of the five bolts on the footpeg plate. The 5th bolt, the largest of the three by the front footpeg, can be loosened and the plate can be rotated counterclockwise (then tighten that bolt to hold the LFA out of the way of the starter.

Also, two parts I wish I'd had on hand and had to improvise: A felt bushing (BMW 23417650149) that goes on the lower shift linkage, it fell apart in my hands and I had to make one; the correct grease (Bosch PZ 2 V 3 silicone grease or equivalent). I applied a very light coating of a moly-based bearing grease.
 

Attachments

  • photo lfa.jpg
    photo lfa.jpg
    56 KB · Views: 185
: A felt bushing (BMW 23417650149) that goes on the lower shift linkage, it fell apart in my hands and I had to make one; the correct grease (Bosch PZ 2 V 3 silicone grease or equivalent). I applied a very light coating of a moly-based bearing grease.

There are 2 of the felt bushings on the 1150 GS shifter. When I replaced my clutch at 44,000 miles they disintegrated in my hands. I really had no idea what they were until I looked in the parts manual. My BMW dealer had them and they are pretty inexpensive. Based on your, my, and others' experience with these bushings I believe they should be routinely replaced every 15-20,000 miles.
 
Hi Roger, welcome (from Conn.)!

Can't help with the technical questions but it looks like they are vastly covered. I have an '04 1150RT with near 40k miles and loving it. Hope to see you out on the road one of these days. Ride safe!!!
 
There are 2 of the felt bushings on the 1150 GS shifter. When I replaced my clutch at 44,000 miles they disintegrated in my hands. I really had no idea what they were until I looked in the parts manual. My BMW dealer had them and they are pretty inexpensive. Based on your, my, and others' experience with these bushings I believe they should be routinely replaced every 15-20,000 miles.

They cost about a buck and they're simple to replace (at least they were on my R1100S). You rotate and pull a pin on the side of the ball, then simply pop the ball out of the socket with a pair of flat heads. It's held in the socket by a circlip. Once the new felt piece is installed you can just squeeze it back to gether with pliers. Re-insert the pin and you're done. 5 minutes.
 
TB Balance Temperature Note

Yesterday, with most of the other work done, I decided to recheck the TB balance. After adjusting the right cylinder intake valves slightly, the idle screw and right hand cable needed minor adjustments-not a surprise.

All fairings and the Intake Manifold Extension (RT) had been removed for other work. The garage was a comfortable 60 degrees so I didn't see a need for a fan initially but had connected my GS-911 to provide RPM information while doing the TBB.

About halfway through the process after getting the RID to indicate a few bars on the temperature scale, I noticed the air intake temperature was reading 90 degrees F (which was 125 degrees when corrected for the BoosterPlug). I was surprised the intake air was that hot.

I then got a fan, faced it toward the front of the bike and the AIT dropped to about 25 degrees F (60 after BP correction). It didn't seem to affect the TBB (would have been surprised if it did) but I think in the future, I will use a fan any time I'm running the motorcycle while it's stationary.

With the valves and TBB adjusted and BP installed, running Autolite 3923 primary plugs and 4164 secondaries, the motorcycle seems smooth and surge free. The updated cam chain tensioner has really quieted the motor.
 
Oil Seepage Rear Boot

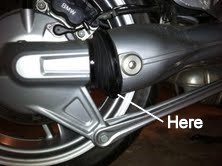
While I was looking over the bike ahead of the O2 project, QD replacement and Spline Lube, I noticed some lube seepage at the final drive boot. It is damp, with some road grit adhering but there doesn't seem to be oil anywhere but at the front seam.

There doesn't seem to be side play in the pivot bearings.

My question before I start opening up the Rear Boot, is this likely to be from the Final Drive seal at the Pinion gear? Anything in particular I be looking for?

Any thoughts/comments would be greatly appreciated.
 

Attachments

  • Rear Drive.jpg
    Rear Drive.jpg
    11.6 KB · Views: 87
that pinion shaft seal is the more common leak source. The other option is that it's from the trans output shaft seal. Need to pop the FD off to confirm if from there. First tho, just pull back the tie down at front of boot, mop up the small amount of oil you'll find in there (probably just a tsp or so), and put it back together. Monitor the leak. Its not uncommon for these things to leak a very small amount over a long period of time, with no overall ill effect. Putting in a new seal does not always resolve the issue.
 
I read somewhere in here that if the oil in the rubber boot is coming from the rear seal of the transmission there should be a tell tale trace of that in the shaft housing.

If not, it is most likely coming from the rear pinion seal on the final drive and/or leaking past the threads of the castle nut.

In both cases, loosening the boot clamp and/or the cable tie holding the boot on and inspecting the path the oil followed to get into the rubber boot should tell you where it came from.
 
that pinion shaft seal is the more common leak source. The other option is that it's from the trans output shaft seal. Need to pop the FD off to confirm if from there. First tho, just pull back the tie down at front of boot, mop up the small amount of oil you'll find in there (probably just a tsp or so), and put it back together. Monitor the leak. Its not uncommon for these things to leak a very small amount over a long period of time, with no overall ill effect. Putting in a new seal does not always resolve the issue.

I read somewhere in here that if the oil in the rubber boot is coming from the rear seal of the transmission there should be a tell tale trace of that in the shaft housing.

If not, it is most likely coming from the rear pinion seal on the final drive and/or leaking past the threads of the castle nut.

In both cases, loosening the boot clamp and/or the cable tie holding the boot on and inspecting the path the oil followed to get into the rubber boot should tell you where it came from.

Thanks for these inputs. I'm going to go open it up and see how much and which direction it's coming from.


... Phew.


Opened it up, dry as a bone, oil was on the outside. Perhaps residual from the mechanic who bled the brakes and changed the FD oil in August. Can't find any signs of leaks from brakes or FD near axle or drive shaft or Pinion gear. Thank again for the responses. RB
 
Last edited:
I read somewhere in here that if the oil in the rubber boot is coming from the rear seal of the transmission there should be a tell tale trace of that in the shaft housing.If not, it is most likely coming from the rear pinion seal on the final drive and/or leaking past the threads of the castle nut.

In both cases, loosening the boot clamp and/or the cable tie holding the boot on and inspecting the path the oil followed to get into the rubber boot should tell you where it came from.

maybe yes, and maybe no.
my rear trans seal was leaking, and no clear visible streaking down the inside of the swingarm. After 2 replacement seals to the pinion shaft, and a continuing hefty leak into the boot, i decided to do the trans seal. Voila, problem solved.
regardless, opening up the boot will tell you nothingwhatsoever about the source of the leak. The pivot bearing assembly blocks teh view up the swingarm, and the rear knuckle of the d/s assembly blocks view to the pinion gear seal. The FD needs to be removed, minimum, even just to see where the leak source might be.
 
Back
Top