• Welcome, Guest! We hope you enjoy the excellent technical knowledge, event information and discussions that the BMW MOA forum provides. Some forum content will be hidden from you if you remain logged out. If you want to view all content, please click the 'Log in' button above and enter your BMW MOA username and password.

    If you are not an MOA member, why not take the time to join the club, so you can enjoy posting on the forum, the BMW Owners News magazine, and all of the discounts and benefits the BMW MOA offers?

'94 R1100RS ABS Front Brake Malfunction

I have replaced many sets of rubber brake lines with Spiegler SS Teflonand learned very quickly that vacuum bleeding (I use a power bleeder) is not nearly as effective as pushing new fluid up from the bottom with a syringe.
Push the fluid up until it appears in the reservoir. ABSII and non.
Then you can use a vacuum bleeder to remove any remaining air from ABS pump (if applicable) and caliper.
Pushing air up is much easier than pulling it down.
This method works very well when replacing the clutch slaves on the 1150's as well.

Below is my setup including a tool (made from a bleed screw available at any auto jobber) to access the quick fill adapter that BMW uses to fill the dry systems when new.


I have replaced many sets of rubber brake lines with Spiegler SS Teflonand learned very quickly that vacuum bleeding (I use a power bleeder) is not nearly as effective as pushing new fluid up from the bottom with a syringe.
Push the fluid up until it appears in the reservoir. ABSII and non.

Thx, for all that material/instruction, very nice setup! You could be an "Airhead"! Bill Ed.
 
That was my point.........there isn't one on my RS.

Well, this is embarrassing. I must admit that I did discover that my 99RS is equipped with a brake fluid reservoir. It's in a fairly inconspicuous location and of no functional value when the bike is sitting on the center stand, IMHO.
 
Last edited:
The usefulness depends on how the bars are turned, the position of the control on the bar, and whether or not the bike is on the sidestand. Voni's is usable if the bars are turned full left.
 
Re: Front Brake Lever not engaging Pads on first pull '94 R1100RS

Just a followup to replies on my problem. I have re-bleed the brake lines including under the tank to where I believe that there is no possible air left trapped in the lines. Some say I should replace the entire lines with Speigler but for the near term I choose not to invest on that option as I can not establish that my lines are swelled. Restating that I recently removed my front wheel for replacing disk(used within specs) and also replaced the front wheel bearings. Up to that point I had no brake issues. On reassembly I now have this issue. Reading a little further in my service manual there is some mention of "When removing the disk and speed sensor ring then where they were mated together this should be noted by placing a mark". Well the old disk were scrapped for the used ones and sensor ring positioned at random onto the disk. Is there some relevancy here to my problems. Any other trails that I should be looking at? Thx! Bill Ed.
 
Big snip... Some say I should replace the entire lines with Speigler but for the near term I choose not to invest on that option as I can not establish that my lines are swelled. Bill Ed.

The reason you cannot establish that your 21 year old lines are swollen is because the swell on the inside. By the time you notice swelling on the outside your brakes will probably have been malfunctioning for a very long time.

I look for lots of places to save money on bike maintenance. Brakes is not one of them.
 
The reason you cannot establish that your 21 year old lines are swollen is because the swell on the inside. By the time you notice swelling on the outside your brakes will probably have been malfunctioning for a very long time.

I look for lots of places to save money on bike maintenance. Brakes is not one of them.[/QUOTE

Well, I am not as ignorant of spending dollars that can save a life. I'm looking at "Well they worked well prior to wheel removal man! Did I possibly assemble wrong, that's all I have asked. New brake lines can be installed over winter if I perhaps over looked something in reassembling disk/sensor, before I would pull the Speiglers trigger. I know that the lines are close to 25yro and once I determine there is no other cause my order goes out.
 
Where precisely is that on my R1100RS?

In case you aren't joking, the sight glass is on the right side of the integrated front master cylinder reservoir.
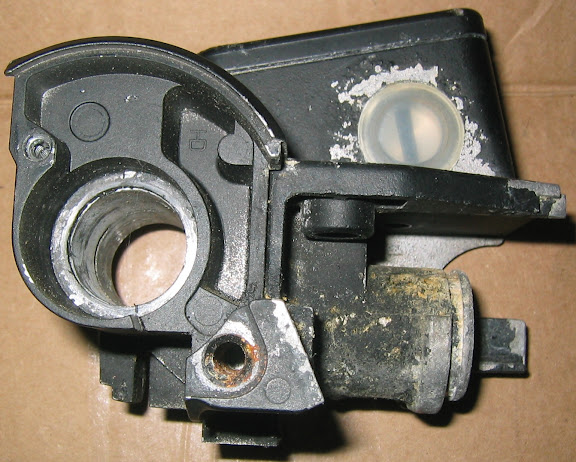
EDIT: Now that I read the next page, I see that you weren't. Aside from locking the the bars to the left, it is also quite easy to remove the switch assembly and have access to the pinch bolt. Then you can rotate the master cylinder on the bar to get the reservoir nearly level. I've just done that and more to rebuild my MC on the bike since I didn't feel like futzing with the heated grip wires; just have to be careful not to rotate it too far and damage the wires.

front%252520mc%252520right%2525201.jpg


(Yes, my spare MC had a seal leak and is crusty and being used as a parts donor instead of being rebuilt at the moment. I'll clean the crud out of the bore and see if it is worth honing when I'm bored someday. I wish they were anodized like the clutch slave cylinders on 1150 models)

If it is overfilled, why not bleed fluid from a caliper or the ABS unit until it is at the right level before popping the cap and risking a paint eating mess?
 
Last edited:
Just a followup to replies on my problem. I have re-bleed the brake lines including under the tank to where I believe that there is no possible air left trapped in the lines. Some say I should replace the entire lines with Speigler but for the near term I choose not to invest on that option as I can not establish that my lines are swelled. Restating that I recently removed my front wheel for replacing disk(used within specs) and also replaced the front wheel bearings. Up to that point I had no brake issues. On reassembly I now have this issue. Reading a little further in my service manual there is some mention of "When removing the disk and speed sensor ring then where they were mated together this should be noted by placing a mark". Well the old disk were scrapped for the used ones and sensor ring positioned at random onto the disk. Is there some relevancy here to my problems. Any other trails that I should be looking at? Thx! Bill Ed.

When you remove your wheel, you must remove the calipers first and in doing so, disturb the brake lines. If you have brake lines that are marginal to begin with, flexing the hoses may be enough to cause the lining to fail. That said, another possibility is that your master cylinder has failed. Put some rags under / around it and peel back the boot between the cylinder and lever which has the push rod going through it. If it is clean in there, I pointed you 5 minutes down the wrong road. If it is a crusty mess and / or dripping fluid, you have work to do and you may as well install a Spiegler kit at the same time. That is what I'm doing tonight and the reason I haven't ridden my bike in quite some time.
 
In case you aren't joking, the sight glass is on the right side of the integrated front master cylinder reservoir.
EDIT: Now that I read the next page, I see that you weren't. Aside from locking the the bars to the left, it is also quite easy to remove the switch assembly and have access to the pinch bolt. Then you can rotate the master cylinder on the bar to get the reservoir nearly level. I've just done that and more to rebuild my MC on the bike since I didn't feel like futzing with the heated grip wires; just have to be careful not to rotate it too far and damage the wires.

front%252520mc%252520right%2525201.jpg

I'm sticking with my opinion that it's not in a useful place. But, it is there.

Only took me 16-yrs to notice.
 
Thoughts on the "one man pump"

I have and use the Motion Pro Easy Bleed Hydraulic Brake Bleeder. When you release the lever, there is a vacuum in the line until the MC piston clears the port into the reservoir. During that time, it is possible to draw air back into the caliper, past the bleed screw threads. There is enough of a vacuum at the caliper that you can watch fluid flow backwards from the Easy bleed tool until it seals and then watch the air bubbles in the clear bleed hose expand. If I can reach the lever and bleed screw at the same time, I finish the job the old fashion way. If not, I'll seal the bleed screw threads with tape before I start.

Here are the instructions from Motion Pro with a few key points underlined:
__________________________

MOTION PRO EASY BLEED HYDRAULIC BRAKE BLEEDER P/N 08-0143

The Motion Pro Easy Bleed Brake Bleeder is a one-way check valve. This tool allows air and brake fluid to escape, but will not allow air to re-enter the system.

Note: This tool will not bleed air from a dry system.

WARNING!
Brake Fluid can cause eye irritation. In case of contact with eyes, flush immediately with plenty of water and get medical attention.

CAUTION!
Always use clean brake fluid of the type recommended by the vehicle manufacturer. Brake fluid contaminated with dirt, water, petroleum products or other materials may result in brake failure.

Brake fluid will damage painted surfaces. If brake fluid contacts painted surfaces rinse immediately with water.

1. Attach a piece of 3/16” I.D. clear plastic tube to each end of the tool. The internal check valve allows fluid to flow in the direction of the arrow, so the arrow should always point from the caliper to the brake fluid catch can.

2. Clean the brake calipers, caliper bleeder valves and master cylinder.

3. Position the proper size wrench onto the caliper bleeder valve. Next, secure the inlet hose of the tool onto the caliper bleeder valve.

4. Remove the brake master cylinder cap. To avoid brake fluid spillage, leave the cap resting loosely on top of the reservoir.

5. To ensure proper operation of this tool, it is necessary to prime it. To do this, position the tool vertically and begin to depress the lever/pedal, making sure to close the bleeder screw when pressure is not applied, repeat until brake fluid is seen in the outlet hose. Position the outlet hose of the tool into a brake fluid catch can.

6. Open the bleeder valve approximately one-half turn. CAUTION: If the brake fluid level in the master cylinder becomes too low, air will be introduced into the system. Depress and release the brake pedal or lever several times to bleed air out of the brake system. Replenish the reservoir with clean brake fluid as needed. Repeat this procedure until all air has been removed from the brake system (no air bubbles appear in the inlet hose).

7. Tighten the bleeder valve to the vehicle manufacturer’s torque specification. Set brake fluid level to the vehicle manufacturer’s specification. Clean and re-install the master cylinder cap.

NOTE: Sometimes brake fluid leakage or air introduction may occur at the threads of the bleeder valve. To avoid these problems, remove the bleeder valve and seal the thread using Teflon tape. Re-install the bleeder valve and perform steps 1 thru 5 above.

________________________________________

As an alternative to Teflon tape, some people use grease around the threads and as possibly the best option, the sealant found on speed bleeders is available as well.
 
Last edited:
One more thought on the issue of not building pressure:

Check your brake pads. Mine have little spring wires to keep them from rattling on the pin that secures them. When I backed my pads off the rotor, one of the spring wires got jammed in the hole in the pad's backing plate, preventing it from moving freely on the pin. After replacing the lines and rebuilding the MC, I couldn't get it to bleed right. I was to the point of pushing the pads back again to see if there was air trapped with a piston when I noticed that the one pad wasn't sitting square against the rotor. It would just rock sideways, binding on the pin and not bottom against the rotor. When I released the lever, it would push the piston back. I removed the caliper, fixed the spring wire, reassembled and voila; working brakes with good feel at the lever.
 
Back
Top