• Welcome, Guest! We hope you enjoy the excellent technical knowledge, event information and discussions that the BMW MOA forum provides. Some forum content will be hidden from you if you remain logged out. If you want to view all content, please click the 'Log in' button above and enter your BMW MOA username and password.

    If you are not an MOA member, why not take the time to join the club, so you can enjoy posting on the forum, the BMW Owners News magazine, and all of the discounts and benefits the BMW MOA offers?

  • Beginning April 1st, and running through April 30th, there is a new 2024 BMW MOA Election discussion area within The Club section of the forum. Within this forum area is also a sticky post that provides the ground rules for participating in the Election forum area. Also, the candidates statements are provided. Please read before joining the conversation, because the rules are very specific to maintain civility.

    The Election forum is here: Election Forum

88 K75C 122,860 mi. faulty fuel pump test

pjar

PeteG
Thanks to all of the questions and responses on the forum too numerous to mention. IÔÇÖm very weak at electrical testing, but after 8 hours, mostly reading posts and wiring diagrams, IÔÇÖve progressed further than anticipated.

I offer apologies in advance for my lack of technical terminology.

Hopefully I can get a little help to get me over this last part.

Symptom: Bike stalled while humming along at 60 mph on the Freeway, never to start again.

A two mile tow to my place of business left me thankful and my wallet $100 lighter.

What IÔÇÖve checked:
1) Spark: Good

2) In neutral, pressed start button, and listened at tank opening. No sound.

3) Backed this up with a fuel pressure test. Result: 0 pressure.

4) Checked fuses with ohm meter: All good.

5) Cleaned battery positive (to Injection Pump Relay & Starter Relay) cables and negative cables and established good clean connections. Ground connection to engine also good.

6) Drained tank, blew out air, and hot wired pump (direct current to pump in tank ÔÇÿyellow wireÔÇÖ and direct ground from pump ÔÇÿblack wireÔÇÖ). Works and sounds fine.

7) Tested for voltage at fuse with direct ground at Green/Red wire (#87) from Fuel Injection Relay: Result 11.8v This was the #6 fuse (6th fuse down from the top of the fuse stack on the left side). Pressed starter button and received 11.8v for about 2 seconds. To me it indicates that the relay is working.

8) Tested for voltage at the 4 wire connection at the back of the tank at the supply (female) side. This was the Green/White wire coming from the #6 fuse. Again, pressed the starter button and received 11.8v for two seconds. This also indicates that the fuse is good.

9) Jumped the 4-wire sending unit connection (supply side Green/White female wire connector) to the Green wire on the tank (output/male) side, with HARD WIRE GROUND (from black wire on fuel pump directly to ground). I wanted to see if power was getting to the fuel pump independent of the harness connection by using a good jump. The result (after pressing start button) is that the pump ran fine for 2 seconds.

If I connect the sending unit plug and test the pump it does not work.

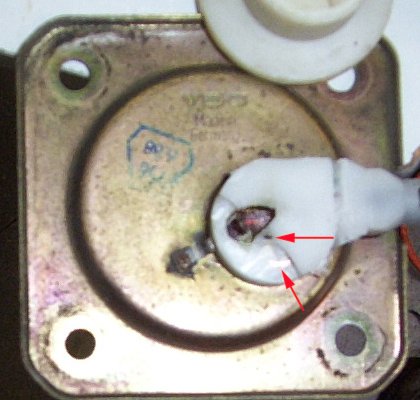
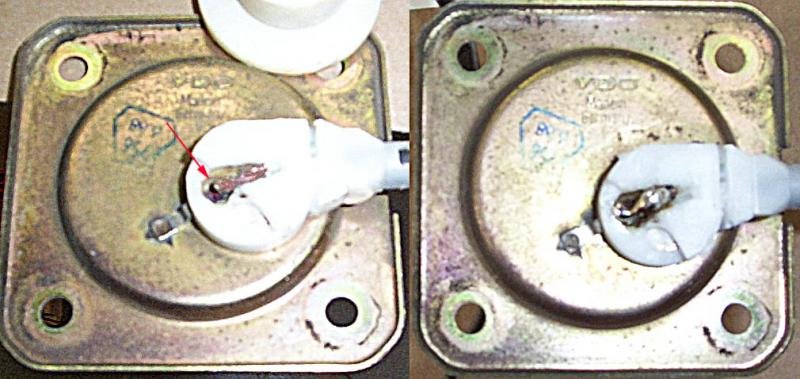
Here is where IÔÇÖm getting stuck. How do I verify that the ground is good on the sending unit? My understanding that the brown wire on the tank side connection (male) is the ground wire (not sure though). I also should check the ground source for the sending unit. Does anyone know where that is located? By this I mean to ask ÔÇ£Where does the sending unit get its ground from?ÔÇØ I suppose if I could jump the power as in item 9 above AND jump the brown (?) wire directly to gound that should verify that the sending unit is OK. Then the ground source would be the most likely culprit or the 4-wire connection itself. The problem with this test is the close proximity of the male connectors and avoiding a short.

The last couple of paragraphs sound confusing to me. Let me know if pictures will help and IÔÇÖll supply them.

My next plan is to get some electrical cleaner and clean out the 4-pin plug connection and try it again.

Thanks in advance for your help,
Pete
 
The electrical pass-through on the fuel tank and the connector fail with age. Mine did. I take it the bike will not start. That is good, it makes it easier to fix.

First, check the tank connector. The contacts often spread resulting in no connection. This can be fixed by pinching them down. Check that you get 12 volts on the bike side of the connector, and then plug in the tank and check the tank side

If you have power at the connector, remove the fuel tank sender and check that the fuel pump wires read 1 ohm or less between the connector and the pump wires.

I do not advise trying to measure voltage in the fuel tank. One spark and it may go boom. Even empty.
 
Thanks Tiny,

I forgot to mention a couple of things that I tried in my original post. I'll list those now for reference to future readers trying to troubleshoot.

1) The first thing I did was to inspect the ECU connection harness and re-seat it, twice. Everything was perfectly clean.

2) The inside of the tank looked immaculate, making me suspect and electrical problem rather than a clogged filter.


The thought occurred to me as I awoke on Sunday morning that voltage may not be getting through to the tank side of the connection because there may be a built-in cut off when the tank is bone dry (float being completely down, hence breaking the ground).

As I'm thinking about it now it doesn't make a lot of sense since the motor has to stop running if there is no fuel, making it a redundant safety feature.

It is easy to check by just propping up the float, making the connection, then seeing if it will start.

I've already crossed the testing voltage in the tank threshold with much trepidation. I SUPPLIED voltage directly to the pump. Used long jumpers, had fire extinguisher handy, and a heavy cap to suffocate a potential ignite. Gas scares the heck out of me and I don't plan on going there again.

How did you pinch the connectors? By pinching the whole plastic unit of four connectors or getting to them individually?

I strongly suspect the connection is the problem at this point and will let you know the results.

Thanks again,
Pete
 
Pete,

Put your meter to the Ohms setting (continuity testing), clip one lead to one of the terminals on the pump, then see if there is continuity to one of the pins on the four pin connector. If yes, clip the lead to the other pump terminal and again check for continuity to one of the other three pins on the four pin connector.

If either one of the wires to the pump does not have continuity to the four pin, then you need to replace the sending unit assembly (unless you can identify exactly where the problem is in it and repair it). Either way, it has to come out.


:dance:dance:dance
 
Thanks Lee, I was hoping you would provide input.

Ohm meter setting on 20k

With sending unit removed I get the following ohm readings to the 4 wires in the connector.

Green/White (This should be the 12v wire) TO Yellow pump wire = Full continuity (0 reading). This seems proper.

White wire TO Black pump wire: Full continuity when float is bottomed out (no gas) and no continuity when float is slightly off bottom position. Looks like this is going to the instrument panel. Again seems proper.

Yellow wire TO Black pump wire: Same as above.

Brown Wire TO Black pump wire: Here is where I'm confused. My understanding that this is a wire going to ground. The reading is independent of the float position, that is, the float position has no effect on the reading. The reading started out a 4.6 and after leaving it connected for about 15 minutes it has climbed to 13.15 and slowly rising (decreasing continuity). I was expecting full continuity and don't understand the decreasing continuity status. I flipped the meter to 200k setting and it started at 33.5 and has slowly decreased to 23.6 (now increasing continuity). In any event, there is variable continuity here between 13.15 (20k setting) and 23.6 (200k setting).

This would explain a bad ground, insufficient power getting to the pump, hence a bad sending unit. Do you agree?

Thanks much,
Pete
 
Pete,

The plug BROWN wire is bike ground. On the bike harness side, you should see 0 ohms to the frame.

On the sending unit, this wire goes to a soldered tab on the outside of the sending unit mounting 4 bolt flange. On the inside of the flange is another soldered tab that the BLACK pump wire comes off of.

You should get 0 ohms (or VERY close to it) between the BROWN plug wire and the BLACK pump wire. If not, the problem is usually at these tabs.


The GREEN plug wire connects (through the insulated fitting on the 4 bolt flange) to the YELLOW pump wire (go figure) which is the pump 12v+. You should get 0 ohms (or VERY close to it) between the GREEN plug wire and the YELLOW pump wire. If not the problem is in the insulated fitting solder joints)


That's it for pump operation. Two solid continuities (but both wires change colors along the way and that's usually where the lack of or poor continuity appears). BROWN to BLACK =ground and GREEN to YELLOW = 12v+.


As far as the fuel level sender goes:

When the float gets toward the down position, the WHITE wire is connected to ground (BROWN wire). This triggers the low fuel light on the dash. When above that it sees an open circuit to ground.

The YELLOW wire goes through the variable resistor that the float drives. This allows the unit to drive an optional fuel gauge. When the float is all the way up (full tank), the YELLOW wire sees close to 0 ohms to ground (BROWN wire). When the float lowers it sees increasing resistance up to around 150 ohms to ground.


Try your measurements again. I bet you will find poor conductivity through the two ground tabs on either side of the four bolt plate. It can be repaired if you are resourceful. Check for any partially broken wires. Check continuity from end of BLACK wire to plate. Check continuity from end of BROWN wire to plate. Check all the solder joints. Clean the area on the plate around the tabs of ANY corrosion or rust then put GOOD solder on the tabs and plate and BLACK and BROWN wires.

If problem is with other than the ground side, then the plastic cover on the bottom of the four bolt plate can be broken open and repairs made and then resealed with epoxy.

Let me know what you find.


:dance:dance:dance
 
88 K75C troubleshoot sending unit results

Pete,

Lee, thanks for taking the time to do this. My responses to your post are in italic.

The plug BROWN wire is bike ground. On the bike harness side, you should see 0 ohms to the frame.
This checks out. 0 ohms to frame.

On the sending unit, this wire goes to a soldered tab on the outside of the sending unit mounting 4 bolt flange. On the inside of the flange is another soldered tab that the BLACK pump wire comes off of.

You should get 0 ohms (or VERY close to it) between the BROWN plug wire and the BLACK pump wire. If not, the problem is usually at these tabs.
This is not the case. This wire does not have proper continuity. If I connect to the bottom of the black wire post on the inside tank side, and read at the circle loop at the end of the black wire, there is connectivity (0 ohm), telling us that from the black wire post, thru the solder point to the end of the wire at the pump is a good connection. From the Brown wire at the tank harness to the black wire at the pump eyelet there is poor continuity.


The GREEN plug wire connects (through the insulated fitting on the 4 bolt flange) to the YELLOW pump wire (go figure) which is the pump 12v+. You should get 0 ohms (or VERY close to it) between the GREEN plug wire and the YELLOW pump wire. If not the problem is in the insulated fitting solder joints)
This checks out fine. 0 ohm reading.


That's it for pump operation. Two solid continuities (but both wires change colors along the way and that's usually where the lack of or poor continuity appears). BROWN to BLACK =ground and GREEN to YELLOW = 12v+.


As far as the fuel level sender goes:

When the float gets toward the down position, the WHITE wire is connected to ground (BROWN wire). This triggers the low fuel light on the dash. When above that it sees an open circuit to ground.
This checks out fine.

The YELLOW wire goes through the variable resistor that the float drives. This allows the unit to drive an optional fuel gauge. When the float is all the way up (full tank), the YELLOW wire sees close to 0 ohms to ground (BROWN wire). When the float lowers it sees increasing resistance up to around 150 ohms to ground.
I'm getting different values. Yellow to Brown with float up 130 ohm, with float down 240 ohm. Not much a concern to me since I don't have the optional gauge.


Try your measurements again. I bet you will find poor conductivity through the two ground tabs on either side of the four bolt plate. It can be repaired if you are resourceful. Check for any partially broken wires. Check continuity from end of BLACK wire to plate. Check continuity from end of BROWN wire to plate. Check all the solder joints. Clean the area on the plate around the tabs of ANY corrosion or rust then put GOOD solder on the tabs and plate and BLACK and BROWN wires.

If problem is with other than the ground side, then the plastic cover on the bottom of the four bolt plate can be broken open and repairs made and then resealed with epoxy.
Everything points to this as being the problem. There is a hole in my plastic cover that reveals a frayed wire, that was covered with corrosion. Looking at pics of used sending units I noticed that this hole was plugged with a black cover. Mine isn't and was exposed to the weather. I'll try to upload of pic just for kicks. I'll break (my speciality as I hold an advanced degree!) that cover and try to repair/replace that frayed wire. In reality, I'll try to cut it open with some type of Dremel tool so as not to get too destructive.

Let me know what you find.
I'll report progress. The new units are about $105 which I'd like to avoid if possible.

Pete

DCP_0005a.png
 
Last edited by a moderator:
Pete,

That appears to be the wire that goes to the ground tab just above it in the photo.

Check continuity from that tab through the plate to the end of the black pump wire.
Then check from that frayed wire to the black wire. Then from the frayed wire to the brown wire pin on the connector.

Looks like the problem is right there under the cap. You might have to splice in a section of good wire between the good part of the wire and the ground tab.

You could probably seal it with silicone to keep the corrosion out.


:dance:dance:dance
 
Sending unit update

Hi Lee,

The connection from the brown wire to the exposed wire is good (not at the post inside the plastic housing, but from wire end to wire end).
The connection from the exposed wire to the black wire pump terminal is poor.
The connection from the black wire to the tab (soldered post on the inside) is also good.

The break is right where the exposed wire is. I used a combination of dremel cutter and screwdriver to break the white cap area open a bit more. I didn't realize that the white plastic piece had the other wires green, yellow, & white embedded right into the plastic rather than it being a hollow housing. In the picture posted the two red arrows indicate the wires embedded into the plastic that are now partially exposed.

It may be possible to try a clean up the broken area and drop some solder into the area. At this point I'm doubting whether it would be a reliable repair. The exposed wire would also need to be checked for continuity. It is something I'll try just for the experience. My brother-in-law (Volvo mechanic) suggested sealing the whole thing up with 'the Right Stuff' gasket sealer. It should give it good protection and stability.

In the meantime I'll search for a used sending unit. Every place I've located at this point has them listed, but SOLD. I check eBay regularly as well.

Have you done this repair successfully?

I'm impressed at the expertise of the forum folks.

Pete
 

Attachments

  • sending_unit.jpg
    sending_unit.jpg
    123.7 KB · Views: 88
Sending unit

I have one from a 1990 K75. Will do some cross checks to see if they are the same. It is for sale Harold in Kansas
 
sorry about that

I have the sender and it is the correct one but I can not prove that the sender variable resister works or that it would even turn a light on. Sorry I posted before I did the checking. It would run the pump but not the gage or light. Harold in Kansas
 
Hi Harold,

If the price is right I'm interested. I don't have an optional gauge, so the variable resistor doesn't matter. The light would be nice, but I can live without it. Perhaps I can fix that as well.

Let me know what you are asking. My direct email is pete@cp2color.com

Thanks,
Pete
 
Sending Unit Repair Update

I decided to go ahead and explore into the defective wire, not expecting anything other than to gain some experience. The hole for the ground wire was opened up, to expose more of its length. Although frayed, it was not broken. It wasn't making contact with the base of the post (see red arrow) that has the fuel pump ground wire connected at the opposite end inside the tank.

Repair was attempted on the sending unit. The hole exposing the ground wire (left side of pic) was enlarged. The red arrow is the spot where continuity was broken. At the risk of embarrassment I've included a pic of the soldering. You can count the times I've soldered on one hand. It is crude looking (right side pic).

RESULT: There is now continuity from the brown (ground) wire at the harness to the black eyelet on the pump wire. With the harness connected & pressing starter button, the voltage check at the yellow and black pump wires is 11.9v for about 2 seconds.

I did continuity checks on all other wires (white, yellow, and green), which are OK.

I think it will work! Not sure how long it will last. The plan is to cover everything up using 'the Right Stuff' gasket sealer, then reassemble for a test start.

I'm open to any helpful suggestions. I'm not sure if the soldering will be a reasonable fix as it may be too rigid to last long. If someone has tried this and knows it will fail in short order please let me know.

In hindsight, knowing that the base of the sending unit should be capped or covered to avoid corrosion would have been preventative. I have no complaints as it has lasted 22 years.

Thanks for all of the diagnostic/repair help and encouragement!

Pete
 

Attachments

  • Sender10_29.jpg
    Sender10_29.jpg
    58 KB · Views: 63
Pete,

I just had a thought (That could be dangerous!).

The problem with your sender was the brown ground wire to the mounting plate tab. The black ground wire from the plate to the pump was fine. How about for redundancy, connect a wire with eye lugs between one of the plate mounting studs and the frame? That way you are sure you have a good ground to the plate. Leave plenty of slack in the wire so removing the tank is easy.:dunno


:dance:dance:dance
 
Lee, you are wild man. Very clever.

It makes good sense. That wire could be connected to the tank mounting stud and cable tied for emergency use. I'd have a prepared ground location, with tools and hardware, in case a roadside ground bypass would be necessary.

In the meantime I'll keep a lookout for a used Fuel Sending Unit.

Thanks.
 
Pete,

No, I meant run AND CONNECT a separate ground from the sender plate mounting stud to the frame NOW. That way you are ensured of having a good ground for your pump and sending unit. It would be a parallel ground. You could even have a quick disconnect (spade or banana) in the middle or on one end to make tank removal easier.

Don't wait for the "emergency use". That might be as you are crossing a highway in front of an oncoming semi. The 2nd separate ground would give you virtually NO chance of the ground failing on the outside of the sending unit (like yours DID).


:dance:dance:dance
 
Hi Lee,

That is what I thought you meant. It is good advice.

The difference between having your engine cut out unexpectedly and perhaps dangerously, then perform repair ground bypass (my way), and your way which is to have a secure backup in place so as to avoid the breakdown.

i shall do so.

Thanks for prodding me along,
Pete
 
Back
Top