pauls1150
MOA #24991, south of Los Angeles
This is how I installed a Motolectric cable kit on my '04 R1150RT; your bike may be different or have some "personal" variances... YMMV.
Kits to beef up the battery cables on Harleys have been available for a long time; typically these started out being installed on strokers and high-compression engines. It never occurred to me that my bike could also benefit from such an installation. BMW is known for using the smallest possible wire gauge, and the shortest possible length of wiring, that they can assemble on the line. But I found out that Motolectric (https://motolectric.com/) has kits to upgrade bikes' battery cabling, so I decided to investigate.
Besides the cables, these kits also include cleaners for electrical terminals, tie-wraps, and a few other small items. The manufacturer's instructions are pretty general in content, and seem to refer to the 1200 and/or 1250 bikes (and other brands also), but this does not cause any issues for somebody who has a little imagination, can turn a wrench, and try something new.
I had to do this project a little at a time, due to other local responsibilities, but that gave me the time to think about how to do this and possible alternate ways.
Of course the first step is to remove the left-side body panel (along with the seats, left mirror, the bottom cowl, the black triangle piece around the centerstand's "grab" handle, and the left sidecase).
Next is the plug for the air temperature sensor (on top of the air filter housing) and the air filter's top cover. In my case, because I have relocated the second fuel filter from inside the tank to this top cover, I also had to unclip that and move it aside. Note that since the fuel line is not electrically connected to anything, the metal quick-disconnects cannot cause a sparking hazard.
This then allows for the removal of the rear snorkel from the air intake (after removing its forward Allen screw). I put a piece of rigid clear plastic (half of a CD case) over the air filter to prevent anything from accidentally dropping in.
Now to loosely lay the cables in (don't bolt them to anything yet) and play with their respective routing...
The common recommendation is to connect the new (additional) ground cable from the battery's negative terminal to the main ground of the bike, in parallel with the one already there. In this case, that main ground is not only just underneath the gas tank, it is under the ABS unit, and is a PITA to access if the bike isn't already apart.
So I looked around... and hey, there is a big bolt (M8 x 40 mm, with a T45 head) on the starter assembly, at the 9:00 position as viewed from the rear, that holds the starter assembly to the flywheel outer housing (which in turn is bolted to the engine). If I could make the connection here, not only would it be an additional parallel path, but it would be a MUCH more direct ground return for the starter than the circuitous path created by das faktory. I verified with my DVM that it really was 0 ohms to ground at several places around the bike.
But how to attach the cable there? There is not enough clearance for the new cable's lug to attach directly (not without a sharp bend to the lug, in the right place), so I fabricated an oval copper plate to use as an extension. This used to be a Home Depot p/n G22501, a copper barrel grounding lug.
I cut off the threaded sleeve and sanded the remainder flat, then drilled tight clearance holes for one M7 screw (for the cable lug) and one M8 screw (for the big mounting bolt). Using M7 hardware to connect the cable to this extension plate made for easy connection and future servicing. (I may swap this out for a larger lug, such as Grainger's 6MFT0 / Thomas & Betts p/n 54852BEPH, with the crimp sleeve removed.)
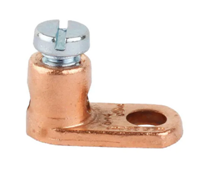
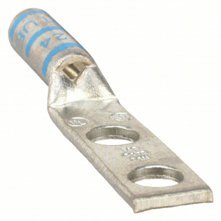
The manufacturer has informed me that they may change the lower lug to accommodate this position, so be sure to tell them which Oilhead you have (RT, R, RS, GS) and whether you prefer to attach the ground to the top case of the engine or the starter mounting bolt, which I believe is electrically the better choice.
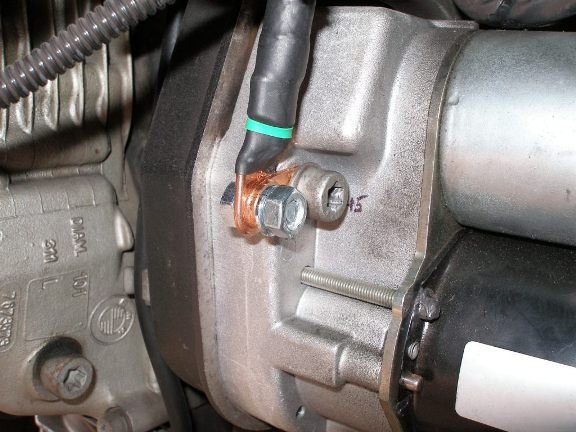
I loosely routed this line forward from the starter mounting bolt, up along the inner side of the left throttle body air tube, above the hard plastic fuel line, back along the frame above the airbox and toward the seat mount, then up and forward, back to the battery's negative terminal. Yes, this could fit... Note that if I had routed the cable to the upper case ground instead, I would have had some extra line to tie down, but I don't consider this an "issue".
Now to route the positive cable. I really didn't want to lose the accessory positive "Jump" terminal, so I removed an SAE accessory line that I had never used in all these years; I've always been able to plug my battery charger and jacket liner into the "cigarette lighter" sockets (no CAN-bus on this bike). I also didn't want to enlarge the hole, nor carve a new hole, through the plastic fuse box or the wiring box below it, as this area is very tight and it would be easy to damage the wiring here.
Starting at the starter, I routed this line up behind the left air tube - making darn sure that neither cable could possibly interfere with the pulley on the throttle body - then behind the frame tube, and behind where the inner intake snorkel would sit when mounted.
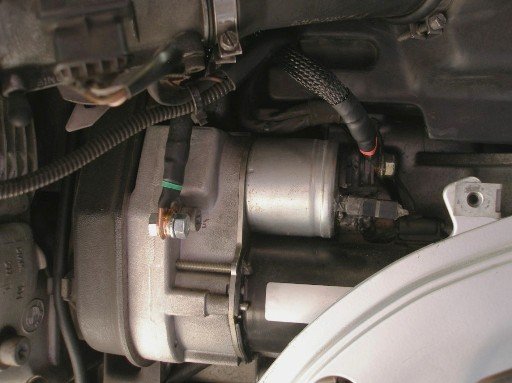
From there it's an easy path to the battery's positive lug. But the extra plastic at the rear of the RT's gas tank cover would interfere here, as would the factory cables, so I learned that the big post of the accessory jump terminal can be unscrewed; it's pretty tight (and rightfully so). The lug on the cable easily fit this screw, so I angled it down a little, to clear the factory cables, and tightened it all down.
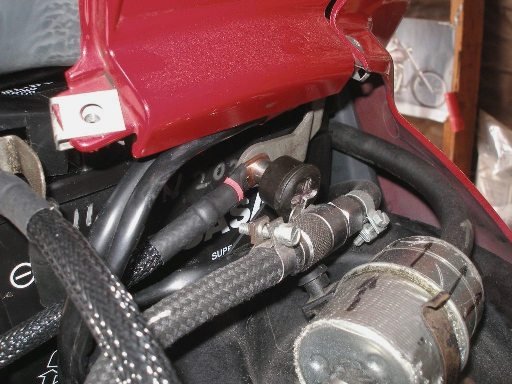
(Ignore the braided hose between my Q/D and the filter - it IS "fuel-injection-rated".)
Tie-wraps were added as appropriate; if I had routed this cable alongside the factory line, I would have had some extra length.
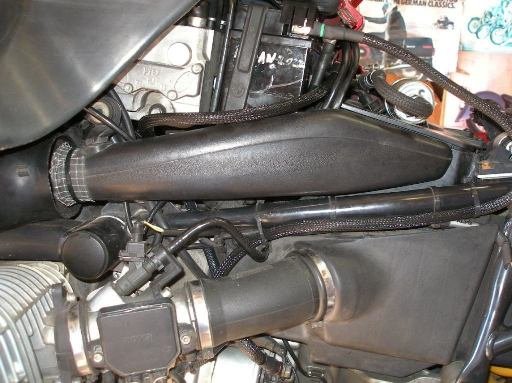
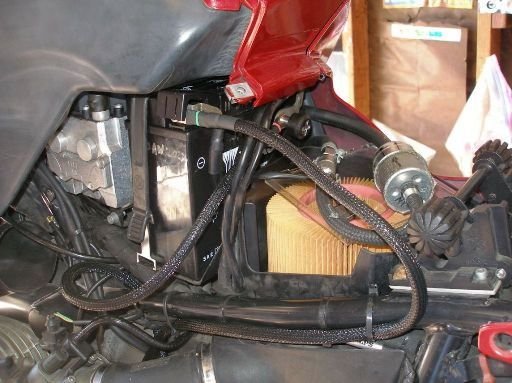
This routing also leaves enough "Service Loop" along both cables to permit easy servicing and easy removal & installation of the battery and the starter. Handy Household Hint: When removing or installing my battery, I've found it useful and comfortable to have about 4 to 6 inches of wood under my left foot, so I can prop the battery on my left knee while connecting or disconnecting it.
So now the smoke test... I had the battery completely disconnected for at least five days, so maybe the computer lost its memory; I've also heard that it takes a compete revolution or two of the engine for the computer to shake hands with the triggers for the ignition and fuel injection, but I have not confirmed this.
I turned on the key, did the "TPS Re-Learn" with the throttle, then shut the bike off again. Turned the key back on, and hit the starter button... One revolution, and VROOM! it fired right up, and the throttle response in the garage seemed OK. Took it out for a 30-mile ride, and it ran great (as usual), so I presume there was no memory loss.
I would call this a great success! And one of their stickers has earned a place on my toolbox.
PaulS
Kits to beef up the battery cables on Harleys have been available for a long time; typically these started out being installed on strokers and high-compression engines. It never occurred to me that my bike could also benefit from such an installation. BMW is known for using the smallest possible wire gauge, and the shortest possible length of wiring, that they can assemble on the line. But I found out that Motolectric (https://motolectric.com/) has kits to upgrade bikes' battery cabling, so I decided to investigate.
Besides the cables, these kits also include cleaners for electrical terminals, tie-wraps, and a few other small items. The manufacturer's instructions are pretty general in content, and seem to refer to the 1200 and/or 1250 bikes (and other brands also), but this does not cause any issues for somebody who has a little imagination, can turn a wrench, and try something new.
I had to do this project a little at a time, due to other local responsibilities, but that gave me the time to think about how to do this and possible alternate ways.
Of course the first step is to remove the left-side body panel (along with the seats, left mirror, the bottom cowl, the black triangle piece around the centerstand's "grab" handle, and the left sidecase).
Next is the plug for the air temperature sensor (on top of the air filter housing) and the air filter's top cover. In my case, because I have relocated the second fuel filter from inside the tank to this top cover, I also had to unclip that and move it aside. Note that since the fuel line is not electrically connected to anything, the metal quick-disconnects cannot cause a sparking hazard.
This then allows for the removal of the rear snorkel from the air intake (after removing its forward Allen screw). I put a piece of rigid clear plastic (half of a CD case) over the air filter to prevent anything from accidentally dropping in.
Now to loosely lay the cables in (don't bolt them to anything yet) and play with their respective routing...
The common recommendation is to connect the new (additional) ground cable from the battery's negative terminal to the main ground of the bike, in parallel with the one already there. In this case, that main ground is not only just underneath the gas tank, it is under the ABS unit, and is a PITA to access if the bike isn't already apart.
So I looked around... and hey, there is a big bolt (M8 x 40 mm, with a T45 head) on the starter assembly, at the 9:00 position as viewed from the rear, that holds the starter assembly to the flywheel outer housing (which in turn is bolted to the engine). If I could make the connection here, not only would it be an additional parallel path, but it would be a MUCH more direct ground return for the starter than the circuitous path created by das faktory. I verified with my DVM that it really was 0 ohms to ground at several places around the bike.
But how to attach the cable there? There is not enough clearance for the new cable's lug to attach directly (not without a sharp bend to the lug, in the right place), so I fabricated an oval copper plate to use as an extension. This used to be a Home Depot p/n G22501, a copper barrel grounding lug.
I cut off the threaded sleeve and sanded the remainder flat, then drilled tight clearance holes for one M7 screw (for the cable lug) and one M8 screw (for the big mounting bolt). Using M7 hardware to connect the cable to this extension plate made for easy connection and future servicing. (I may swap this out for a larger lug, such as Grainger's 6MFT0 / Thomas & Betts p/n 54852BEPH, with the crimp sleeve removed.)


The manufacturer has informed me that they may change the lower lug to accommodate this position, so be sure to tell them which Oilhead you have (RT, R, RS, GS) and whether you prefer to attach the ground to the top case of the engine or the starter mounting bolt, which I believe is electrically the better choice.

I loosely routed this line forward from the starter mounting bolt, up along the inner side of the left throttle body air tube, above the hard plastic fuel line, back along the frame above the airbox and toward the seat mount, then up and forward, back to the battery's negative terminal. Yes, this could fit... Note that if I had routed the cable to the upper case ground instead, I would have had some extra line to tie down, but I don't consider this an "issue".
Now to route the positive cable. I really didn't want to lose the accessory positive "Jump" terminal, so I removed an SAE accessory line that I had never used in all these years; I've always been able to plug my battery charger and jacket liner into the "cigarette lighter" sockets (no CAN-bus on this bike). I also didn't want to enlarge the hole, nor carve a new hole, through the plastic fuse box or the wiring box below it, as this area is very tight and it would be easy to damage the wiring here.
Starting at the starter, I routed this line up behind the left air tube - making darn sure that neither cable could possibly interfere with the pulley on the throttle body - then behind the frame tube, and behind where the inner intake snorkel would sit when mounted.

From there it's an easy path to the battery's positive lug. But the extra plastic at the rear of the RT's gas tank cover would interfere here, as would the factory cables, so I learned that the big post of the accessory jump terminal can be unscrewed; it's pretty tight (and rightfully so). The lug on the cable easily fit this screw, so I angled it down a little, to clear the factory cables, and tightened it all down.

(Ignore the braided hose between my Q/D and the filter - it IS "fuel-injection-rated".)
Tie-wraps were added as appropriate; if I had routed this cable alongside the factory line, I would have had some extra length.


This routing also leaves enough "Service Loop" along both cables to permit easy servicing and easy removal & installation of the battery and the starter. Handy Household Hint: When removing or installing my battery, I've found it useful and comfortable to have about 4 to 6 inches of wood under my left foot, so I can prop the battery on my left knee while connecting or disconnecting it.
So now the smoke test... I had the battery completely disconnected for at least five days, so maybe the computer lost its memory; I've also heard that it takes a compete revolution or two of the engine for the computer to shake hands with the triggers for the ignition and fuel injection, but I have not confirmed this.
I turned on the key, did the "TPS Re-Learn" with the throttle, then shut the bike off again. Turned the key back on, and hit the starter button... One revolution, and VROOM! it fired right up, and the throttle response in the garage seemed OK. Took it out for a 30-mile ride, and it ran great (as usual), so I presume there was no memory loss.
I would call this a great success! And one of their stickers has earned a place on my toolbox.
PaulS
Last edited:

