Navigation
Install the app
How to install the app on iOS
Follow along with the video below to see how to install our site as a web app on your home screen.
Note: This feature may not be available in some browsers.
More options
-

Welcome! You are currently logged out of the forum. Some forum content will be hidden from you if you remain logged out. If you want to view all content, please LOG IN!If you are not an MOA member, why not take the time to join the club, so you can enjoy posting on the forum, the BMW Owners News magazine, and all of the benefits of membership? If you click here, you have the opportunity to take us for a test ride at our expense. Enter the code 'FORUM25' in the activation code box to try the first year of the MOA on us!
You are using an out of date browser. It may not display this or other websites correctly.
You should upgrade or use an alternative browser.
You should upgrade or use an alternative browser.
R1100s models, repair information and related
- Thread starter tibork
- Start date
More options
Who Replied?fbt80
Active member
Starting to think maybe that slot is one tool and it's a tire gauge pencil. But like spark plug bar concept too. I'll find a bar that fits the clasp perfectly and then see if it fits in the spark plug tool.Quit yer whining! Here's what I've got.

You can see a slot that's missing something, is it the bar for turning the spark plug socket? Yours is missing too. Maybe I'll get in touch with the previous owner and see if he's got it kicking around?


Last edited:
fbt80
Active member
My newly acquired kit had the bag in it, same writing. Sitting on top of the flat kit. What are you supposed to use it for?Quit yer whining! Here's what I've got.
You can see a slot that's missing something, is it the bar for turning the spark plug socket? Yours is missing too. Maybe I'll get in touch with the previous owner and see if he's got it kicking around?
fbt80
Active member
That's what I've used.I thought the screwdriver was used to turn the plug wrench.


It would be pretty cool to have some Rally coverage. In the past there were Rally picture threads but picture availability seems to have waned lately.MOA Rally coverage. If I don't take too much luggage, I'm going take a Drone, GoPro and Insta360 and try a full-on vlog coverage film production.
If it cuts into my Beerfest time too much then it'll be a short film.

OM
fbt80
Active member
It'll be a big file, do you think it best to just post a link to youtube? or does the site have a place for an actual file of that size? 100's of meg.It would be pretty cool to have some Rally coverage. In the past there were Rally picture threads but picture availability seems to have waned lately.
OM
A link to YouTube would be the best. If you happen to be the first to post “pictures from the Rally” feel free to start the thread…… Thanks for your efforts!It'll be a big file, do you think it best to just post a link to youtube? or does the site have a place for an actual file of that size?
OM
fbt80
Active member
Decided to take it easy on the way up, instead of just hammering out 700+ miles in a day, I'll break it into two days and will stay the night at the halfway point...in Byron Georgia!. Oh yeah!!!!, a water tower, a motorcycle dealership and city hall all have my name on them and will have to be in the film.MOA Rally. Getting ready for the rally, will document my travels and the event. Will try to represent my Oilhead brothers and sisters as best I can by basically not getting arrested. Can't guarantee much else.")
fbt80
Active member
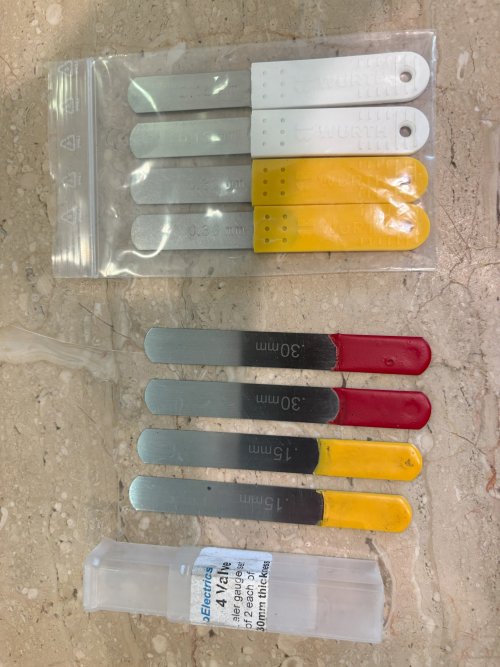
Valve lash adjust. Finally got around to checking the valve clearances prior to the trip. No real reason other than curiosity. No weird sounds, basically fine sounding. I've put 10k in miles since the last adjust (if the dealer actually did it) from the dealer I bought it from. They were tight, but nothing terrible. I think the valves do tighten up rather than loosen I'm told. After much screwing around I got both heads to my satisfaction and finally got to use my dial indicator. Test ride did feel a little more spritely. Maybe a 1hp gain? But...I used my feeler set from EME, works but no handle like I've seen in multiple videos on how to set your valves...this bugged me. So I plasti-dipped the ones I had, but still wanted those plastic handled sets that I could not find. Found them. Made by Wurth (would add the "Umlaut" above the U if I could figured out the special key). Maybe available from the Wurth US importer, but I ordered from ebay via Frankfurt https://www.ebay.com/str/lagerschaetze . 28Euros (that's real money right?). Anyway, I'm happy again and am packing for the trip next week, and charging a myriad of camera batteries.
Attachments
Last edited:
pauls1150
MOA #24991, south of Los Angeles
Yes, they do typically "close up", since the wear on the valve seats and the backside of the valve is slightly greater than the wear of the valve stems and rocker ends.
Your PC should have a "Character Map"; if you can't find it, on mine it's at C:\Windows\System32\charmap.exe , or look under Accessories\System Tools.
It's easy to create the shortcut to keep on your desktop; the umlaut is available in several of the fonts.
Your PC should have a "Character Map"; if you can't find it, on mine it's at C:\Windows\System32\charmap.exe , or look under Accessories\System Tools.
It's easy to create the shortcut to keep on your desktop; the umlaut is available in several of the fonts.