•  

    Welcome! You are currently logged out of the forum. Some forum content will be hidden from you if you remain logged out. If you want to view all content, please LOG IN!

    If you are not an MOA member, why not take the time to join the club, so you can enjoy posting on the forum, the BMW Owners News magazine, and all of the benefits of membership? If you click here, you have the opportunity to take us for a test ride at our expense. Enter the code 'FORUM25' in the activation code box to try the first year of the MOA on us!


Mounting Denali D2 lights on 2023 R1250RS

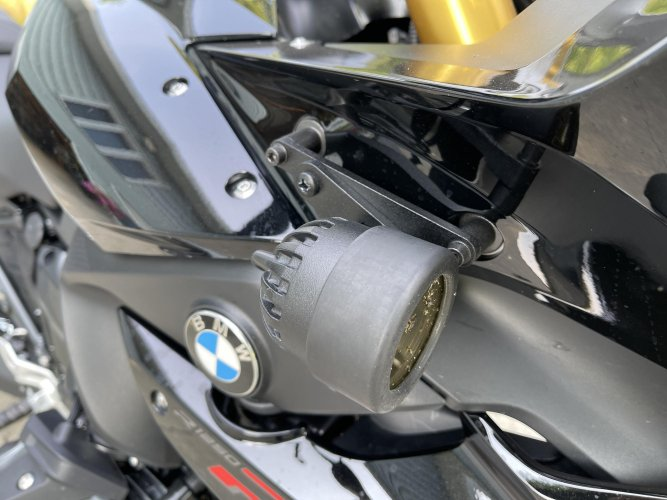
Okay...It's not all sunshine and rainbows, puppy dogs and kitty cats. In fact, it's pretty far from anything like that. I had temporarily mounted the brackets with bolts that were too short for real use, just to keep the project moving. The longer bolts arrived last night and while installing the one on the left side, I realized the Wunderlich engine bar interfered with mounting the bracket. It will not sit properly, unless a certain amount of the bracket is ground away to provide clearance.

I've decided it's not worth the effort - especially because I'd have to refinish the powder coated bracket and I suck at painting. I've ordered a set of the Machineart Moto X Head cylinder guards and will be binning the Wunderlich bars.

I am also very disappointed with the finish on the frame of my $22k BMW premium, nose-and-pinkie-in-the-air, I'm-better-than-all-the-peasants motorcycle. I already pulled the Wunderlich bar off the left side of the bike and when I did, all the white finish (powder coating, I think) on the frame tab came off with it. I have an 11 year old Triumph Street Triple with a better paint job on the frame than this POS.

More than a little frustrated right now.
 
I almost forgot, can someone who doesn't have engine bars attached confirm this threaded hole in the engine block, right behind the little chin spoiler is unused. I've gone back through the instructions for the Wunderlich bars and it appears it should be. I would just like to be certain.

54174603261_47748603ff_b.jpg
 
Ouch! How disappointing. So I can plan for which bar I'll need to remove and "adjust" as part of my installation process, when you indicate "left" side are you referring to the clutch side or throttle side?
 
I almost forgot, can someone who doesn't have engine bars attached confirm this threaded hole in the engine block, right behind the little chin spoiler is unused. I've gone back through the instructions for the Wunderlich bars and it appears it should be. I would just like to be certain.

54174603261_47748603ff_b.jpg
We have the metal spoilers and one of the brackets attach there.
That spot might also be used for the BMW crash bars.
 
Ouch! How disappointing. So I can plan for which bar I'll need to remove and "adjust" as part of my installation process, when you indicate "left" side are you referring to the clutch side or throttle side?

The clutch side. Were I to make the "adjustment," I would attack the light mount. Before I made the decision to bin the engine bars, I reflexively did a quick touch up job. It was a small nick, too, so kind of hard to see, but here's a picture to maybe help a bit. The center punch is indicating about where the inside edge of the bracket contacted the Wunderlich bar, and you can see about where you would need to grind the MaMo bracket.

54175383880_8a95ee2f53_b.jpg


I hope that helps.
 
Yesterday while I was waiting for the new brackets to arrive - until about 8 PM, FedEx showed them having a 2 Dec delivery date - I drove to Moto Machines (luckily, they are fairly local to me) and picked up the X Head cylinder guards. I got them installed, but had a little difficulty with the very tight fit and the small mounting screws (5mm x 0.8). Nothing can be done about the screws, but I might have made it a little easier if I had warmed them up a bit. They were sitting in my cold garage for a few hours before I put them on.

I also cleaned up the threads on the M8 tank mounting bolts and chased the threads on the frame. The left one was particularly difficult to remove, leading me to believe it might have been cross-threaded during assembly. Now, they easily spin by hand.

FedEx now says the light brackets will be delivered today. I'll believe it when it happens, but if it does, I might finally be done with this "quick and easy" project. :D
 
The brackets arrived about 4 pm, but I was watching the football - as in real football, where they actually use their feet - so I finished up after dinner.

54182306335_39519764ac_b.jpg
Very nice. Agreed about the real football. My wife is an avid Buffalo Bills fan and I love to ask her why that's called football when they hardly ever use their feet 😁 Then I go to the garage.....
 
The new lights seem to be doing their job. I haven't done any real testing of them, but I seem to be able to see a little better on the way home from work. Now that I've done what it takes to run the wires for the lights, and am comfortable dislodging - if not completely removing - the fuel tank, I figure my next trick will be a "dash" cam.

Unlike with the lights, I appear to have the mounting system sorted, but I'm not sure which Innovv system to get. Leaning towards the K3. Thoughts?
 
I'm unsure as well. I have been looking at the Innovv camera setups and just can't seem to get to a decision point and haven't been able to find a comparison review/test of their offerings.

OTOH, the light mount bars arrived last evening from Nippy Normans so I am hoping to get the left side bar modified and get them installed over the coming weekend. Then we'll have to install a set on my neighbor/buddy's 2023 1250 RS after we see if his non-BMW "crash bars" interfere with mounting the light mount bars too.
 
I would very much like to see how this goes for you. I would have liked to have kept the Wunderlich bars, but where I was when I discovered the left mount wouldn't work, the quickest and easiest route to project completion was the path I took. I'm horrible at painting anything, especially motorcycle parts, and just about the most advanced metal working tool I own is the belt sander I made in shop class in 1976. Now that it's done, I'm very happy with the route I took. The X-Head guards look really good. As with all bike protection, I hope I never actually use it.

I'm leaning towards the K3, because both cameras are smaller and the DVR is housed under the seat. I believe the K2 is the same, but the K3 is a little more updated. I ruled out the K5 and K6, because the DVR in integrated into the front cameras making them larger. Unfortunately, I just saw the have a K7, which looks the same as the K3, but with slightly shorter and higher resolution cameras and dual-band WiFi. It's more expensive than the K3 but might be worth it.

I plan on mounting the front camera to one of the two bolts oriented horizontally under the front of the fairing. They appear to be connected directly to, or close enough to, the fairing support and should be rock solid.

54195552116_d023f2274b_b.jpg


For the rear, I'm going to drill a hole close to the trailing edge of the Givi adapter plate I have for my top case. From there I should be able to easily route the wire through the gap between the rear light and body panel without having to remove anything.

54195980825_b93f63efbc_b.jpg


I have a lot of interwebbing to do before I pull the trigger on this. To that point, I just scanned through this video. Key points: They attached the front camera under the front using the included 3M double-sided tape included with the camera. That seems a little sketchy to me, but they are professionals, and there's a trigger wire for the parking mode, which they ran all the way to the front. Not sure why they didn't use the power wire for the tail light, but they must have had their reasons. They also mounted the rear camera to a turn signal mount and ran the wire through the tail unit. I'll take a look at that when the time comes.

Keep in touch!
 
Excellent, thanks. I am thinking of the K7 but since I'm finishing up this light install on my RS and I just put new tires on my Alfa Giulia I need to wait a bit before spending any more automotive money. After all, Christmas is coming and my wife wouldn't be amused if her present was an Innovv K7 camera system. :rolleyes:
 
there's a trigger wire for the parking mode, which they ran all the way to the front. Not sure why they didn't use the power wire for the tail light, but they must have had their reasons.
Timing, probably. Some circuits "wake up" sooner than others.
 
1734199486444.png

This is my second set of Clearwater lights and like the OP, I did not want to put them lower on the forks. So, with some thinking, and a misc bracket set, and some black spray paint - I removed the winglets and used those mounting holes. They are very very solid and work well.
 
Nice. I thought about installing them there, but on top of the winglet using a longer bolt and a spacer. However, had I done that I would have to remove then re-aim them every time I needed to do something as "simple" as cleaning the air filter - If removing about 20 bolts/screws and most of the front plastics from the bike can be considered simple.

My Innovv K7 will be delivered tomorrow.
 
I'll be interested to hear about your experience with the K7. I'm about 3 more weeks away from being able to wrench after having a trigger finger tendon release surgery on Dec 4. so I can't do the install of my BMW auxiliary lights until then. I plan on following that up with the K7 if your experience sounds good.
 
I installed the cameras today. It was pretty easy. I mounted the cameras where I posted earlier. The front one catches just a bit of the inside of the fairing, but it's not too bad. I drilled a hole to mount the rear one to my Givi top case adapter plate, then ran the wire between the plate and the base for the rack. Power hooked up exactly like the guy who does the "A Bike Thing" videos showed in his K2 screw by screw installation on a GS, except the K7 doesn't have a separate power converter. It's just a cable that plugs directly into the DVR.

The only real problem I had was with all the wires/cables and the lengths of them. Combine that with the complete lack of any usable space under the passenger seat. For the life of me, I cannot figure out why you would put a 1.2m cable on a rear camera that is going to be installed on a motorcycle. The GPS module cable is also insanely long. Where else are you going to put it besides under the seat? A foot of cable would have been more than enough.

At this point I could barely get the passenger seat on with quite a bit of force. Since I took that picture, I pulled the wires for the CANSmart forward to under the rider's seat and rearranged the camera wires a bit. The passenger seat goes on easier, but tomorrow I'm going to try to improve things. I think if I wrap the wires in bigger loops, they will fit better.

54225141506_3b1de6cbf1_b.jpg


Front camera:

54224012962_9b3966422f_b.jpg


Rear camera and wire routing:

54225540845_70cca110dc_b.jpg


54225376398_190182864d_b.jpg


And, the remote:

54224012972_b0f55f63ec_b.jpg


I downloaded the app, was able to connect, and everything seems to be working as it should.
 
I finished up today. Joyful Saturnalia to me! My plan for under the rear seat worked. Now the seat goes on almost as easily as if there was nothing under the seat.

It looks a little less like a soup sandwich, too. ;)

54226573513_df64260298_b.jpg
 
I was hoping to be riding to work this week and seeing how the cameras work, but I don't think that is going to happen.

Woke up to this at about 0600 and it's still coming down. Will be going out to shovel for the second time after lunch.

54250245119_898dca5079_b.jpg
 
Back
Top