•  

    Welcome! You are currnetly logged out of the forum. Some forum content will be hidden from you if you remain logged out. If you want to view all content, please LOG IN!

    If you are not an MOA member, why not take the time to join the club, so you can enjoy posting on the forum, the BMW Owners News magazine, and all of the benefits of memebrship? If you click here, you have the opportunity to take us for a test ride at our expense. Enter the code 'FORUM25' in the activation code box to try the first year ogf the MOA on us!


1971 75/5 Weird Clutch / oil pump shaft break

I packaged up the rear drive and shipped it off to let a pro take care of it.
My biggest worry was not getting the reworked time-sert exactly perpendicular to the gasket sealing surfaces without a good drill press or mill. Also I didnt have the Time-Sert kit - which costs close to $200 when all is said and done. Not sure how long it will take but hopefully not too long.
 
While waiting for the drive I was checking over a few things. The clutch pull is very hard - harder than before. It actually feels like I’m just stretching the cable/lever rather than compressing the clutch pressure plate/ spring. I don’t think someone with a weak grip would be able to pull it in at all. Doesn’t smell right. My buddy (an 80s airhead rider) agreed that it is very hard pull. I can live with it if that’s what it is but I just want to make sure I didnt miss something.
I didn’t measure the throw but I estimate that the clutch pushrod is pushing in about 3-4mm. Is that normal?
I have attached a video of the actuation in case anyone is familiar with what the actuation should look like.
 
Good to see you’re still working on the “Skunk Works Spezial” !

The ‘71 and ‘80s clutches & hand levers are different. You’ve done the 201mm, 2-4mm adjustment routine ? The six(6) spacers were re-installed ‘tween the flywheel and pressure plate ? Bit of pre-lube on throw-out bearing ? Throw-out bearing rear most half didn’t “roll” the chevron type seal and jam the bore in rear cover ? If pushrod itself was removed, it is only re-inserted from the front of the transmission and care must be taken to not roll the felt inside the main input shaft as it jams the push rod ? Throw-out lever lubed at pivot pin ?The hand lever assembled correctly as well as lubricated ?

Worked before, Don’t work now… smells like a skunk is there ?
 
Don - I pulled out the clutch again and found that the inner pressure plate (the one closest to the flywheel) wasn't flexing properly. It was getting hung up due to the thin sheet metal being bent slightly out of shape and binding on the edge main plate. This was more than likely because when I initially installed it I had it the wrong way around. I realized my mistake after starting with the jack screws and corrected it immediately. Damage was already done though apparently. Either that or it was a dud to begin with. Unfortunately I didn't take pics of it out of the packaging. That sheet metal is very weak when compared to the metal on the original 1971 clutch.

So I installed a brand new pressure plate - works like a champ now. Just need to wait until I get my rear drive back on Tuesday and I should be back on the road for a test ride.

Paul
 
Paul, I gotta tell you that, “You’ve Earned Your Stripes” on this R 75/5 🫡

Looking forward to updates; guessin’ you know to put the rear axle through the swing arm to align the rear drive, prior to torquing the four(4) nuts (350 IN/LB) securing it to the drive shaft housing ? Kinda “float” it so that the crown gear feels centered on the axle, you probably know that already !

As far as gear oil in the drive shaft housing; whatever has been in there is drained out, which is good ! The short wheel base drive shaft housing gets a measured 125ml of gear oil, 90W… as you saw what heavy-handed torquing of the drive shaft fill & drain plugs does, I torque to 120 IN/LB with new crush washers. FWIW, I torque the bevel drive housing drain plug at 170 IN/LB, fill plug at 240 IN/LB… both with new crush washers; fill with gear oil, 90W, to lowest thread in fill hole with bike on centerstand.

Paul, how ‘bout picking up the pace a bit; shee-it, I’m gonna die of old age before I see your First Ride video 🤣

Don
 
Paul, I gotta tell you that, “You’ve Earned Your Stripes” on this R 75/5 🫡

Looking forward to updates; guessin’ you know to put the rear axle through the swing arm to align the rear drive, prior to torquing the four(4) nuts (350 IN/LB) securing it to the drive shaft housing ? Kinda “float” it so that the crown gear feels centered on the axle, you probably know that already !
Yes - I have seen that floating recommendation recently. I think it was on here somewhere.
As far as gear oil in the drive shaft housing; whatever has been in there is drained out, which is good ! The short wheel base drive shaft housing gets a measured 125ml of gear oil, 90W… as you saw what heavy-handed torquing of the drive shaft fill & drain plugs does, I torque to 120 IN/LB with new crush washers.
I'm looking forward to seeing the drive. He put Time-serts in them so probably overkill, but they should last for many years to come.

FWIW, I torque the bevel drive housing drain plug at 170 IN/LB, fill plug at 240 IN/LB… both with new crush washers; fill with gear oil, 90W, to lowest thread in fill hole with bike on centerstand.
Thats what I'll do then!
Paul, how ‘bout picking up the pace a bit; shee-it, I’m gonna die of old age before I see your First Ride video 🤣

Don
I hope to get out this weekend but who knows!
 
To close out this project at long last here is an update:
1. I’ve put about 300miles on the clock. No major issues
2. Clutch works great - so the original issue is closed.
3. Valves adjusted, rockers tightened up, head nuts torqued. Bit of noise from the left cylinder but that can wait.
4. New points installed and gapped. The F is below the view hole at ~ 3000rpm so some more fettling needed there. There is a bit of vibration that I think will be addressed by getting the timing sorted

5. Next on the block is
- Carb sync
- Some front end work (head bearings and fork seals).
- There are also some dents on the front rim so I need to get those taken care of. They are not noticeable when riding although the engine does vibrate a bit much so not easy to tell for sure.

Thanks for all the help getting this beast on the road everyone!

Paul
 
WOOHOO 😃

Congratulations Paul !

Its been a “short ugly” road for you, getting to this point; It’s gonna be a “long beautiful” road ahead now !

My best regards… ride on !

Don
 
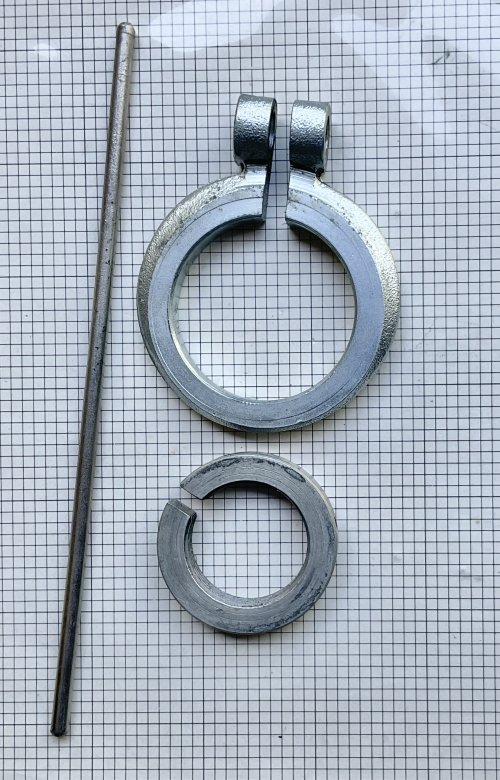
… seeing that you mentioned the head stock bearings: the original bearing pre-load “fastener” was actually two(2) parts; a split-nut and a clamping ring. It was tedious setting the pre-load, which is particularly important on the SWB Slash 5, with that fastener !

IMG_7167.jpeg

If you’ve always wondered what that 4mm diameter rod was in the tool kit, it’s inserted into either of the 4mm holes (4) around the circumference of the split-nut, to adjust the pre-load. Once set, the clamping ring is installed over the split-nut; the socket head M8-1.25 X 25mm bolt and nut installed in the clamping ring; torqued to 300 IN/LB.

Problem is: torquing the clamping ring changes the pre-load so, you “chase your tail” getting the pre-load right: from straight ahead, a gentle nudge turning to either side should let the fork slowly fall to the stop without banging it ! It is not uncommon for the pre-load to loosen over a few miles with the two-part fastener !

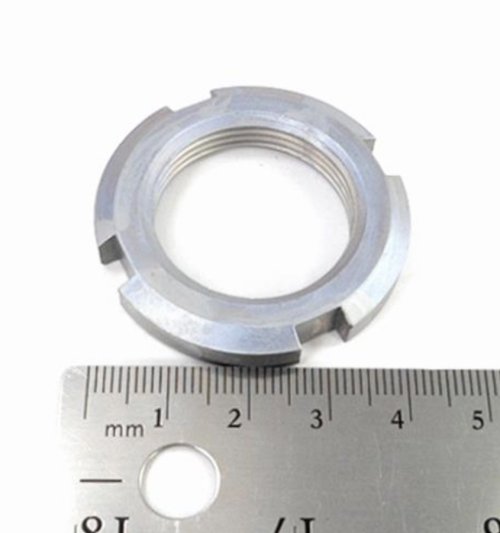
I remove that ring and nut; install the castellated nut used in the Slash 6 and up…

IMG_7162.jpeg

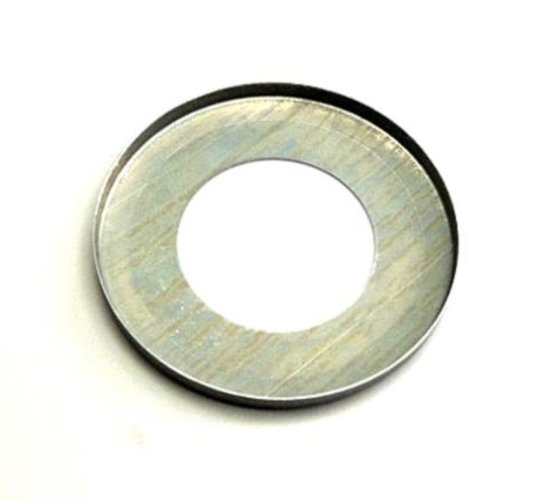
Easier to set pre-load and it holds that pre-load until the next service interval ! If replacing the head stock tapered roller bearings (2), you’ll need a replacement “dust cap” below the lower bearing…

IMG_7165.jpeg
 
Thanks Don. It’ll be a few weeks before I get into this. I put electronic ignition on over the weekend. That solved my double image issues - likely due to the messed up camshaft spindle. It works like a charm and really smoothened out the ride.
There’s a vintage motorcycle event on this weekend down south of here so I’ll take a spin down there to shake her out a bit.
 
Back
Top