•  

    Welcome! You are currently logged out of the forum. Some forum content will be hidden from you if you remain logged out. If you want to view all content, please LOG IN!

    If you are not an MOA member, why not take the time to join the club, so you can enjoy posting on the forum, the BMW Owners News magazine, and all of the benefits of membership? If you click here, you have the opportunity to take us for a test ride at our expense. Enter the code 'FORUM25' in the activation code box to try the first year of the MOA on us!


1971 R75/5 Tranny Output Flange

DonTom

Member
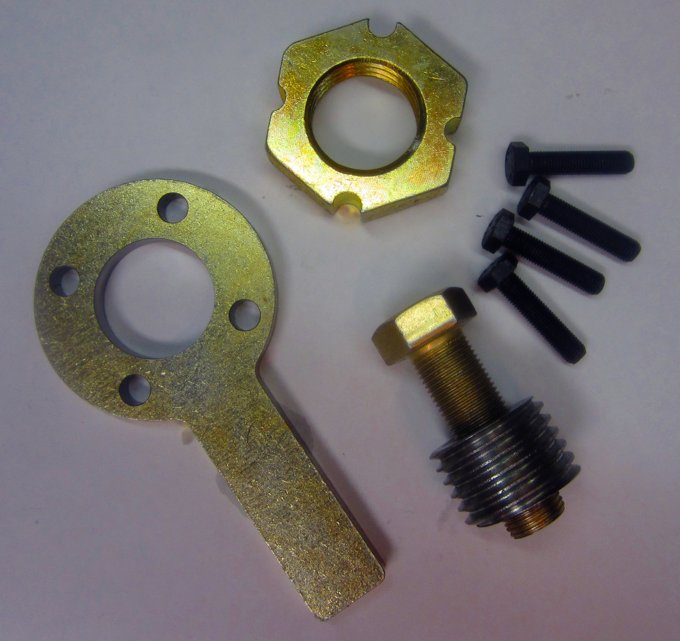
I recently replaced the clutch in my 1971 R75/5 which I thought would be a very good time to replace the rear tranny end gasket, which had a very small leak of gear oil. So I got the flange nut off with no problem--but I used an electric impact wrench that took it off in a few seconds. I hope that didn't screw anything up--because here is the rest of the story.

Next, I got the flange removal tool from NorthWest Airheads and tried to pull out the flange. It didn't budge and started to strip the bolts used with the tool because of all the pressure.

I then decided to give up and bring the tranny to somebody who knows what they are doing--an authorized BMW dealer.

The next day they call me and tell me that they are having the exact same problem I had. It's destroying their tools too, from trying to get my output flange off.

I wish I never even touched the tranny. I expected this to be a simple job. Could I have caused such a problem with that impact wrench or is this thing just stuck from being on there for 44 or so years?

Anyway, it's now in the hands of a BMW dealer.

-Don- Reno, NV
 
Could I have caused such a problem with that impact wrench or is this thing just stuck from being on there for 44 or so years?

SOP is to apply the holding fixture before removing the nut, but I don't think removing it with an impact wrench did anything to it. The flange is fitted to a taper and sometimes the application(s) of a bit of dead-blow hammer, repeat dead-blow, to the end of the puller bolt will convince the flange to pop loose. Technique: torque the center puller bolt, give it a smack, torque it a little more, give it a smack... etc. Most olds cool mechanics (auto or bike) are aware of this trick.

While not the output flange, I did this with the drive shaft coupler bell (that mates with the final drive). The swing arm was out of the bike, and when the couple finally let go the drive shaft took off across the shop floor.

I think you meant Northwoods Airheads... yes?

Cycle Works also makes a flange removal tool. Their bolts appear to be hardened (guessing grade 8), and it's hard to imagine them stripping, before the flange does.

There have been a number of threads on the subject here, but since the website upgrade was done, they haven't synched up the archives with search results; any search of the subject yields results, but result in a "page not found".

Flange%20Puller.jpg


edit - p.s. my rear cover starts to weep occasionally... try torquing the 6mm nuts down that secure the rear cover. Worked for me.

8629171117_731db9c04a_z.jpg
 
Before you tighten the 4 puller bolts, put antiseize paste on the bolt threads (and under the bolt heads) so that you get maximum bolt tension without stripping the threads in the flange adapter. A sharp rap with a hammer onto the shaft after each tightening sequence as described above is helpful too.

Quick heat on the flange would help too as would anyway of chilling the shaft, but that may not be practical. Good luck!

No, the impact wrench didn't hurt anything.
 
SOP is to apply the holding fixture before removing the nut, but I don't think removing it with an impact wrench did anything to it. The flange is fitted to a taper and sometimes the application(s) of a bit of dead-blow hammer, repeat dead-blow, to the end of the puller bolt will convince the flange to pop loose. Technique: torque the center puller bolt, give it a smack, torque it a little more, give it a smack... etc. Most olds cool mechanics (auto or bike) are aware of this trick.
I think I kinda did do that. I was trying all types of stuff trying to get the flange to even budge--which makes me wonder if I only screwed it up more before I gave up. I hope it can all take a lot of force and misuse--as that is what I felt I was doing.
While not the output flange, I did this with the drive shaft coupler bell (that mates with the final drive). The swing arm was out of the bike, and when the couple finally let go the drive shaft took off across the shop floor.
I have heard of that type of stuff happening before. Anyway, after this experience, I don't think I wil ever even try to open up the tranny again. I will just take the tranny out and give it to somebody who knows what they are doing.
I think you meant Northwoods Airheads... yes?
Yes, I just then couldn't remember the name correctly.
Cycle Works also makes a flange removal tool. Their bolts appear to be hardened (guessing grade 8), and it's hard to imagine them stripping, before the flange does.
I would rather strip the bolts in the tool than the treads in the flange, so at the time, I was kinda glad that happened. My threads in the flange all still look good, which means the local BMW dealer can still have something to use.

BTW, the bike is at my South San Francisco home. The Tranny is in Mt. View @ Cal BMW.. I am in Reno. I hope to get the tranny fixed and be able to glue the bike back together and ride it here to Reno (my primary residence) and leave it here permanently with a NV military veteran's license plate with the letters "V11B". or if taken, "N11B" Those who have been in the army will know what it means (VietNam-infantry). They only allow 4 letters on a vet cycle plate here, but I can pick them.

I purchased this bike new in May of 1971 with money that was difficult to spend in the Central Highlands of Vietnam--and was sent home.

I figure I will be happy to have the bike running by spring time. But could be a lot sooner. I noticed I can buy these trannys for less that $500.00 in case my old one is hopeless.

I just remembered that my tranny has been opened once before by a BMW shop in SF in the early 80's. They installed a double roller bearing in place of the stock one that they say often breaks and leaves people stuck in one gear. They suggested this when the bike was in there for its first clutch job.

BTW, what year trannys will fit on my 71 R75/5? Will any of the five speeds fit? But I kinda hate to give up on the kick starter.

Thanks for all the info!


-Don- Reno, NV
 
Quick heat on the flange would help too as would anyway of chilling the shaft, but that may not be practical. Good luck!.
I have seen such stuff mentioned in service manuals before--and I have always wondered how this was done--which is never explained. So easy to say--but I wondered how easy it was to do. When they say heat something--will a heat gun usually get hot enough?

But how do they cool?

-Don- Reno, NV
 
I have seen such stuff mentioned in service manuals before--and I have always wondered how this was done--which is never explained. So easy to say--but I wondered how easy it was to do. When they say heat something--will a heat gun usually get hot enough?

But how do they cool?

-Don- Reno, NV

Definitely would have to be a real good heat gun to transmit heat fast enough so as NOT to heat up shaft as well. Not in this application. but we have used a Bernzomatic torch, on the 4 blade "propeller" and used dry ice on the shaft to help try to shrink it. Once done (heated and cooling) be ready to give the puller which is pushing on the shaft (have something over the end so as not to damage the threads, I usually put the original nut on but keep it loose) a quick "crack" with a good ball peen hammer. Then try tightening the puller some more, and crack again. Usually this "pops" off the pressed on item (in this case, the propeller).

Be careful using the heat - especially if you use a flame, because just behind that propeller is an oil seal - which may be a good idea to replace while you are in there!

I did mine recently, but I made my own puller/tightener in the shop. It worked quite effectively.

One word of WARNING - be SURE to be careful about that thin transmission flange that the rubber driveshaft boot hooks onto, On my bike, someone (previous owner?) had tried to use a screwdriver and wedge it between the flange and the propeller to try to keep it from rotating. Broke the flange. When I found the error (through a slight oil leak that bugged me!) I removed trans. re-machined the flange, welded it up, and machined it to nearly original specs, but a little stronger. Five thousand miles later, not a drop of leakage!

Good luck.
 
One word of WARNING - be SURE to be careful about that thin transmission flange that the rubber driveshaft boot hooks onto ...

And it's a good one indeed. It's happened to the transmission pic that I posted. That image, by the way, was from Brook Reams blog, I should have credited it before. Apologies Mr. R.

Any airhead 4 or 5 speed gearbox will fit the /5, and vice-versa. And any airhead final drive from 70-95 should be interchangeable as well. A handy thing to know if your FD, or tranny, needs work; you can find a used FD for a couple of hundred buck and swap it until your original unit is repaired. The ratio may be different, but you can live with that for a while.

Not all transmission will fit. Pre 9-80 dates are do not have the same input shafts as post 9-80 dates. Also clutch fly wheel Assy. Are different between build dates.

Don
 
Not all transmission will fit. Pre 9-80 dates are do not have the same input shafts as post 9-80 dates. Also clutch fly wheel Assy. Are different between build dates.

Don
Which year did they go to a 5 speed tranny? I assume it was before 1980. If so, would there be any real benefit of changing mine to a five speed tranny? And can a kick starter be added to these?

-Don- Reno, NV
 
Don -

5-speeds started with the '74 /6 models. The first year 5-speeds were somewhat anemic although people will say theirs has lasted a long time. It was the first year and there were some issues IMO so if you're looking for one, pick a later year. As for the kick start, that feature was also anemic and generally one should use it sparingly...for emergencies. Again people will say theirs is fine. But I don't think it would be good to find a non kicker 5-speeds and try and add it...it's really wasted money and requires much work and many parts. It might give you piece of mind, but it's just another thing that can go wrong with an otherwise solid transmission.
Then, in case I decide to put on another tranny--which years should I look for and which years should I avoid?

And, IYO, is it a worthwhile change to have five gears on the R75/5?

I almost never use the kick starter, but it had bailed me out a few times. From charging problems as well as bad batteries, that developed during a trip.

Once I used two six volt dry lantern batteries in series, (bike died on freeway) from a little store around 60 miles outside Phoenix, AZ With a kick start, I made it all the way to the BMW dealer in Phoenix to get a new stator. Was also good to not need to keep lights on--off which a switch. So I didn't have to disconnect them. So I do like kick starters--but calling for a tow truck with my Spot Messenger will work too.

-Don- Reno, NV
 
I think the issues are:

- '74 might want to pass on that year
- up through the '75 models, the neutral switch gets pushed in to make contact so I suspect there's only one wire going to the switch
- '76 - '80 models, the neutral switch is pushed out to make contact and there's two wires going to the switch...the second wire goes to ground. Thus, when the switch gets pushed out, the ground patch goes from the input wire, thru the switch, out the second wire to ground.

I'd think any of the '75 - '80 would be OK. The '75 model will have the type of neutral switch/wiring that your bike already has. Otherwise, it would be pretty easy to add the second wire.
 
Then, in case I decide to put on another tranny--which years should I look for and which years should I avoid?

And, IYO, is it a worthwhile change to have five gears on the R75/5?

I almost never use the kick starter, but it had bailed me out a few times. From charging problems as well as bad batteries, that developed during a trip.

Once I used two six volt dry lantern batteries in series, (bike died on freeway) from a little store around 60 miles outside Phoenix, AZ With a kick start, I made it all the way to the BMW dealer in Phoenix to get a new stator. Was also good to not need to keep lights on--off which a switch. So I didn't have to disconnect them. So I do like kick starters--but calling for a tow truck with my Spot Messenger will work too.

-Don- Reno, NV

While I loved the kick starter function on my /2 and my /6, I agree with above that it would be a waste to spend the extra bucks to get what you essentially don't need. There is always "bump" starting which is very easy in 2nd gear, and if you watch where you park, you can part upside of an incline and just "coast" it to start it!

Good idea about hooking up the two 6v batteries. Good to know for emergencies!

On my "headlight-always-on" /7, I wired in a switch (using "USA" circuit which was still there) so that I can turn off lights when I need to.
 
I think the issues are:

- '74 might want to pass on that year
- up through the '75 models, the neutral switch gets pushed in to make contact so I suspect there's only one wire going to the switch
- '76 - '80 models, the neutral switch is pushed out to make contact and there's two wires going to the switch...the second wire goes to ground. Thus, when the switch gets pushed out, the ground patch goes from the input wire, thru the switch, out the second wire to ground.

I'd think any of the '75 - '80 would be OK. The '75 model will have the type of neutral switch/wiring that your bike already has. Otherwise, it would be pretty easy to add the second wire.

I think all neutral switches have been 2 wires. They are on all 3 of mine. The oil pressure switch is a single wire.

Don
 
I think all neutral switches have been 2 wires. They are on all 3 of mine. The oil pressure switch is a single wire.

Don

Could be but what would be the purpose of the second wire on the early Airheads? Since the switch internally made the ground connection, I'm not sure what the other wire was for. Unless it was for a ground connection for another system? I'm sure they've always been 2 terminals...I'm still not seeing the purpose for the second wire on the early switches.
 
The '75 model year was a transition year in many respects. But the key thing is that the switch must be compatible with the cam inside the transmission to work correctly.
 
All the wiring diagrams I have looked at one wire goes to the main ground point and the other goes to the neutral light by way of the diode on the board in the head light bucket.

Don
 
Definitely would have to be a real good heat gun to transmit heat fast enough so as NOT to heat up shaft as well. Not in this application. but we have used a Bernzomatic torch, on the 4 blade "propeller" and used dry ice on the shaft to help try to shrink it. Once done (heated and cooling) be ready to give the puller which is pushing on the shaft (have something over the end so as not to damage the threads, I usually put the original nut on but keep it loose) a quick "crack" with a good ball peen hammer. Then try tightening the puller some more, and crack again. Usually this "pops" off the pressed on item (in this case, the propeller).

Be careful using the heat - especially if you use a flame, because just behind that propeller is an oil seal - which may be a good idea to replace while you are in there!

I did mine recently, but I made my own puller/tightener in the shop. It worked quite effectively.

One word of WARNING - be SURE to be careful about that thin transmission flange that the rubber driveshaft boot hooks onto, On my bike, someone (previous owner?) had tried to use a screwdriver and wedge it between the flange and the propeller to try to keep it from rotating. Broke the flange. When I found the error (through a slight oil leak that bugged me!) I removed trans. re-machined the flange, welded it up, and machined it to nearly original specs, but a little stronger. Five thousand miles later, not a drop of leakage!

Good luck.
These are really good ideas! Remember that you are trying to maximize the temperature gradient across those parts and that any gradient you can achieve will be gone in a few seconds. That's why a heat gun won't do much, a propane torch might do it, but the best heat input would be a quick shot (few seconds) of an acetylene torch while maximum tension is applied to the flange puller bolts. Dry ice on the shaft is also a good idea but might not be practical with the the puller you have.

The ultimate heat flux scheme is an electric arc welder but that wrecks one of the parts of course.

Another thing - The bolts that came with the puller must have been comparatively soft to have allowed the flange threads to survive. Replace those with a set of high strength metric bolts that have a long enough thread that you can first put on nuts & then tighten the nuts against the puller (use anti-seize) rather than make the tension bolt threads slide in the flange threads. This will help protect the flange threads. If you end up stripping something, it'll be cheap to replace the bolts again.

When this flange comes - it is going to be quite a bang!
 
All the wiring diagrams I have looked at one wire goes to the main ground point and the other goes to the neutral light by way of the diode on the board in the head light bucket.

Don

All these show just one wire to the switch...the ground is made by the switch internal to the transmission:

http://rna.ucsc.edu/albion/bmw/images/slash5_wire.jpg
http://www.powerboxer.de/images/stories/schalt_wart/schaltplaene/im_01_strich5_schaltplan_e.gif (switch is #13)

When you get to the two-wire setups, they would be like this for the late /6s:

http://www.powerboxer.de/images/sto...ltplaene/im_03_strich6_75-76_schaltplan_e.gif (switch is #20)
 
Back
Top