•  

    Welcome! You are currently logged out of the forum. Some forum content will be hidden from you if you remain logged out. If you want to view all content, please LOG IN!

    If you are not an MOA member, why not take the time to join the club, so you can enjoy posting on the forum, the BMW Owners News magazine, and all of the benefits of membership? If you click here, you have the opportunity to take us for a test ride at our expense. Enter the code 'FORUM25' in the activation code box to try the first year of the MOA on us!


Just joined...1994 K75S...Knowledge Needed Please.

I was following this perfectly illustrated & explained step-by-step. Then, when I went to squeeze the tabs together to release the pump from the shelf, they both broke off in my fingers. I guess plastic doesn't hold up well when immersed in gasoline for 30 years. :eek: 😭 :eek: 😭 :poop:
Looks like I'm buying a new tank.
 
Take another look at the exploded diagram on the previous page (or go to an on-line parts fiche, e.g. MaxBMW's fiche) - you might need the part shown as #4. I have broken the plastic tab before also. See some of the less costly alternatives for fuel pump replacement (links given in earlier posts).
 
Thanks, Rob - but with the tabs broken off (with the lower part of the tab still grabbing the shelf from beneath), I can't figure a way to remove the retaining ring and the pump. Seems they're irrevocably stuck!
 
Rob,

Before you make any decisions, check the bottom seams of the tank for corrosion (that will determine your decision whether to replace the tank or not). If one of the seams is bad, then the decision to replace the tank is a no brainer. The corrosion in the tank occurs at the deepest part of the tank where any water in the tank settles below the gas. This spot is just to the rear of the fuel pump well wall. You can see it through the filler opening. There is a similar spot on the right side of the tank, but no wall since the pump is not on that side. The corrosion is usually more prominent on th e left side due to the lean from the side stand.

The telltale sign will be at these spots on the OUTSIDE of the tank next to the seam. Look for bubbled paint and signs of seepage.


If the tank appears solid in these two spots and is cosmetically acceptable, the choice might be to continue to try and remove the pump. I would try further breaking the white plastic retainer until you can remove the pump. I wouldn’t worry too much about damaging anything OTHER THAN THE PUMP MOUNTING SHELF because the pump’s probably junk. All the pump and mounting parts can be replaced for under $150. I’ll send you the link if you get the pump out. I would work with a small screwdriver, knife or pick to attack what is left of the plastic tabs. Just break them completely away. Refer to the previous pictures to see what you are dealing with. It WILL come out!


:dance :dance :dance
 
Rob,

Before you make any decisions, check the bottom seams of the tank for corrosion (that will determine your decision whether to replace the tank or not). If one of the seams is bad, then the decision to replace the tank is a no brainer. The corrosion in the tank occurs at the deepest part of the tank where any water in the tank settles below the gas. This spot is just to the rear of the fuel pump well wall. You can see it through the filler opening. There is a similar spot on the right side of the tank, but no wall since the pump is not on that side. The corrosion is usually more prominent on th e left side due to the lean from the side stand.

The telltale sign will be at these spots on the OUTSIDE of the tank next to the seam. Look for bubbled paint and signs of seepage.


If the tank appears solid in these two spots and is cosmetically acceptable, the choice might be to continue to try and remove the pump. I would try further breaking the white plastic retainer until you can remove the pump. I wouldn’t worry too much about damaging anything OTHER THAN THE PUMP MOUNTING SHELF because the pump’s probably junk. All the pump and mounting parts can be replaced for under $150. I’ll send you the link if you get the pump out. I would work with a small screwdriver, knife or pick to attack what is left of the plastic tabs. Just break them completely away. Refer to the previous pictures to see what you are dealing with. It WILL come out!


:dance :dance :dance
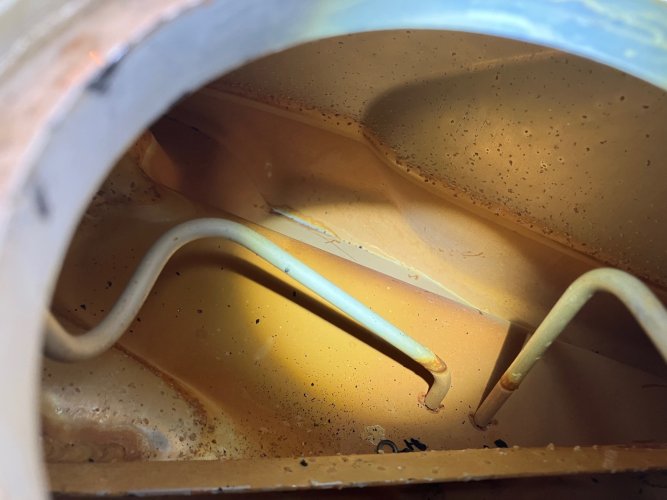
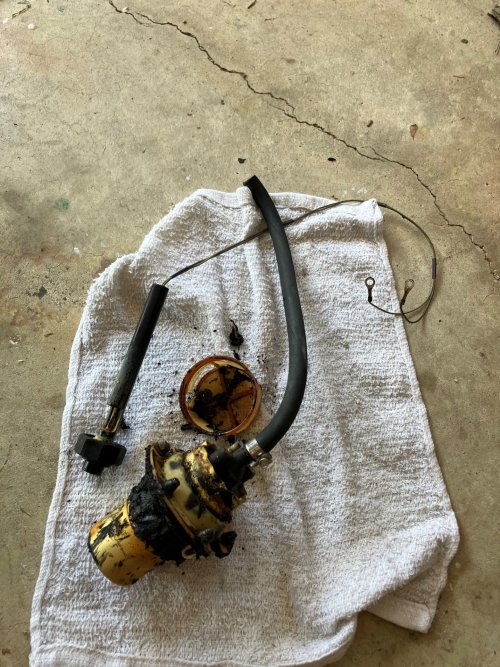
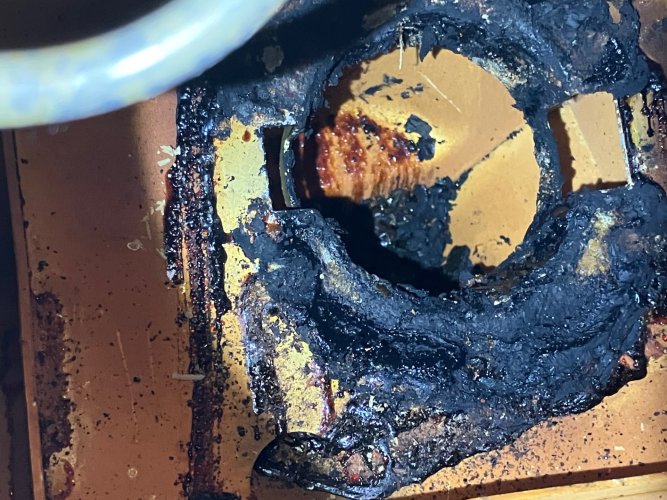
Lee! You gave me new life....and I got it out! Looks like something died inside the tank :oops: but I THINK there's little/no corrosion. And I scraped & scratched the near side of the shelf some, but no visible damage.
Any suggestions for how to clean out the crime scene and this thing ready to re-fill?

thumbnail_IMG_7276.jpg
thumbnail_IMG_7277.jpg
thumbnail_IMG_7280.jpg
thumbnail_IMG_7281.jpg
thumbnail_IMG_7273.jpg
 
Lee! You gave me new life....and I got it out! Looks like something died inside the tank :oops: but I THINK there's little/no corrosion. And I scraped & scratched the near side of the shelf some, but no visible damage.
Any suggestions for how to clean out the crime scene and this thing ready to re-fill?

I did one over a year ago where the rubber sleeve had turned completely to spooge. Started by donning nitrile gloves and hand-scraping and removing as much of the spooge as possible. After the bulk of it had been pulled out I used a non-flammable solvent (Goo Gone or similar) to soak what remained, then wiped it out with cotton rags. Last step was a washout with hot soapy water and a trip to the car wash to wash the interior with a spray wand. The tank came out clean and was put back into service with new internals.

Best,
DeVern
 
Rob,


While I have never personally had to clean out a tank that had a dissolved pump vibration damper, I have heard that white vinegar has worked for some people.

Your pump is the 52mm version. Here’s a great deal on the pump, damper, filter, and tank seal. AND they have a lifetime guarantee!: https://www.highflowfuel.com/fuel-pump-w-filter-tank-seal-oem-replacement-hfp-437-tf-qfs/?Vehicle Type=Street Motorcycle&Year=1985&Make=BMW&Model=K100

The in-tank flexihose they provide is too short. I would go to your local auto parts store and buy SUBMERSIBLE fuel injection rated hose for in tank useage.

The vent hose that connects to the inlet filter is available from BMW:
16 13 1 455 350​
HOSE - 1000MM (meter)​
0.09​
X​
$16.36
ADD TO CART
Part Thumbnail
Part Thumbnail
Petrol hose (meter), K75 - K1100LT. No braiding. This is a vent hose in most applications. This hose is designed for use inside the fuel tank in some applications. Resists breakdown and deterioration while being immersed in gasoline. Do not use anything other than this fuel hose type when replacing.​


:dance :dance :dance
 
Last edited:
Thanks, Lee....the filter I removed doesn't have that hose nozzle, so I assumed I'd replace the filter with the same type?

Also, another part I'm looking for....the plastic screw-in housing for the electrical leads that enter the tank from front left to power the pump. The housing is junked with corrosion....but I can't find it in the parts fiche for the life of me. Any ideas?
 
Prob'ly a crazy idea, but I'll toss it out there anyway...
Can you remove the plastic connector housing and clean it out? Rebuild it with JB Weld's gas tank goop? Maybe even replace the thru-pins? Or, clean up the pins so they'll take to soldering, and attach a short pigtail (with the proper sex connectors) to both sides...
 
Lee - the gas tank story has a happy ending. Looks like I salvaged what looked like a lost cause.

After scraping, soaking, scrubbing (and repeating the aforementioned 10x), it looks clean enough to eat off. Just maybe not to serve guests.

Thanks again for the support!
 

Attachments

  • IMG_7397.jpg
    IMG_7397.jpg
    627.9 KB · Views: 13
  • IMG_7398.jpg
    IMG_7398.jpg
    553.8 KB · Views: 13
  • IMG_7399.jpg
    IMG_7399.jpg
    682.1 KB · Views: 13
Lee - the gas tank story has a happy ending. Looks like I salvaged what looked like a lost cause.

After scraping, soaking, scrubbing (and repeating the aforementioned 10x), it looks clean enough to eat off. Just maybe not to serve guests.

Thanks again for the support!
Rob,

Looks great!! Good job.

Have you come up with a solution for the electrical connection yet?


:dance :dance :dance
 
Rob,

Looks great!! Good job.

Have you come up with a solution for the electrical connection yet?


:dance :dance :dance
I think maybe, just maybe, the electrical connector is salvaged too. Haven't tested the seal yet, but after much scraping of corrosion there too, it seems to screw on nice & tight.

Rob
 
Back
Top