• Welcome, Guest! We hope you enjoy the excellent technical knowledge, event information and discussions that the BMW MOA forum provides. Some forum content will be hidden from you if you remain logged out. If you want to view all content, please click the 'Log in' button above and enter your BMW MOA username and password.

    If you are not an MOA member, why not take the time to join the club, so you can enjoy posting on the forum, the BMW Owners News magazine, and all of the discounts and benefits the BMW MOA offers?

  • Beginning April 1st, and running through April 30th, there is a new 2024 BMW MOA Election discussion area within The Club section of the forum. Within this forum area is also a sticky post that provides the ground rules for participating in the Election forum area. Also, the candidates statements are provided. Please read before joining the conversation, because the rules are very specific to maintain civility.

    The Election forum is here: Election Forum

Rebuild novice takes on 1976 R75/6

Getting back to it

First off, thanks everyone for all the great advice and encouragement on this thread.

Its been a long time since I was in the garage. Very happy to be back. Family had encroached on my space so the first 2 hours were taken up by sorting, stacking and cleaning.

<img border="0" src="http://3.bp.blogspot.com/--ycA1Uu4f8I/TyIDSHBb0wI/AAAAAAAAARk/31XoU5-eJPs/s1600/IMG_1326.jpg" />

Got my space back now so feeling a lot happier.

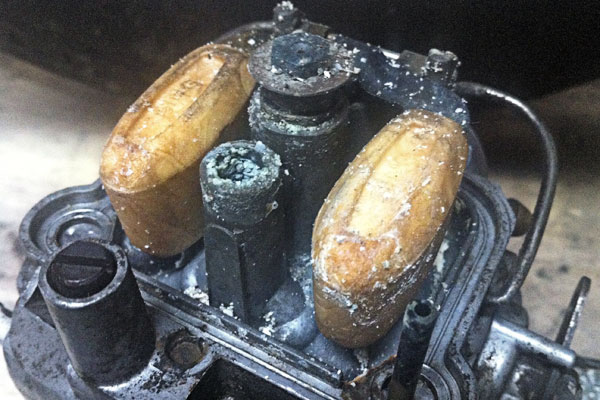
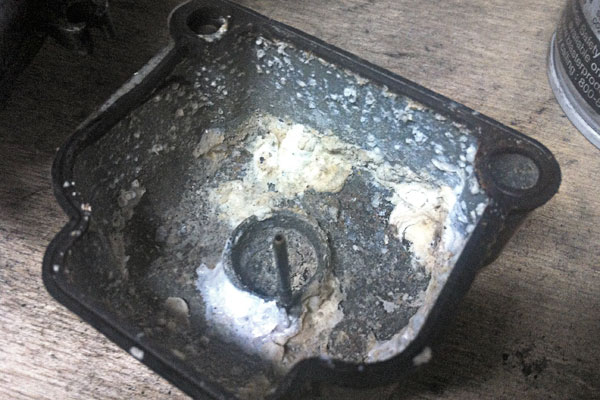
Before my hiatus I took the carbs out of the box and ran straight into a roadblock that derailed me :banghead. Every screw is locked solid. Whats more they appear to be made from butter, the slightest pressure and the head disintegrates!

<img border="0" src="http://4.bp.blogspot.com/-TP5Vm6MBnu8/TyIGEKNPgqI/AAAAAAAAARs/uFHHgvotWWk/s1600/IMG_1328.jpg" />

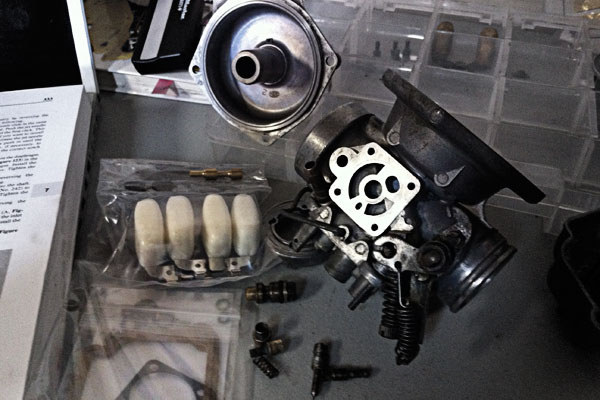
My first bike job was a 10 year old that needed fixing.. so no issues like this but I guess this is my "welcome to bike renovation :)". I tried PB Blaster, heat and wishing but I just cant get these screws to budge. I would not be surprised to find the PO used lock-tight or something, oh well.

I am not going to fall over at the first hurdle so I purchased a nice new drill, a torque driver, a table vice and because this is just looking bad from the start a drill-out-screw kit.
 
Ahhh.. Don't worry!

Those carb screws are the least of your problems! :thumb
 
If they're locktited, you'll need some heat to help release the connection. But you should be able to see if there's any sealant by looking at the exposed end of the screws.

Consider the following to get those screws out. Take a slotted screwdriver bit and use something like a small c-clamp to secure the bit into the screw slot...one side of the clamp on the underside of the carb top, the other side of the clamp on the end of the bit. Use something to protect the underside of the carb edge. Apply a little pressure to the clamp to keep the bit wedged into the slot. Then use an open end wrench to loosen the screwdriver bit. You'll need to slowly back off the c-clamp as the bit works out. But once you've broken the corrosion or sealant, you should be able to use a regular screwdriver on the screws. You can also use grinding paste on the screwdriver bit tip to help it bit into the screw slots.
 
Take a slotted screwdriver bit and use something like a small c-clamp to secure the bit into the screw slot...one side of the clamp on the underside of the carb top, the other side of the clamp on the end of the bit. Use something to protect the underside of the carb edge. Apply a little pressure to the clamp to keep the bit wedged into the slot. Then use an open end wrench to loosen the screwdriver bit. You'll need to slowly back off the c-clamp as the bit works out. But once you've broken the corrosion or sealant, you should be able to use a regular screwdriver on the screws. You can also use grinding paste on the screwdriver bit tip to help it bit into the screw slots.

Did not know that trick, will definitely give that a try, thanks!

Ahhh.. Don't worry!

Those carb screws are the least of your problems! :thumb

I appreciate the optimism :)
 
Be careful with heat

Assuming the carbs are off and in hand try flipping them upside down and squirting a little PB Blaster onto the underside of the screw holes which should be upright and visible now. Let it sit or speed up the process with a hair dryer or heat gun. While the carb is still a little warm try the valve grinding past on the sew driver tip thing. The trick here is to hold the carb body firmly without breaking or bending it. Two blocks of soft wood in a large vise with the carb openings buffered by the soft wood blocks and held in the jaws. ***Don't tap it or hit with a hammer*** or you will need a new carb body. Too much heat like with a tourch and without wrning you can have a meltdown, believe me I've tried it.
 
Ooh! Ooh! Ooh! You're gonna play too. Here's mine, first BMW, first restoration, first motorbike:

Link to: Idiot v. R75.

Best of luck!

Came across Mr. Melville's site and all I have to say is "Thank you" for sharing your restoration process. Just love the VW vans that are in the background and I have asked my wife that in my next life, gotta get one of these puppies to drive.

But seriously, I have done about 11 ground up restorations on British bikes and I am in the middle of doing a 1976 R75/6. Funny as it may sound, loving every minute of it.

The one thing that I have found (learned the hard way) is to do each area as a module meaning do one thing at a time. As example from Mr. Melville's picture's he takes one thing at a time, and works his way through it, then moves on to the next area that needs attention.
 
First hand experience with those carb screws

I found an impact driver was able to get those off!!!!:dance

Just the hand held impact driver you hit with a hammer.:thumb
 
Impact driver

I had the same problem. I found the impact driver at Nappa. It worked like a charm. Two smacks with a hammer and the screws backed out with no further damage to the already mangled ( from previous attempts at removal) screw heads.:dance
 
Check out rust removal process #E at this website:

http://www.motorcycleanchor.com/motorcycle/how_to/mc_tankrust.html

I used this process on my 1974 R75/6 restoration - been riding all summer with no problems. It's cheap, easy and works well enough.

Also - check out Dunlop tires @ $60.00 - they work great at half the price of Metzlers and others - I can't tell the difference in performance - and I've gone through many sets of Metzlers on my other bikes.

Having just restored this bike (resurrected from 30 years of storage by the ocean in Florida), I have found many inexpensive fixes. Contact me via e-mail if you have questions - pandry1@frontier.com

Hi Pandry, thanks for the link, my gas tank is a little dented from custom bar riser and does have some rust. Also for the tire advice
 
I found an impact driver was able to get those off!!!!:dance

Just the hand held impact driver you hit with a hammer.:thumb

another update.

With the first carb carefuly protected and snug in the vice I gave the impact driver a try.. very gingerly as I dident want to damage anything.
3 came out :dance for the 4th had to resort to drilling it out but sucsess! and thanks all got the advice on diferent ways to do this. Taking apart the rest of the carb every nut or screw put up a fight so I know I will be needing all the tequniques shared as this rebuild progresses.

I am sure you have seen worse but I was surprised at the amount of junk in the carbs.
IMG_1338.jpg

IMG_1339.jpg


I have a full rebuild kit so stripped it all down, sprayed it all with carb cleaner and put in some elbow grease. I now have cleane parts (mechanically but not cosmetically) and will get to rebuilding carb 1 next.
IMG_1424.jpg

I do wish I had a media blaster to hand. I am sure these would clean up real nice.
 
... double no. Well, yes, they would clean up real nice but never work again.

Soda blasting is generally considered safe for use on carburetors, no? If not, my Bings are toast.

You can make yourself a soda blaster on the cheap to clean carbs. Instructions here. Of course, "on the cheap" assumes you already have a very expensive air compressor.
 
If you have all the rubber & plastic pieces off the carbs, you can clean them by boiling them in water. You just want to make sure that it is only the metal parts and nothing else that can be hurt by the hot water.

This works well on old carbs. You just have to sneak a pot from the boss.
 
Sweet

Very cool project, I wish you all the best, never apologize for wanting to think outside the box and make the bike your own, I will follow you progress closely. I am undergoing a similar Cafe Project right now, if you have not seen it yet, the below link should take you to our antics!

http://forums.bmwmoa.org/showthread.php?p=754533

I wish you the best of luck,
Shane
 
Check out EUBMW.com for throttle cables and other items. Decent prices for the USA. Ebay also works for some stuff. I feel your pain$.

I don't envy your project, but I admire you for taking it on.:brow

Good fun.
 
Very cool project, I wish you all the best, never apologize for wanting to think outside the box and make the bike your own, I will follow you progress closely. I am undergoing a similar Cafe Project right now, if you have not seen it yet, the below link should take you to our antics!

http://forums.bmwmoa.org/showthread.php?p=754533

I wish you the best of luck,
Shane

Looks like you are having fun, I will follow with interest
 
I now have the carbs stripped down and cleaned. One carb was in a very bad way full of what looked like calcium buildup? Having cleaned it all out I discovered it has corroded right through so I now have a small hole in the float bowl to deal with somehow.

IMG_1622.jpg


The other carb was in reasonably good condition. ItÔÇÖs hard to believe they have been sitting for the same amount of time unused, the float bowls are slightly different and the one on the left is considerably lighter so I am now suspicious.. not that it really matters.

Next I want to get some electricity running through the old girls wires and see what if anything works. The key-ignition is missing so I need to rig up a simple on/off switch for now. I'll start poring over the electrical diagrams and dusting off the electronics 101 that is hidden somewhere in the back of my brain but if anyone knows how to hotwire one of these things without frying the system please share.
 
Stole an hour for the bike today, got my temporary ignition switch in place and was very relieved to see the break failure, Cen & Oil lights go on + tail light!. Horn and indicators don't work but thats small potatoes.
Also got the starter motor cranking and the rear wheel spinning under its power and the moving parts all sounded ok, no noticeable grinding noises.. so feeling much better about the viability of this project today :)
 
Back
Top