• Welcome, Guest! We hope you enjoy the excellent technical knowledge, event information and discussions that the BMW MOA forum provides. Some forum content will be hidden from you if you remain logged out. If you want to view all content, please click the 'Log in' button above and enter your BMW MOA username and password.

    If you are not an MOA member, why not take the time to join the club, so you can enjoy posting on the forum, the BMW Owners News magazine, and all of the discounts and benefits the BMW MOA offers?

  • Beginning April 1st, and running through April 30th, there is a new 2024 BMW MOA Election discussion area within The Club section of the forum. Within this forum area is also a sticky post that provides the ground rules for participating in the Election forum area. Also, the candidates statements are provided. Please read before joining the conversation, because the rules are very specific to maintain civility.

    The Election forum is here: Election Forum

Preparing Headlight Brackets for Clamping Top Bridges. Cutting

gtgt_bangbang

New member
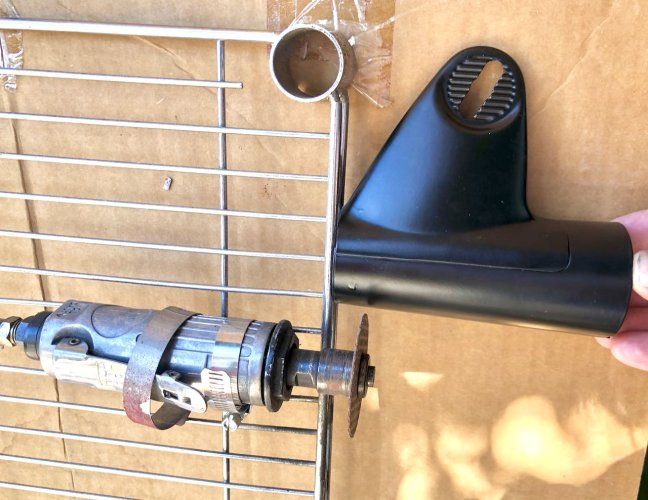
Cutting the bracket shorter ; I used a die grinder w/ abrasive cut-off wheel.
Band clamp the die grinder to s/thing (securely ! this is the cut off length, dont want it to move half way around !)
The blade should overhanging shelf edge by length you want to cut off Head Light bracket HLB

This wire shelf is ideal; easy to clamp grinder to, nice slippery & square shelf face to steady the HLB against while rotating at blade.
The 2nd band clamp loosely slips over/off the grinders trigger to run free hand.

Fire up the grinder, focussing on holding top edge of HLB squarely against the shelf edge & rotate HLB against blade.

I cut ~1/3 around the bracket, then "rotate workpiece backward" and start a 2nd cut , traveling in the direction toward 1st kerf.
Stop this 2nd cut just slightly BEFORE reaching the 1st cut, to leave a little bridge between the keeper workpiece & the cutoff ring
I did 4 cuts like this, 4 bridges.

Leaving short bridges between cuts makes it TON UP easier to hold the work piece square & at intended distance, to get the best cut.
IF you just work in a straight line around, the HLB will eventually collapse toward cut off ring, snag the disc, fling HLB like poo, and all bets are off for how pretty the results. The goal is cut off accuratly and no deformation of course

When Bracket will be about 90% sliced, then nick through the bridges to free the ring.

I left the HL bracket a few MM long, because there is a Slacker Way of trimming to length in next post

BMW R100S headlight bracket prep cutting - 1 (1).jpeg
 
Last edited:
Preparing Headlight Brackets for clamping-style Top Bridges. Trimming Level

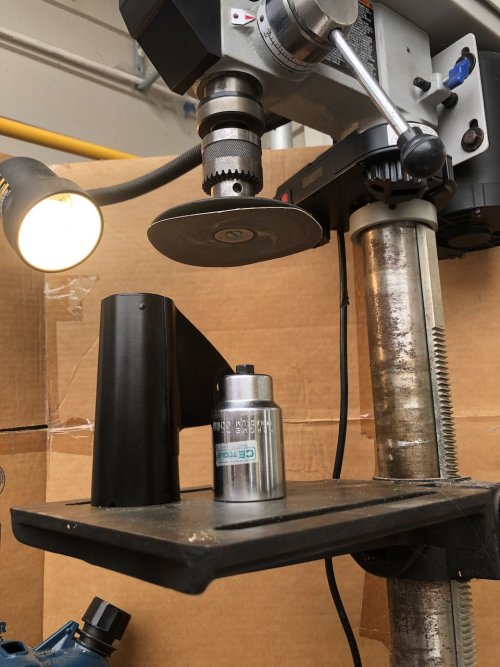
cautionary note - sanding the HLB , hand-held & trapped between the drill table and uneven/grabby sandpaper disc is risky!
Catch the front edge too hard , it WILL snatch the HLB from your grasp and WILL dick up the HLB edge and you WILL cuss GT out quite unfairly.
Use that pivot anchor or maybe a less grabbyy abrasive ( going to try a SiC cut off wheel the wrong way.. )


I am a Duke D'Remel & a Jack Di'Grinder , but NO freeking way can I free hand this HLB accurately.
Use the drill press and a sanding disc to make the bad metal go away.

Make sure the drill press table is square to the chuck, the HLB should have very square ends.
I chuck up a long drill bit & use a layout square to check table against bit in 2 directions.

Coarse junk sand paper worked pretty fast so stop & measure a lot.

The HLB is going to want to grab the sanding disc and get Flung Away, which will really Hulk Up the edges of the HLB.
Dont let this happen. If you decide to experiment with flying hulking HLBs, remeber to smooth out a lot of the damage by hammering back to round over some mandrel, a bigass socket, ect . Much less fun tinkering than the following;

Hold carefully, dont apply too much force while pressing, oh and bolt a massive socket to the table as a secure pivot point.
Lightly lower the sanding disc to HLB , while rotating HLB with firm grasp , to evenly grind away.

I try to locate / rotate the workpiece slight off-center of the sand paper axis , which makes everything go better like paper wear/destruction, grabbing, and uniformity.

Before you do the final sizing, I invite you to read the next post all about bushings.


BMW R100S headlight bracket prep level - 1.jpeg
 
Last edited:
Preparing Headlight Brackets for Clamping-style Top Bridges. Sleeve for grommet

Tack weld the HLB's cut-off ring section inside the shortened HLB, as an inner sleeve for grommet fitting. The End.

still here? hey man, you just cut off a cool little ring that is EXACTLY LIKE what the critical top of the HLB was formerly like.
It is the correct ID to hold the top grommet. The shortened HLB @ top ID is at best a sloppy 2nd fit , and grommet falls out.

It would be cool if this tapered ring just slipped up from bottom into the remaining HLB and made it all the way to the top , as a bushing,
but we are hardy types and want no such luck. It makes it PD close , so

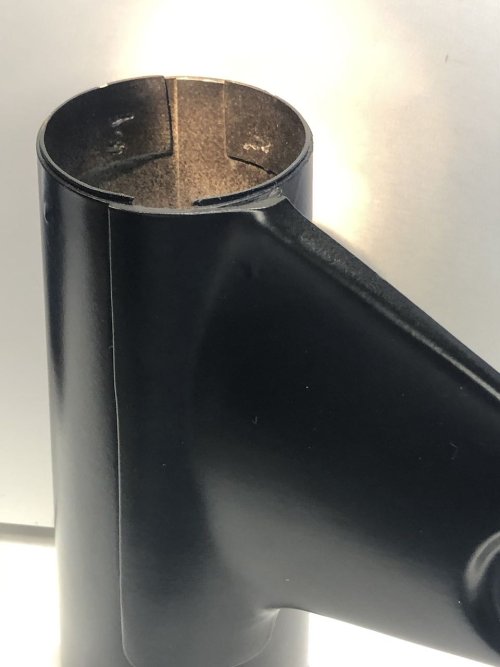
I removed a slice of the ring wall to collapse a bit, allowing it to insert up to the top edge of the HLB.

I drilled a number of small holes in the ring wall, and used my crappy HF mig to basically Plug Weld the ring inside the HLB.
I had to beat the ring back into round shape, rolling & hammering around a fat socket , after the drilling op deformed, due ot how awkward this all was. The ring wont show anyway, just needs to be as round as the grommet seat.

Joining these 2 pieces , with a show face, via a via , is easy for better welders than I but ;

Set tiny mig fairly low and very slow, get involved metal spotless & dry to minimize foamy welds, and clamp a copper chill plate behind the weld (on the showing surface of the HLB) to minimize deformation or burn through.
Each weld was over almost before it started. Dont dawdle.

The weldment is located inside the holes drilled thru the ring, but a plug weld has to start on the (colder part) HLB METAL SURFACE.
The moment the HLB starts to puddle, swing mig stinger over to ring, dwell a moment then stop PD quick. Feed only a small dot of new steel.
It was about a 3sec + 2 sec move by my watch.

Drill some extra holes that you DONT NEED to weld , in case you want to quit while ahead on a ugly attempt and move to an alternate spot. Errors will be largely hidden except for a burn through. Or just use epoxy to secure ring if you are less lazy yet impatient than me

Clamping is a pain- the ring & HLB metal need be in close proximity to join fast, plus need the chill plate in intimate contact to function;
but dont deform the HLB metal while clamping. share your good work. Dog fudged mine.

My hardest place to weld was where the HLB was overlapped layers (like at ear). maybe avoid those spots.


Layout your drilled holes in ring at location that would be less obvious / visible if you did burn through,
and practice on the least see-able locations first.

The width of metal slice removed from the ring will determine the final net ID of the bushing, sort of.
( a tiny slice leaves a lot of ring, thus a SMALLER effective ID. A wider slice puts less bushing in the HLB, for larger ID.)

Its close to correct with the gap shown in pix but takes some ID grinding , as the top grommet is tight as all shell.

I welded bushing flush with the top of the shortened HLB which was intentionally cut too long , to allow final trim.
Since trim / level is next, its not necessary to be precise with edge matching, etc.
Get the ring tips secure so they dont ruin the sand paper or hang the grommet.

BMW R100S headlight bracket prep sleeve - 1 (1).jpeg
 
Last edited:
When I did my 100S brackets

When I shortened my R 100S brackets for a billet triple tree I split the cut between top and bottom of the headlight bracket so it would be less noticeable and less of a headache getting the rubber spacers to fit.
 
When I shortened my R 100S brackets for a billet triple tree I split the cut between top and bottom of the headlight bracket so it would be less noticeable and less of a headache getting the rubber spacers to fit.

Yep,heard of that. I figured that would just make for TWO poorly fitted grommets, plus shift the headlight centering within the S fairing to a noticeable ( prolly only to me!) extent.

The slit ring trick is simple-is-better easy; probably should have just JB Welded it inside but I was having fun with MIG
 
Sigh. I cut mine down outside in the parking lot behind my apartment with a hacksaw. Working on the gate of my pickup.
 
Back
Top