gtgt_bangbang
New member
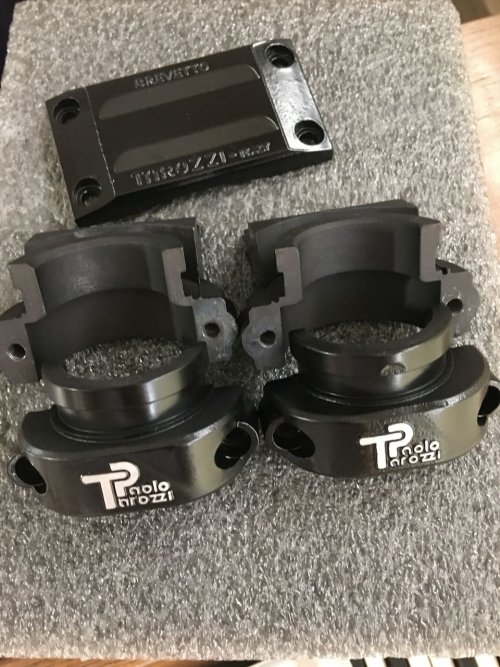
Pic.1 ; Paolo Tarozzi Fork Brace, a 5 component cast / machined aluminum assembly (Pic.1; two collars clamp around each fork slider + a bridge piece, all held together by 8 screws) , and a Mfg's name that is really fun to say with bogus Italian accent ...
I had previously aligned new fork tubes in a known flat lower yoke, clamping the tubes & yoke to a bit of a granite surface plate & checking layout with vernier calipers.
Everything was exceedingly well aligned before gently releasing the yoke clamps.
Results were great - it was a provable thing that the tubes were were dead flat / parallel & square to the yoke.
Even the tube ends were so co-planar ( same insertion length into yoke) , there was zero light under either end when assembly was set on-end on the surface stone.
I could put the top yoke ( clamping style) on the wrong end (lower end) of the tubes and it slooooowly slide down the entire tubes length with just gravity, like it was hydraulically controlled. Nice way to start off a good ride !
The sliders on the legs felt like buttah; took a couple lbs. pressure to get moving ( assembly oil only, no springs / no oil fill yet) , although there was a perceptible difference between the L & R sliders in force required to move (due to new rings & possible difference between surface prep inside the new tubes)
But no matter how I tried ( many times~ many ways) to torque the Brace screws, everything remained feelin good until the Brace was fully tightened down .
Then, slider motion was obviously & hugely hampered by the brace.
I had already trued up the Brace; flat-llapped the bridge bottom & square faced the bridge ends, squared the joints, relieved any corner interference, step-tightened screws in stages , ect, various snug-ups with axle & triple clamps holding alignment, ect, every assembly trick I could think.
The assembled forks continued to slide smoothly and easy as expected until final torque down of Brace assembly, then it was a heck of a work out to move it.
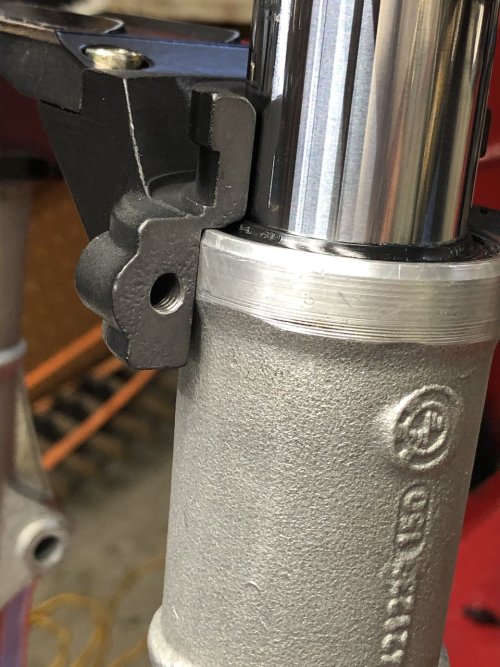
When installing the Brace, it seemed obvious to place the two collar's bores flat & fully on the machined fork slider tops (2nd pix) , since this resulted in the two "abutments" (the seats on the collars for the bridge plate ) checking out as parallel / co-planar to flatly seat the bridge.
When I took the Brace off again after many many snug-ups & slide tests & much worry & dismay, the bridge plate (previously flattened ) sive on the surface plate) was no longer flat; it was obviously re- tweeked. Clearly I had Hulked it. Of course its impossible to measure the fork tubes with the sliders and bellows installed ( nothing exposed to measure ! ) , but after disassembling most of the front suspension again, the fork tubes remained flat & parallel ( whew! I figured their alignment had been disturbed with all the force applied working the assembly ) .
Then I saw it and cant unsee it , like going down to the river first time & seeing sugar magnolia wading in a drop of dew.
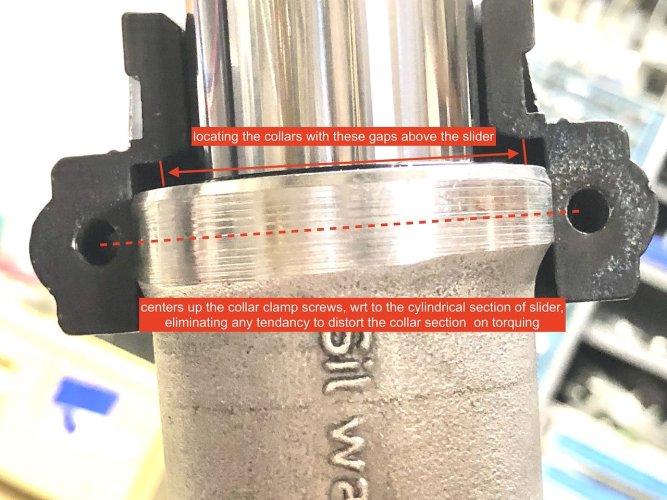
Next time assembled , the sliders worked great as a unit, felt like two sticks of buttah but definitely headed the same direction together.
Pop quiz time ! Opened notes is OK ... who sees the problem ?
I'll post my answer later its time to beat the trash man to the curb
I had previously aligned new fork tubes in a known flat lower yoke, clamping the tubes & yoke to a bit of a granite surface plate & checking layout with vernier calipers.
Everything was exceedingly well aligned before gently releasing the yoke clamps.
Results were great - it was a provable thing that the tubes were were dead flat / parallel & square to the yoke.
Even the tube ends were so co-planar ( same insertion length into yoke) , there was zero light under either end when assembly was set on-end on the surface stone.
I could put the top yoke ( clamping style) on the wrong end (lower end) of the tubes and it slooooowly slide down the entire tubes length with just gravity, like it was hydraulically controlled. Nice way to start off a good ride !
The sliders on the legs felt like buttah; took a couple lbs. pressure to get moving ( assembly oil only, no springs / no oil fill yet) , although there was a perceptible difference between the L & R sliders in force required to move (due to new rings & possible difference between surface prep inside the new tubes)
But no matter how I tried ( many times~ many ways) to torque the Brace screws, everything remained feelin good until the Brace was fully tightened down .
Then, slider motion was obviously & hugely hampered by the brace.
I had already trued up the Brace; flat-llapped the bridge bottom & square faced the bridge ends, squared the joints, relieved any corner interference, step-tightened screws in stages , ect, various snug-ups with axle & triple clamps holding alignment, ect, every assembly trick I could think.
The assembled forks continued to slide smoothly and easy as expected until final torque down of Brace assembly, then it was a heck of a work out to move it.
When installing the Brace, it seemed obvious to place the two collar's bores flat & fully on the machined fork slider tops (2nd pix) , since this resulted in the two "abutments" (the seats on the collars for the bridge plate ) checking out as parallel / co-planar to flatly seat the bridge.
When I took the Brace off again after many many snug-ups & slide tests & much worry & dismay, the bridge plate (previously flattened ) sive on the surface plate) was no longer flat; it was obviously re- tweeked. Clearly I had Hulked it. Of course its impossible to measure the fork tubes with the sliders and bellows installed ( nothing exposed to measure ! ) , but after disassembling most of the front suspension again, the fork tubes remained flat & parallel ( whew! I figured their alignment had been disturbed with all the force applied working the assembly ) .
Then I saw it and cant unsee it , like going down to the river first time & seeing sugar magnolia wading in a drop of dew.
Next time assembled , the sliders worked great as a unit, felt like two sticks of buttah but definitely headed the same direction together.
Pop quiz time ! Opened notes is OK ... who sees the problem ?
I'll post my answer later
Attachments
Last edited:


 , hard to create a precise angle & alignment)