gtgt_bangbang
New member
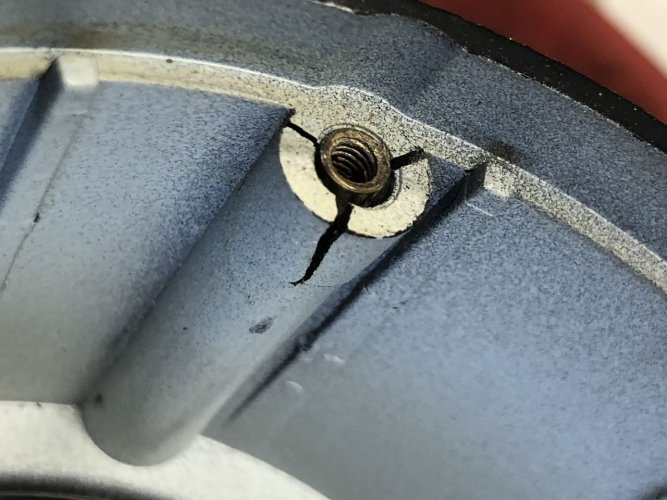
All the screw insert pillars for the teeny screws in the instrument shell were cracked.
Will SOMEbody please get that 3DPO (Dreaded Damn Dumb Previous Owner) a smaller screwdriver ?!?! use the putter damit
Im installing katdash so time to fix up this old house.
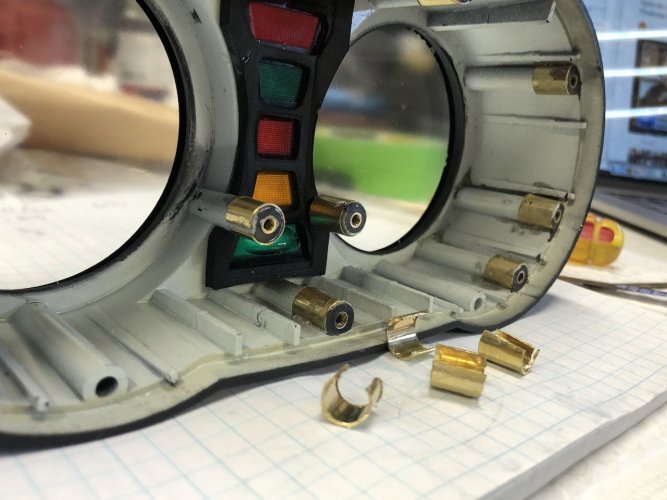
I sliced K&S brass tube into short rings to re-inforce the cracked pillars. The End.
Still here ? OK Cutting with a thin dremel abrasive disc. like butta it was.
I attach the dremel to a table & rotate the tube at the blade for better control. Easy does it is the rule for this thin wall soft stuff.
Find your own way to deburr, eyah it sucks but you got to do it to glue it. Flash & burrs will prevent tight interfaces, which boofs the gluing .
Tiny files. dremel nubbins. deburring was the first worst part of this repair.
DAP Rapidfuse (some new supersnotty superglue. GT approved for now) worked well between the brass & plastic.
A few whole rings can slide down on stand-alone pillar , but most need to be snapped horizontally onto it's pillar and so must be open / partial cylinders.
Guesstimate how much of each segment to slice from ring wall in order for it to fully snap home .
Then cut off a wee bit more, its deceptive. Test fit spares before the glue
As long as >1/2 of the original tube circumference remains, it should grip , but mine were cracked 360 so I wanted all the hug I could get.
The 11/32" brass tube is a snug fit over the free-standing pillars, so when snapping on a sliced cylinder, do it deft to preserve ID for a snug fit. UNLESS the edges bottom out.
Fun Game; Test your fingertip Dremel daringdo with these "open ring " tasks. I could count on one finger where I got nicked during this work. Every time.
It was far easier to slice the segment / strip out of a couple inches of tube FIRST (while tube is still long enough to hold easily) THEN lopp off individual short rings from length.
Its easier to deform a ring that way, but you have enough tube to lose a few to practice. I said soft. Like virgin, metal.
PS you can true up deformed rings w/ a little hammer & roll around a smooth bolt
I put a tiny dab of that DAP glue and snapped the collars on. Which went surprisingly well, once fit up & deburr were right.
After the collars are glued on, re-anchor the threaded bushes with water-thin / wicking superglue.
( 3 little warnings - super glue.
1) Careful to not overly dose this water thin glue and fill in the threaded bushing. Very. A tiny dot will fill the cracks once tightened by the ring repair.
2) Also superglue wicks fast & far on this particular plastic. - a regular drop placed on pillar top / bushing creeps inches away about the same time the vapors maced me.
Thats when the toothpick application came out. Skip the "use the hashed up bottle tip" method.
3) Since it would really suck to drip super glue on the clear lens ( get to look at it all the time ) , I had the bright idea to sloppily mask tape over the glass lens.
BUT big butt , the tape adhesive soaked up tiny amount of wicking glue and formed some helicopter-strength ugly flash here & there where it interfaced.
Maybe Ill do a future post on how carefully slice & dremel THAT UGLY SH!T off , but no. You could just use less glue and mask smarter.
The K&S 8134 Round Brass Tube: 11/32" OD x 0.014" wall was the juuust right, especially on the pillars requiring a sliced cylinder ( ie most of them)
I see too many words, i post some porn for you picture readers View attachment 88757

NExt post a few notes on instrument reassembly....
Will SOMEbody please get that 3DPO (Dreaded Damn Dumb Previous Owner) a smaller screwdriver ?!?! use the putter damit
Im installing katdash so time to fix up this old house.
I sliced K&S brass tube into short rings to re-inforce the cracked pillars. The End.
Still here ? OK Cutting with a thin dremel abrasive disc. like butta it was.
I attach the dremel to a table & rotate the tube at the blade for better control. Easy does it is the rule for this thin wall soft stuff.
Find your own way to deburr, eyah it sucks but you got to do it to glue it. Flash & burrs will prevent tight interfaces, which boofs the gluing .
Tiny files. dremel nubbins. deburring was the first worst part of this repair.
DAP Rapidfuse (some new supersnotty superglue. GT approved for now) worked well between the brass & plastic.
A few whole rings can slide down on stand-alone pillar , but most need to be snapped horizontally onto it's pillar and so must be open / partial cylinders.
Guesstimate how much of each segment to slice from ring wall in order for it to fully snap home .
Then cut off a wee bit more, its deceptive. Test fit spares before the glue
As long as >1/2 of the original tube circumference remains, it should grip , but mine were cracked 360 so I wanted all the hug I could get.
The 11/32" brass tube is a snug fit over the free-standing pillars, so when snapping on a sliced cylinder, do it deft to preserve ID for a snug fit. UNLESS the edges bottom out.
Fun Game; Test your fingertip Dremel daringdo with these "open ring " tasks. I could count on one finger where I got nicked during this work. Every time.
It was far easier to slice the segment / strip out of a couple inches of tube FIRST (while tube is still long enough to hold easily) THEN lopp off individual short rings from length.
Its easier to deform a ring that way, but you have enough tube to lose a few to practice. I said soft. Like virgin, metal.
PS you can true up deformed rings w/ a little hammer & roll around a smooth bolt
I put a tiny dab of that DAP glue and snapped the collars on. Which went surprisingly well, once fit up & deburr were right.
After the collars are glued on, re-anchor the threaded bushes with water-thin / wicking superglue.
( 3 little warnings - super glue.
1) Careful to not overly dose this water thin glue and fill in the threaded bushing. Very. A tiny dot will fill the cracks once tightened by the ring repair.
2) Also superglue wicks fast & far on this particular plastic. - a regular drop placed on pillar top / bushing creeps inches away about the same time the vapors maced me.
Thats when the toothpick application came out. Skip the "use the hashed up bottle tip" method.
3) Since it would really suck to drip super glue on the clear lens ( get to look at it all the time ) , I had the bright idea to sloppily mask tape over the glass lens.
BUT big butt , the tape adhesive soaked up tiny amount of wicking glue and formed some helicopter-strength ugly flash here & there where it interfaced.
Maybe Ill do a future post on how carefully slice & dremel THAT UGLY SH!T off , but no. You could just use less glue and mask smarter.
The K&S 8134 Round Brass Tube: 11/32" OD x 0.014" wall was the juuust right, especially on the pillars requiring a sliced cylinder ( ie most of them)
I see too many words, i post some porn for you picture readers View attachment 88757


NExt post a few notes on instrument reassembly....
