• Welcome, Guest! We hope you enjoy the excellent technical knowledge, event information and discussions that the BMW MOA forum provides. Some forum content will be hidden from you if you remain logged out. If you want to view all content, please click the 'Log in' button above and enter your BMW MOA username and password.

    If you are not an MOA member, why not take the time to join the club, so you can enjoy posting on the forum, the BMW Owners News magazine, and all of the discounts and benefits the BMW MOA offers?

European Headlight Switch Wiring

On my 1983 R100, I have a headlight switch on the left handle bar (it came to me that way). I was told that this is a European switch and that the PO probably fitted it to the bike.

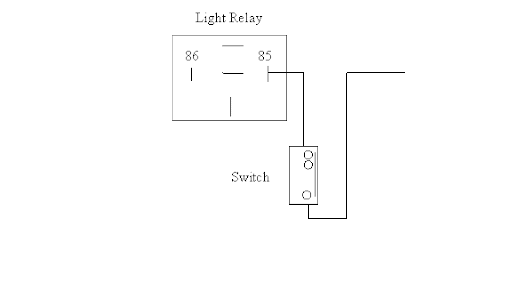
I am in the middle of my swap the Vetter Windjammer III for an RT fairing and am trying to find a wiring spec for this. Since its not stock (at least in the US), Clymer's doesn't mention it. It basically allows me to turn off all lights, just the headlight or leave them all illuminated. I'd like to retain it, but in what I thought was a careful unwiring of the ignition switch, the Vetter harness, an old CB radio, Fog lights and an AM/FM/Cassette Cycle Sound system, I can't quite figure out how this works. I have everything working, but something doesn't make sense--like where does this switch get power from and not interrupt the ignition?

I also hate smoke and fire on bikes...so, I really want to get to the bottom of this. If I have to, I'll take the switch apart but would prefer not to do that. I'd re-written a wiring diagram and am trying to piece together steps needed for anyone else considering an RT or RS fairing on a bike that was delivered naked. :brow

Does anyone have any idea about these switches or European wiring spec sources? The switch is yellow plastic, same color as the hi/low/flasher switch and the shape of the red kill switch on the right handlebar.
Any help would be greatly appreciated.
 
Last edited:
I believe the Haynes manual shows the European wiring in addition to the American wiring...I'll check...
 
Yes it does, though I am at work (no Haynes here!)

Take a look at the /6 wiring schemes, they had the identical switch: you could turn them off, turn on the park lights, or turn them all on. The variations also had to do with the ignition switch: Eurospecs call for a parking light, which comes on in position 2 iirc and allows you to withdraw the key with the park lights 'on".

Should not be too hard to figure out, with a vom you can see what goes off and on at the ignition switch, and then wire the headlights as you want them.

:)
 
Euro switch

AnnapolisAirhead:

There are lots of prior posts with detailed stuff regarding the hookups (some are mine). There are a couple of different ideas about how the connections go but I think you'll find that the Euro switch has two extra wires which you don't see on the schematics in the various repair manuals and the switch/wiring schematics are different from model to model and year to year. I used the two extra wires to service the eyebrow light on the RS/RT fairing. If you want, Private Message me and I'll tell you what I did.
 
It makes a lotta sense to be able to leave the headlight off while you start the bike...Of course, Federal law precludes this, but when my pal and I built the Harley which eventually became mine, we omitted the jumper wire on the ignition switch which came stock to enable the headlight to remain on all the time...even during engine start. I'm a BIG fan of headlight on during daylight hours, so I religiously turn it on...so what AA is saying about wiring in the European switch does make a lotta sense...The Haynes does have the UK wiring included on its diagram, so there ya have it!!!
 
With my "always on" headlight ('81 R100), the headlight is switched "off" while the engine is cranking: this is done through the start- and headlight-relays.

:D
 
My '78 is also "always-on" and the light goes out on start. I think they may have started that in '78 or maybe '77. Or maybe that was started when they went away from the "nail" as the key??
 
I have run some backroads and gravel roads in the day time at slow speed for an extended period of time where for all practical purposes I'm the only traffic on the road. It's a good option to be able to turn the head lite off and save the battery from a low charging alternater.
 
Give me the choice

I'm all in favor of daylight headlight use. That being said, I have installed headlight switches on both the RS and the KLR. If I could get one, (switch), for the Wing I'd do it too. I want the option of when that light comes on, plus the fact of the meager charging system on the RS & KLR. Believe it or not, as big as that Wing is, with 110 watts of lighting, more cars don't see it than either the RS or KLR. And I run the RS with the headlight off the majority of the time. Sorry I can't help you out with the wiring. I installed that switch some 26 years ago and the mind just isn't what it use to be.
 
It would be a VERY easy matter to install a switch for the headlight on ANY bike: simply cut the ground wire (that way it works for both high-and low-beam) and splice in a switch, with a two-wire "extension" to the place of your choice. It can be a rocker switch, a toggle switch, mounted anywhere convenient. On the headlight bucket would be the easiest, but it could be anywhere with the appropriate-sized wire.....

:)

Ive done that, but I was referring to OEM style switches, which the RS & KLR have.
 
The yellow wire is low beam, the white wire is high beam, and the brown wire is ground. Find those wires where they were connected to the harness for the Vetter Fairing and attach them to the H4 wiring for your RT fairing.
 
Ive done that, but I was referring to OEM style switches, which the RS & KLR have.


Slash 6 bikes have a headlight on-off switch on the left cluster, but they did not have the turn signal on the left.

I've sorta lost track of what the original question was, and what we are talking about, here......:buds


:)
 
Thanks for all the suggestions/remarks. I figured it out, but would still like to see a proper diagram.

I've got it now so that the eyebrow is my parking light. So with the key positions:

#1 Engine off, key removed, no lights
#2 Engine off, key removed, parking lights or no lights at all
#3 Engine on, lights can be off, parking only or all on

I start my bike with the headlight off and generally turn the headlight (only) off for the last 1/2 mile home during bright, sunny days. Seems to keep my battery topped off, because when I do that and plug in the trickle charger it indicates full charge, if not, it charges for a little bit. I suppose the safety purists would say what's the point, charge when you get home. Anyway, this will leave my eye brow light on.

On to the LED project, fork alignment and finally mounting of the RT fairing. I've wired 4 white LED lights, switched. One in the headlight bucket with a 4" slack lead, one in each of the RT fairing pockets and on zip tied along the backbone of the frame, then wound around the left rear downtube with a Velcro strap. I encased the LED lights inside of a hollowed out inline fuse holder. This way, I have light where I need it, including one to dangle just over one carb or the other.
 
The extra wires in the Euro switch enable that switch to turn on/off the park lights.

This wiring is pretty simple, as if it has a long straight plastic connector over the terminal, that wire connects to the headlight relay. If the connector is vinyl covered and the terminal is right angle, it connects to the circuit board on the back of the headlight bucket and colors on the board match the colors of the wires.

Once upon a time there was a short green wire from the circuit board to the headlight relay that provided the always-on headlight power. IIRC there's yet another pair of wires in the Euro switch to perform this function. The green spot on the circuit board is powered whenever ignition is on. The power wire now going to the headlight switch now serves as "flashing" power, too. When you turn the switch on, it also flows back to the relay.

Once this is all wired correctly, if you note that when you have headlight switched off and the headlight comes on during starter cranking, then the PO has failed to replace the later version headlight relay with the earlier version headlight relay, which is required for this conversion.

I have done this to 3 bikes. The short green wire referred to by lchris is removed. The extra gray wire coming from the bars goes to the gray area on the circuit board. For all wires from bar switch harness, right angle connectors go to board; straight ones go to relays. I did also replace headlight relay with pre78 version.

For outdoor events at night I find it courteous to just run parking lights in parking lots As well as in other situations.

As for the headlight shutoff relay function while cranking, this does not obviate the potential problem cold starting. Yes, while you are running the starter, the headlight (only) is shut off. But, mwhen it is cold, and your battery and oil are sluggish, between cranks you ar in fact depleting the battery via the headlight with the key on. The other lights do stay on. Being able to shut all lights off gives you maximum cold starting capability.
 
Thanks for all the suggestions/remarks. I figured it out, but would still like to see a proper diagram.

I've got it now so that the eyebrow is my parking light. So with the key positions:

#1 Engine off, key removed, no lights
#2 Engine off, key removed, parking lights or no lights at all
#3 Engine on, lights can be off, parking only or all on

I start my bike with the headlight off and generally turn the headlight (only) off for the last 1/2 mile home during bright, sunny days. Seems to keep my battery topped off, because when I do that and plug in the trickle charger it indicates full charge, if not, it charges for a little bit. I suppose the safety purists would say what's the point, charge when you get home. Anyway, this will leave my eye brow light on.

On to the LED project, fork alignment and finally mounting of the RT fairing. I've wired 4 white LED lights, switched. One in the headlight bucket with a 4" slack lead, one in each of the RT fairing pockets and on zip tied along the backbone of the frame, then wound around the left rear downtube with a Velcro strap. I encased the LED lights inside of a hollowed out inline fuse holder. This way, I have light where I need it, including one to dangle just over one carb or the other.


Here it is:

image001.gif
 
I know this is an old thread but has been helpful to me, I just added this euro switch and thought I would note the relay number I used to stop the headlight from coming on while starting. BMW relay 1 358 198
 
Back
Top