• Welcome, Guest! We hope you enjoy the excellent technical knowledge, event information and discussions that the BMW MOA forum provides. Some forum content will be hidden from you if you remain logged out. If you want to view all content, please click the 'Log in' button above and enter your BMW MOA username and password.

    If you are not an MOA member, why not take the time to join the club, so you can enjoy posting on the forum, the BMW Owners News magazine, and all of the discounts and benefits the BMW MOA offers?

  • Beginning April 1st, and running through April 30th, there is a new 2024 BMW MOA Election discussion area within The Club section of the forum. Within this forum area is also a sticky post that provides the ground rules for participating in the Election forum area. Also, the candidates statements are provided. Please read before joining the conversation, because the rules are very specific to maintain civility.

    The Election forum is here: Election Forum

2016 R1200RT Throttle tube sticky/notchy

natrab

New member
Anyone else noticed the throttle return being a little notchy? It's most noticeable when I've been at a constant throttle opening for a few seconds and go to roll on or off, it feels like there's something sticky in the throttle tube that resists a little and prevents it from being totally smooth. It functions fine and the return spring does its job, but it certainly doesn't feel good. I'm hoping there's a way to fix it without having to just get a new throttle tube (as it looks like they are around $350). Also, I bought the bike used, so I'm not sure if it came this way or if it is a problem it developed over time.
 
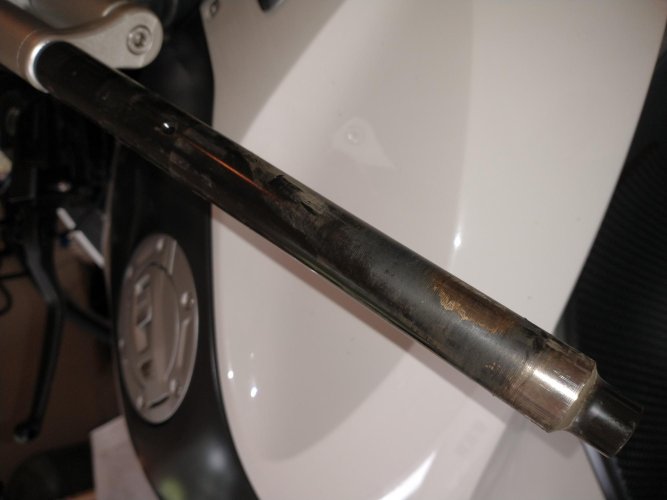
I noticed the same thing on my 2015 RT. Since it is a throttle by wire, like you, I decided there was a problem with the right handlebar throttle assembly. Using the shop manual, I removed the throttle assembly. I discovered that between the inside of the throttle tube and the outside metal handle bar, there was a significant amount of dirt and grime. I cleaned everything off and found in several places that the black paint on the handle bar had been removed. It looked as if someone had taken a Scotchbrite pad to the bar. Since everything was clean, I slipped the throttle back on the handlebar and it felt like it was brand new.

Since that was definitely the problem, I removed the throttle again, prepped the bare metal, and applied a couple light coats of black epoxy paint. After letting the paint cure for a couple of days, I put everything back together and haven't noticed any problems since.
 
Well that’s good to hear! Thanks for sharing. I’ll be working on it as soon as I can.


Sent from my iPhone using Tapatalk Pro
 
I noticed the same thing on my 2015 RT. Since it is a throttle by wire, like you, I decided there was a problem with the right handlebar throttle assembly. Using the shop manual, I removed the throttle assembly. I discovered that between the inside of the throttle tube and the outside metal handle bar, there was a significant amount of dirt and grime. I cleaned everything off and found in several places that the black paint on the handle bar had been removed. It looked as if someone had taken a Scotchbrite pad to the bar. Since everything was clean, I slipped the throttle back on the handlebar and it felt like it was brand new.

Since that was definitely the problem, I removed the throttle again, prepped the bare metal, and applied a couple light coats of black epoxy paint. After letting the paint cure for a couple of days, I put everything back together and haven't noticed any problems since.

Hi Seattle,

I have the same issue now w/ my '16 RT. I don't seem to have the right tool to take the first screw out of the switch assembly you have to open to get to the screw that holds the twist-grip on the bar. Do you know if that small recessed screw accessible from the underside of the switch housing is torx, or allen? How easy is it to get the thing off so you can clean it? Now that you've done it a couple times, start to finish how long did it take? Thanks!
 
Anyone else noticed the throttle return being a little notchy?

Yes. I asked the same question after I bought my 2017 RT. The throttle was smooth at first, and then became slightly sticky. One response I received suggested that the plastic throttle tube was being deformed by the pressure of the rider's weight on the grip, causing it to rub on the handlebar. Lacking any instructions for how to disassemble the throttle, I elected to try something else. I put "grip puppies" over the OEM grips. These have some stretch to them, and will help to keep the throttle tube round. Their greater diameter also provides more leverage (larger torque arm). I also made a conscious effort to wrest my wrist on the bar-end rather than the grip itself. I haven't noticed the sticky throttle behavior since I made these changes.

Since then, I bought a shop manual, and given the previous post by SeattleRTrider, I may take it apart and see what I discover.

Cap
 
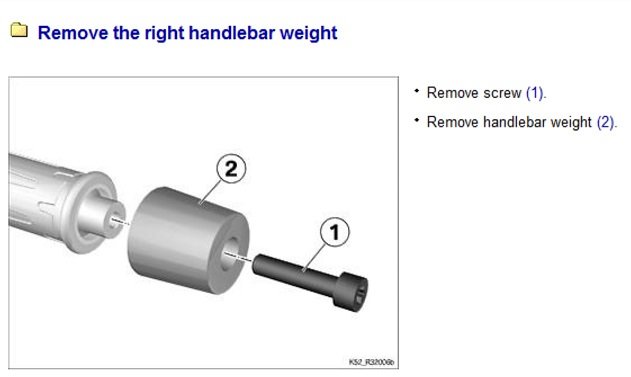
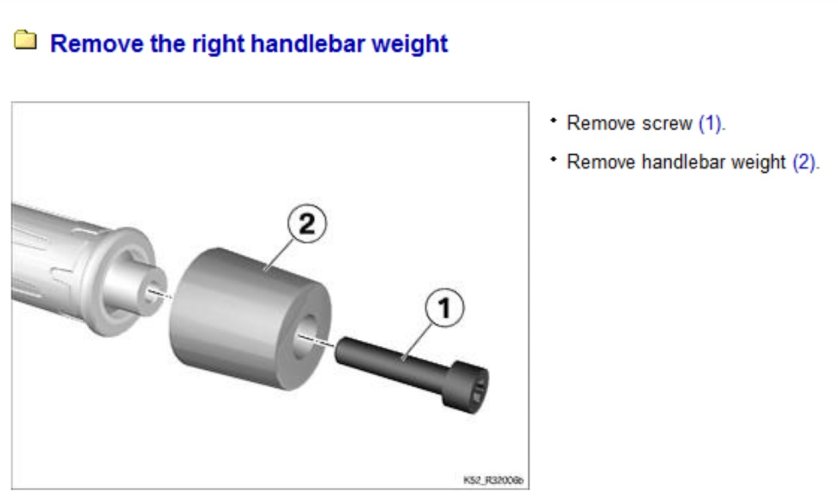
I didn't have a long #9 torx driver so could not start to take the twist throttle assembly off the bars to clean it. After removing the bar-end weight I thought I'd try WD-40 to the bar-tube interface on both sides of the grip and voila, all better now the sticky/notchy is gone and it feels smooth again. Might not last long w/ lube it now we'll see at some point I need to take it apart and clean it but this is a good stop gap measure and is quick to do.
 
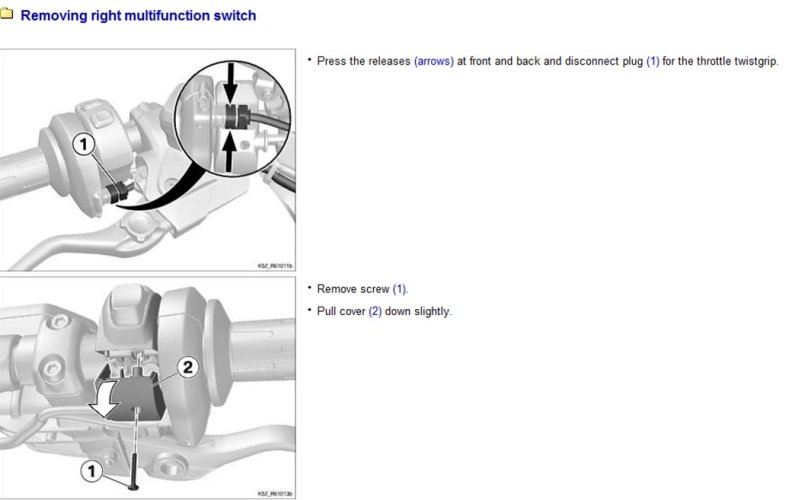
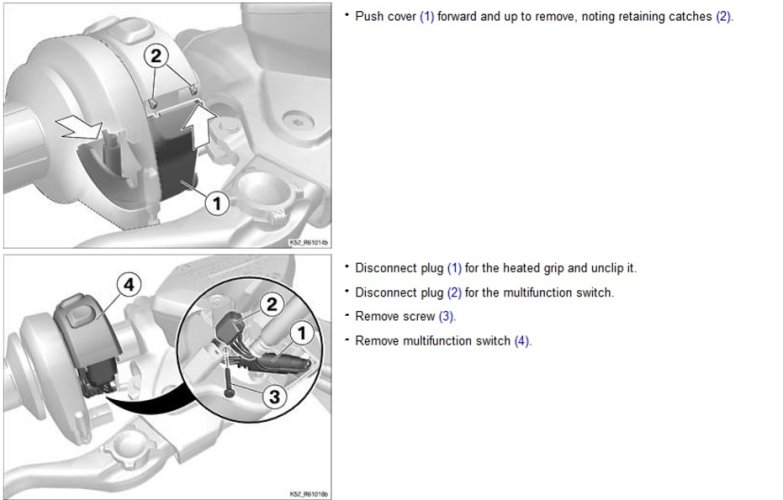
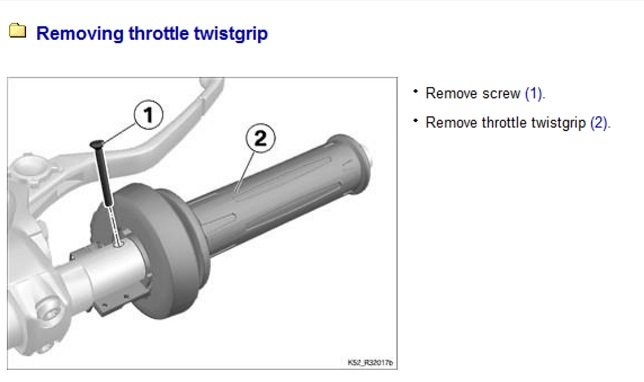
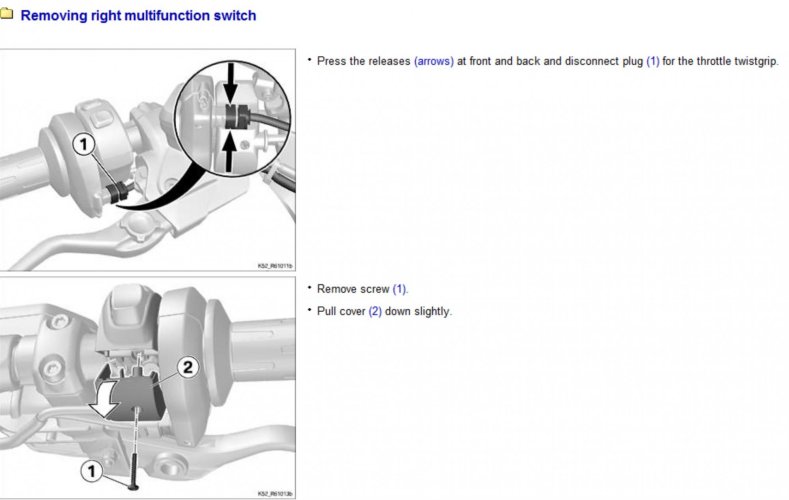
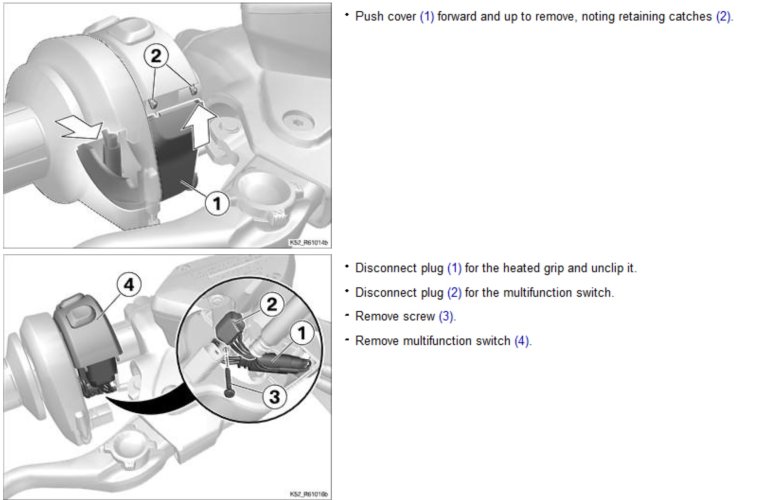
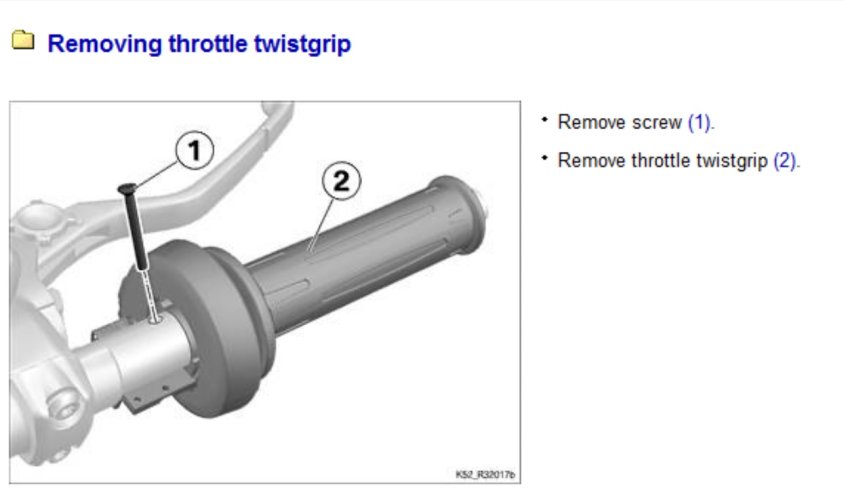
Some instructions

When all else fails, RTFM

Throttle0.jpg

Throttle1.jpg

Throttle2.jpg

Throttle3.jpg
 

Attachments

  • Throttle0.jpg
    Throttle0.jpg
    73.6 KB · Views: 366
  • Throttle1.jpg
    Throttle1.jpg
    116.6 KB · Views: 363
  • Throttle2.jpg
    Throttle2.jpg
    224.5 KB · Views: 364
  • Throttle3.jpg
    Throttle3.jpg
    87.3 KB · Views: 360
Sorry for the huge images above, I couldn't figure out how to delete the duplicates after I resized them.

I followed these instructions last night, and discovered that most of the friction in the system is created by sloppy plastic-to-plastic rubbing in the twistgrip housing itself. Yes, there was some dust on the handlebar and inside the throttle tube, but not very much. I do not believe the sticky throttle feeling is caused by rubbing between the tube and the handlebar. The throttle tube is retained in the twistgrip housing with some clearance to allow the tube to rotate. The twistgrip housing has a return spring that tends to pull the throttle tube out of axial alignment with the housing. The result is that there is uneven friction inside the housing as the tube rotates.

The twistgrip housing is held together with a tamper-proof screw (so, taking it apart is not an option). I used an aerosol electric contact cleaner to blast dust out of the housing. And then I very carefully placed tiny amounts of high-tech lube in a couple of places I could see where the plastic throttle tube was bearing on the plastic twistgrip housing. The result was an immediate improvement in the smoothness of throttle rotation.

As others have noted, you will need a narrow shank Torx bit to remove the screws in the throttle assembly. I used a T-8. The screw holding the twistgrip to the handlebar is larger, I think I used a T-20 on that. Otherwise, the process is pretty straight forward.

Cap
 
...and discovered that most of the friction in the system is created by sloppy plastic-to-plastic rubbing in the twistgrip housing itself.

As others have noted, you will need a narrow shank Torx bit to remove the screws in the throttle assembly. I used a T-8. The screw holding the twistgrip to the handlebar is larger, I think I used a T-20 on that. Otherwise, the process is pretty straight forward.

Cap

I concur with your conclusion that it's the plastic to plastic rubbing (at the proximal end of the twist grip) because it wasn't until I hit that area w/ WD-40 that immediate improvement happened. I was happy to discover what I had thought might have been a flat spot in the acceleration curve indeed had to do w/ the stickiness of the twist grip. That may not have been the best lubricant to use--what might be less interactive w/ plastics/rubber? Doesn't seem like taking this apart is required.

Hey neighbor, what's 287 like from FC to Laramie as far as pavement quality and wildlife is concerned?
 
I had this problem. Blasted some silicone lube into the gaps between throttle and bar and it was cured! No disassembly required.
 
I've had the plastic insert in the throttle give me a problem several times. Cleaning helps...butt...

Once coming into Bisbee, AZ the throttle simi-locked on our 2004 K1200RS. I did a insert removal in the parking lot. It went into the trunk and later the trash.

Leaving the hotel in Springerville, AZ on our 2008 K1200GT the sleeve bound up with the throttle maybe half open. I used the kill switch to cut the engine and coasted to the side of the road. I did the insert removal beside the road.

Note: If you have heated grips be very careful of the wires going through the handle bars; and I cut the sleeve off so I wouldn't have to remove the heated grip totally.

The only side effect I felt was a bit of looseness in the throttle close to the multi-switch. No real problem, didn't notice it after a ride or two.

My suggestion is, if it is sticking, to at least remove your throttle handle and check it out. It could get dangerous.
 
2015 rt

I can't call it sticky or "notchy" because for all intents and purposes I find the throttle to be smooooooth. My gripe is it feels heavy to me and any sustained amount of time in twisties can cause my 62 y/o wrist to be begging for straight aways and relief by way of the cruise control. Anyone else feel this? I don't think it is any sort if problem since the throttle dies operate open and closed very smoothly. Are lighter springs available or???? I also own an 84 Softail and an 02 Sportsters whose throttles do not wear me out like the Beemers does. I have to find a way to make it easier.
 
I can't call it sticky or "notchy" because for all intents and purposes I find the throttle to be smooooooth. My gripe is it feels heavy to me and any sustained amount of time in twisties can cause my 62 y/o wrist to be begging for straight aways and relief by way of the cruise control. Anyone else feel this? I don't think it is any sort if problem since the throttle dies operate open and closed very smoothly. Are lighter springs available or???? I also own an 84 Softail and an 02 Sportsters whose throttles do not wear me out like the Beemers does. I have to find a way to make it easier.

I think that if you replace the throttle cable(s) the issue will go away.
 
I think that if you replace the throttle cable(s) the issue will go away.


The 2015 RT is a Wethead, so it has an electric throttle, no cables.

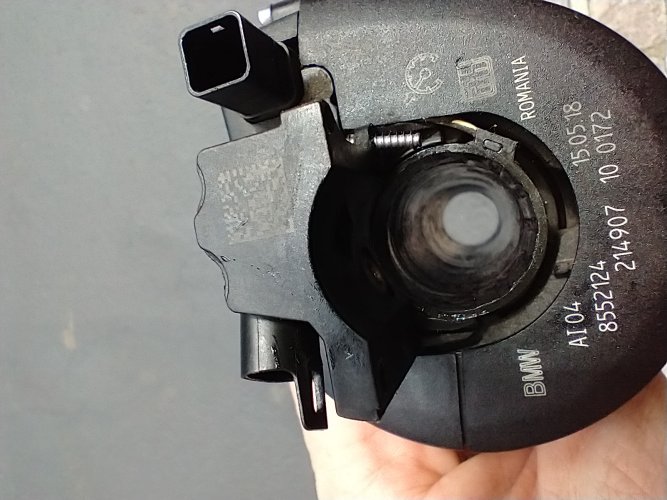
BMW does offer not any way to reduce the spring tension and I don't know of any one who has dared to take apart the $342 assembly. The manual warns against disassembly as it can cause loss of calibration.

A grip cover like Grip Puppies or Beemer Buddies would give you better leverage on the throttle and reduce the effort required.

Or ride more to build wrist strength. :thumb
 
Last edited:
...A grip cover ...Or ride more to build wrist strength.

+1

I had similar reactions to the return spring after my first long rides on the wethead RT. None of my prior bikes had cruise control. And I "discovered" that using the cruise control, if only for a minute at a time, would allow me to stretch my right hand, arm, and shoulder. So, I worked that routine in to my riding -- a thorough set of stretching for both sides, and also my neck, about once every hour. It really helps.

Cap
 
The 2015 RT is a Wethead, so it has an electric throttle, no cables.

BMW does offer not any way to reduce the spring tension and I don't know of any one who has dared to take apart the $342 assembly. The manual warns against disassembly as it can cause loss of calibration.

A grip cover like Grip Puppies or Beemer Buddies would give you better leverage on the throttle and reduce the effort required.

Or ride more to build wrist strength. :thumb

I have had the grip puppies for some time as I found the stock grips far.too skinny. Guess I just work on strengthening the wrist.
 
Sorry for the huge images above, I couldn't figure out how to delete the duplicates after I resized them.

...

Cap

Hey Cap - thanks bunch for posting those. I ended up on this thread after I started to notice the throttle on my 2016 RT being a bit "scratchy" or "sticky".
Using the pictures you posted it was pretty easy to remove the throttle grip. I agree with earlier poster - I think the issue is in the "plastic-to-plastic" part of the mechanism, not the plastic tube rotating around the painted metal handle. I used the end of a wooden gun-cleaning swab stick and some Sil-Glyde silicone based lubricant and applied strategically - huge difference. I did add a thin layer of moly-based lube on the handlebar where the throttle grip tube rotates, just in case, but the difference was noticed even before I did that, when I lubed the plastic moving against plastic bits.

May proactively do the same lube to my 2017 GS next time I change oil, mechanism is the same. Was pretty quick job.
 
Unlike some other riders, I find the throttle return spring to be slightly on the weak side. When hitting medium sized bumps I find this allows the throttle to be inadvertently turned thereby adding or reducing the monumental amount of power available from my RS. My other bike (not a BMW) which is also throttle-by-wire doesn't have this issue.

Silly question time....
Is there an easy way to replace the existing spring with a stronger one?
 
Sticky Throttle-Clean/Lube with Photos and Description

Hello: This thread helped me a lot, especially the Manual Diagrams from Cap. I was able to resolve the Sticky Throttle problem using the thread's information. I took Pix for my own reference and figured it might be helpful others with this problem to detail my experience with the remove and reinstall. It is not very complicated, but I have some experience as an Auto Tech and I took my time with it. I am NOT a BMW mechanic, just a home garage wrencher. Keep in mind you are working around some small wires/connectors for the Ride By Wire (RBW) and Heated Grip.

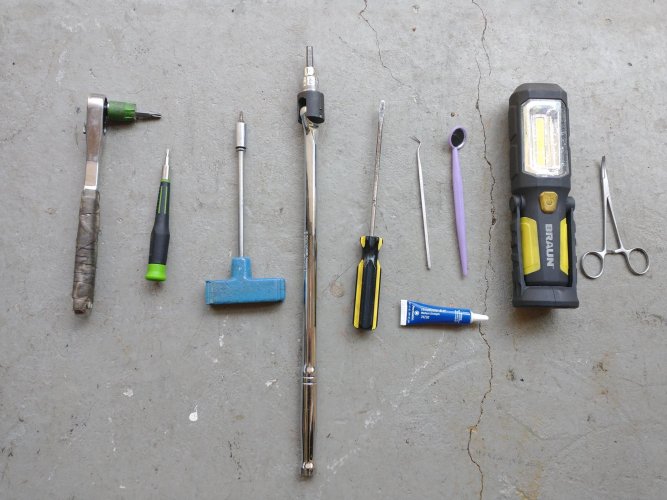
Tools:
Ratchet & T-30 for the Brake Lever/Master Cylinder mount
Breaker Bar & #6 Hex for Handlebar/Weight Removal (I installed HVMP Extra Heavy Bar ends so the BMW Standard may be a different size)
Narrow T-8 for Switchgear screws
1/4" T-15 for Throttle Tube Screw Removal
Dental Pick or Narrow Flat Head Screwdriver for removing the Heated Grip & RBW Throttle Control Connectors (The dental pick really helped)
Dental Mirror & Flashlight (Not absolutely necessary, but helpful in the beginning finding screw for the Upper Switchgear Housing and getting a look at how the underside & wiring in it was put together to avoid any wire damage)
Blue LocTite for Bar End Re-Install (Highly recommend. I lost a bar end somewhere on a ride on an older RT when I didn't use it)
Rags/Cloth to protect the paint

RT Throttle Tools.jpg

1) Undo the Brake Line/RBW/Heated Grip cable ties to give more slack

2) Hex Drive & Breaker Bar to remove Bar End (You could use a ratchet, but these take some oomph to get the bolt free)

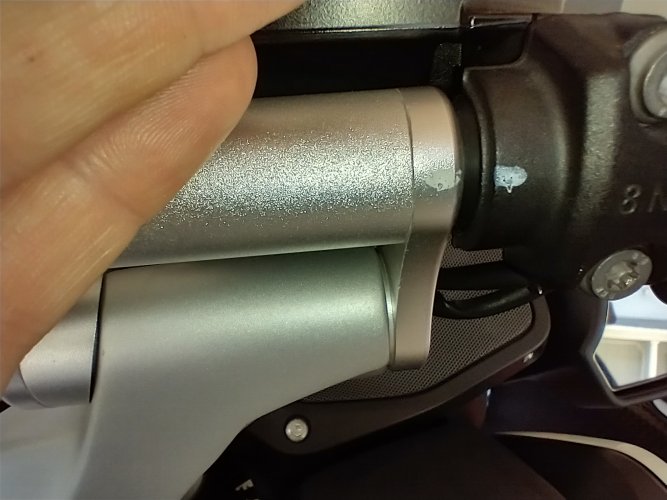
3) Mark the current position of the Brake Lever/MC Mount on Bar Mount for proper re-mount position. T-30 & ratchet to remove bolts. I put the Brake/Master Cylinder on some rags on the tank. There's plenty of slack.
RT Throttle-Mark Position.jpg

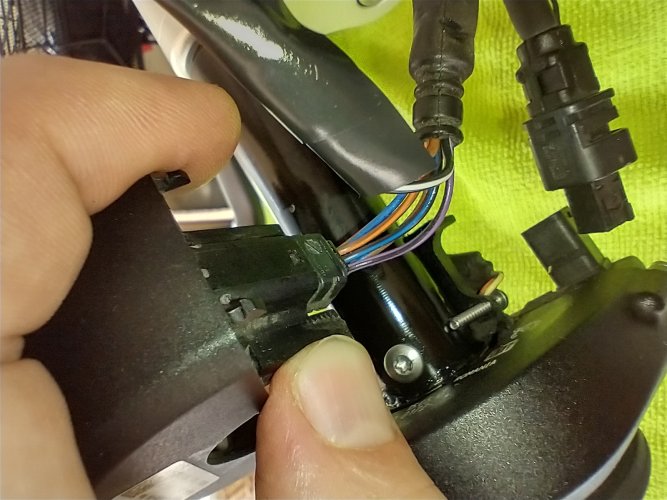
4) Remove RBW Throttle Connector using dental pick or finger squeeze and gentle pull & wiggle. (Delicate Wires!) Mine hadn't been removed for 5 Years so it took some patience.

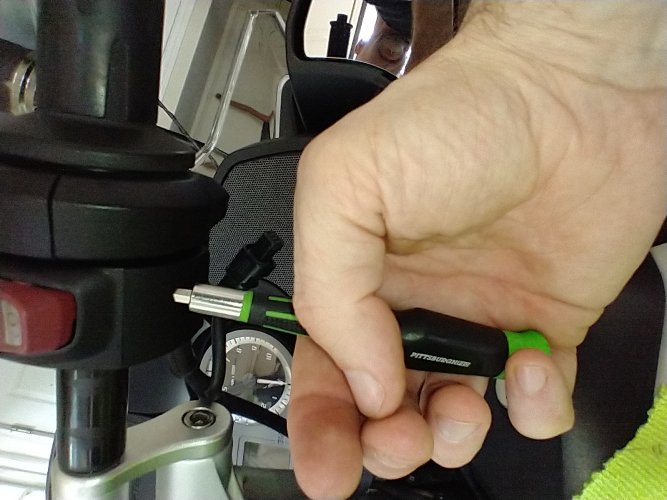
5) Use Narrow T-8 to loosen the front/bottom Switchgear housing screw. Take your time, don't want to strip this screw. It doesnt need to come all the way out and will stay in the bottom part of the housing if you go slow and find the point where it rocks loose. If it falls out you can start it back in the bottom before reinstalling to make lining the pieces up easier.
RT Lower Switchgear.jpg
6) Slowly rock it back and gently manipulate it around the stub of the RBW Thottle Connector to remove

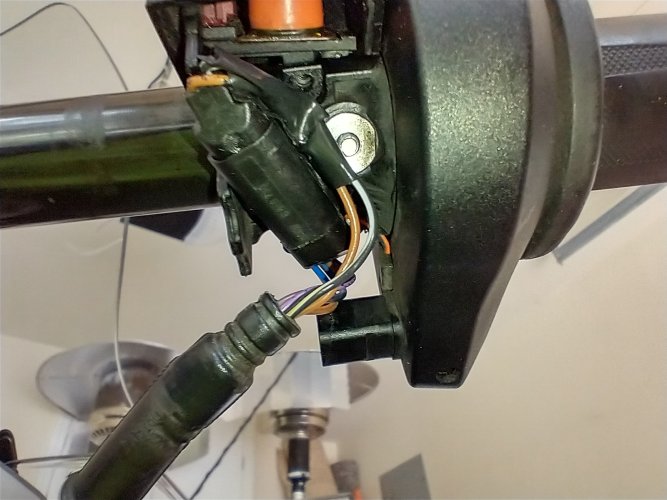
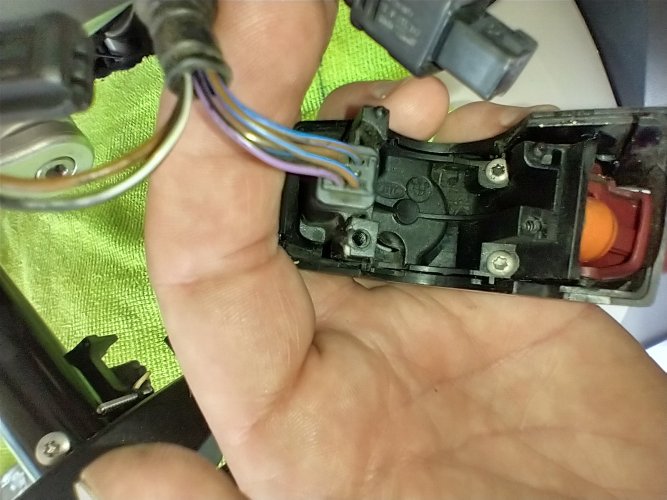
7) Disconnect Heated Grip wiring. There is tab on the top of the connector to lift up slightly. (The photo is of the bottom of the connector & dental pick was very helpful here) and gently wiggle the wiring harness Pin connector out. Again, been in there for 5 years so it was stubborn to get loose. I ended up using a Small grip clamp on the pin connector which was helpful. Delicate wires, so be patient and avoid tugging directly on the wires.
RT Heated Grip Connect.jpg

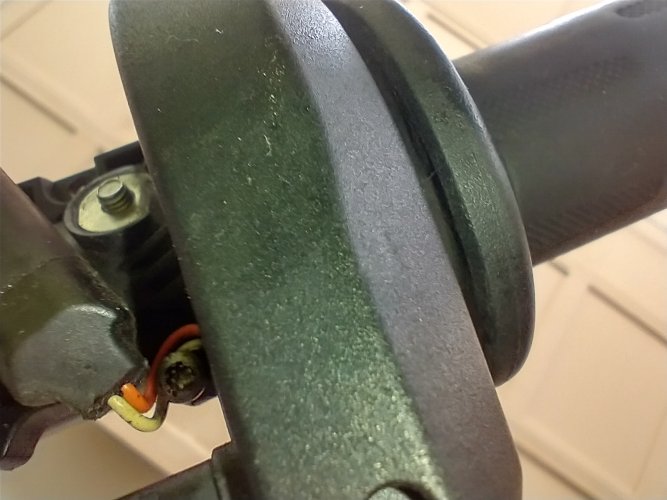
8) Head to the other side of the switchgear and find the other T8 Screw. This attaches the Top of the Switch Gear to the Throttle tube housing unit. Mine was hidden under the wires you see in the photo. The dental Mirror and pick were helpful in finding the screw and making space without damaging the wires. Now that you know where to look for the screw you, shouldn't really need the mirror. Make sure those wires are clear when you reinstall this screw so they don't get pinched/damaged. Like the other Switch Gear screw it will remain in the housing if you don't back it out all the way.
RT Top SG Screw.jpg

9)Remove the Top switchgear unit, plenty of slack to put it out of the way.

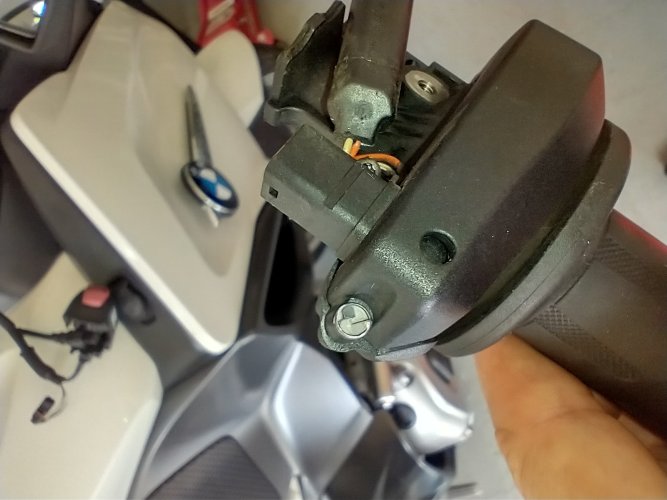
10) T-15 to remove the long Torx screw that attaches the Throttle Tube Assembly to the Handlebar and it slides right off. There's only one hole through the bar so it can only be installed in this position when you put it back together, so no alignment/placement issues.
RT Top SG Remove.jpg

11) As the others in the thread have mentioned you can see the collected dirt & gunk in the tube, worn paint on the bar. Per someone's recommendation I agree sanding smooth and a good epoxy re-paint would be the best way to address this long term. You can feel and see scratches/scoring on the bare areas of metal. The soft rubber interior of the tube itself was not roughed up or gouged. One thing of note is the spring and wiring for the RBW is not sealed from the elements. Something to consider if considering spraying a liquid lubricant into the sleeve without cleaning it first. Could blow dirt/debris/residue into that area. Everyone needs to make the choice that is going to be right for them.
Bar Scratches-Wear.jpgTube Interior-Dirty.jpg

12) I used some Carb Clean on a rag to clean everything up and finished the inside of the Tube with some Paper Towels drizzled with Alcohol. My Middle finger was long enough to get 1/2 way on each end. It took more scrubbing than I would have thought to get all of the gunk out of it. There was no actively flaking paint to remove and I chose to not strip it any further.

13) Lube: It is just throttle tube rubber on the metal bar so, I wanted to use something that would last longer than a liquid like spray silicone or WD40. The first try I used a pure Silicone Grease from my SCUBA Gear, then tried Dialectic Grease (Also silicone based so should have known there wouldn't be much difference). These were too viscous and really retarded the snap back on the throttle spring (surprisingly so) and while smooth, weren't fantastic with roll-on. I ended up going with a light coating of LUCAS Red & Tacky grease. It is high Temp tolerant for the heated grip element. I have used it on other rubber products without issue in the past and it doesn't fling around like lighter greases. I put a few extra dabs on the spots where the paint had worn off. Proper Snapback and nice smooth roll on with zero binding/creaking/hang up. Will report back on how effective it remains/issues long term. YMMV.
IMG_20230721_152642267.jpg

14) Reassembly is just reversing the process. I don't have Torque Values for the fasteners. Make sure not to strip out or over tighten as the screws are going into plastic and if one needs to do this particlular service/repair...that plastic has aged and probably spent more than a little time in the sun.

15)Other Notes: Since it was apart I decided to clean the top Switchgear Switches. Lots of dirt in there and my Start/Stop button had been a bit notchy. There are 2 T8 screws that hold it together. Remove and it easily comes apart. I used a toothpick to put tiny dabs of my Scuba Silicone Grease on the glide surface with a toothpick. I also used the toothpick to put some micro dabs on the little seals on the Heated Grip and RBW Throttle connectors to make any future removal easier.
IMG_20230721_142151772_HDR.jpg

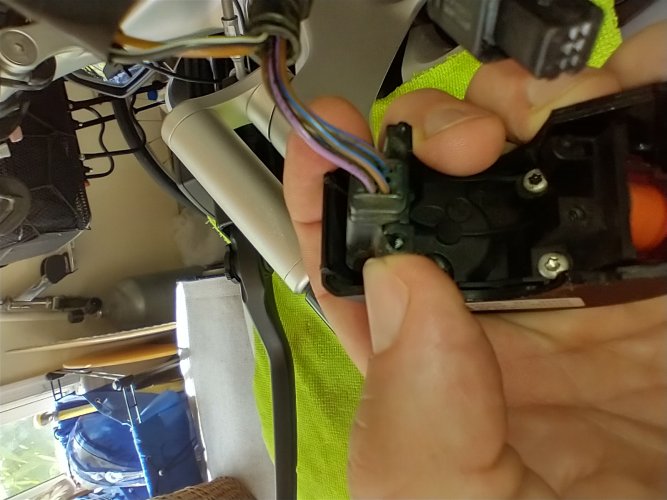
16) Top Switch Gear Re-Mounting note. In the photo my thumb is next to the hole you need to line up with the T8 screw on the bottom of Throttle Tube Assembly to get it properly seated/positioned on the bar. Take your time and get your face in there because it doesn't always seat itself properly. Its easy to see from the front side of the handlebar BUT, there is a little play from the screw in the housing and you DO NOT want to strip out the receiving threads of the plastic.
SG Top Reassmb.jpg

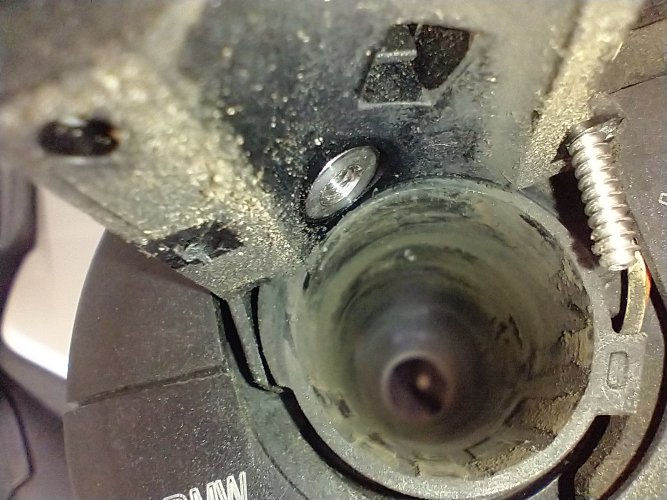
17) No Touchy Screw/Fastener. This is a fastener that one of the other posters mentioned might be used for Throttle Calibration. I Don't know, but given it is a special interface screw I didn't touch it as it doesn't need to be used for any of this. If anyone is bold enough to try let us all know what it does.
RT No Touchy Screw.jpg

18) Heated Grip Wires/Bottom Switch Gear Housing Re-Install Notes. There was a piece of cloth wrap around the upper portion of the heated grip wires when I took it apart, but it was falling apart so I replaced it with quality electrical tape. One of it's purposes might have been additional protection from the lower switchgear screw. Make sure the wires are tucked out of the way BEFORE attempting to re-install the lower switchgear. They were in the way after reconnecting the wiring harness and if I had just pushed the screw through/in it could have damaged the wires for the heated grip. You'll see the screw hole just below the orange button/above the electrical tape in the photo and you'll be tightening this blind. I used the flat head screwdriver to gently get them in the spot I wanted. Do be careful with the wires as I accidentally damaged one on my old F800 and it was really annoying to repair.
RT Heated Grip Connect.jpg

19)Take your time working the lower Switch Gear Housing around the RBW Throttle connector and make sure the little guide pins firmly click in. You'll know/hear/feel it when it happens, but be gentle. Those pins are small and not robust. If you feel you have to force it, stop and reposition it. Connect the RBW Wiring Harness last, it gets in the way reassembling.

20) Clean the receiving threads for the Bar End and the Bolt before putting on the Blue Loctite. There was a surprising amount of flaking/debris.

Hopefully this is Informative/Helpful to someone down the line. My Thanks again to the other posters that helped me fix this annoying problem.

Best to all!
 
Last edited:
Back
Top