Navigation
Install the app
How to install the app on iOS
Follow along with the video below to see how to install our site as a web app on your home screen.
Note: This feature may not be available in some browsers.
More options
-
Welcome, Guest! We hope you enjoy the excellent technical knowledge, event information and discussions that the BMW MOA forum provides. Some forum content will be hidden from you if you remain logged out. If you want to view all content, please click the 'Log in' button above and enter your BMW MOA username and password. If you are not an MOA member, why not take the time to join the club, so you can enjoy posting on the forum, the BMW Owners News magazine, and all of the discounts and benefits the BMW MOA offers?
-
Beginning April 1st, and running through April 30th, there is a new 2024 BMW MOA Election discussion area within The Club section of the forum. Within this forum area is also a sticky post that provides the ground rules for participating in the Election forum area. Also, the candidates statements are provided. Please read before joining the conversation, because the rules are very specific to maintain civility.
The Election forum is here: Election Forum
You are using an out of date browser. It may not display this or other websites correctly.
You should upgrade or use an alternative browser.
You should upgrade or use an alternative browser.
1971 R/75 starter button
- Thread starter bigvic54
- Start date
How is your battery? Have you monitored the battery voltage at the terminals when you hit the starter button? If the voltage drops dramatically, then the battery is the problem. If the voltage stays at nominal, say 12.5v or so, then it's something else.
That something could be the starter relay under the tank. The relay can develop corrosion on the terminals. Locate the relay, and unplug/replug a few times...that might help. The relay is a black plastic cube about 1" square on the left side of the frame backbone.
That something could be the starter relay under the tank. The relay can develop corrosion on the terminals. Locate the relay, and unplug/replug a few times...that might help. The relay is a black plastic cube about 1" square on the left side of the frame backbone.
How is your battery? Have you monitored the battery voltage at the terminals when you hit the starter button? If the voltage drops dramatically, then the battery is the problem. If the voltage stays at nominal, say 12.5v or so, then it's something else.
That something could be the starter relay under the tank. The relay can develop corrosion on the terminals. Locate the relay, and unplug/replug a few times...that might help. The relay is a black plastic cube about 1" square on the left side of the frame backbone.
The PO chopped most of the wires and I'm reassembling. The battery is new and the starter relay is new. I need to know how do you know if the switch make some kind of "click" when you push it.
Ouch...the PO disease! Well, the relay should make a noise when the starter button is pushed. The button puts 12v across one side of the relay which draws the contacts closed. Then those closed contacts allow higher amperage power to be directed to the starter. Can you tell what color wires are connected to the relay and to what numbered terminals they go to?
The PO chopped most of the wires and I'm reassembling. The battery is new and the starter relay is new. I need to know how do you know if the switch make some kind of "click" when you push it.
I don't need to know if the relay clicks, I need to know if the switch clicks. Is the switch operational?
stevenrankin
Active member
no
No click, no real on off just a momentary type push switch. St.
No click, no real on off just a momentary type push switch. St.
gregfeeler
Dances With Sheep
No click or other tactile feedback, just the push and hold, then release.
My description is that there's no click but noticeable movement as you depress the button. It has to move inward to press the contacts together.
Starter button
Hi
I have a 73 lwb. Starter button will not make contact most times when I try to start bike. BTW no click or noticeable contact on button. I push button and nothing happens most or at least half the time. What I do is push button hard and hold it with one hand and slowly rotate it with my other hand and Bike ROARS to life haha. So give that a try. Push hard and grind/wiggle the switch. Good thing about old technology is bike has a kick start and I have a hill close by, although I haven't had to use them yet. I did order a new switch a few years ago, Its on my bench waiting to be installed. The experts could tell me how and why the switch is broken but I'm just going to replace it. I have heard stories of owners trying to repair the switch with poor results. I figure after 50 years its time to replace it. Good luck, I hope this helps, and keep us posted.
Brian
pglaves
#13338
Hi
I have a 73 lwb. Starter button will not make contact most times when I try to start bike. BTW no click or noticeable contact on button. I push button and nothing happens most or at least half the time. What I do is push button hard and hold it with one hand and slowly rotate it with my other hand and Bike ROARS to life haha. So give that a try. Push hard and grind/wiggle the switch. Good thing about old technology is bike has a kick start and I have a hill close by, although I haven't had to use them yet. I did order a new switch a few years ago, Its on my bench waiting to be installed. The experts could tell me how and why the switch is broken but I'm just going to replace it. I have heard stories of owners trying to repair the switch with poor results. I figure after 50 years its time to replace it. Good luck, I hope this helps, and keep us posted.
Brian
The pushing hard and rotating the switch probably scuffs some crud off the contacts temporarily. Maybe - just maybe - some electrical contact cleaner might revive the switch.
stevenrankin
Active member
Contact Cleaner
I always try contact cleaner first on switches and stuff, it is a lot less expensive and frustrating than tearing something apart or replacing it. That is if it works, and over the years I am at a 60/40 ratio of works versus not. St.
I always try contact cleaner first on switches and stuff, it is a lot less expensive and frustrating than tearing something apart or replacing it. That is if it works, and over the years I am at a 60/40 ratio of works versus not. St.
beemerguru
Member
The PO chopped most of the wires and I'm reassembling. The battery is new and the starter relay is new. I need to know how do you know if the switch make some kind of "click" when you push it.
Ouch...if you have big wads of electrical tape holding wires together..time to consider a new main harness. That will save you a ton of grief later, and it's not that hard if you take your time.
If you do go for new, I cut the old harness out BUT leave a couple of inches of the old harness still attached to whatever so I can just go wire to wire by matching up the colors Old wire off, new one replace..one at a time.
Wait till you get a bike in with electrical issues and you find a half dozen wire nuts in the headlight bucket..you start feeling bad for the bike.
And yes, no click when you push the starter button, usually the battery if not a loose ground.
stevenrankin
Active member
Harnesses
Sadly from BMW pretty much all harnesses are now no longer available. EME is selling replacement after market harnesses made in Germany and have a good selection. Problem there is the guy making them is I understand a one man shop and sometimes there are issues with back orders.
I purchased all new harnesses for my 84 RT a couple of years back and they are well made and almost exact copies of the BMW stuff. Minor issues are too small to be mentioned.
Yeah replacing harnesses is sometimes a whole lot better than patching damaged ones. My local shop owner has purchased rolls of proper gauge wire and in BMW color stripes or solid color so he can make repairs and stick to the original plan. plugs and stuff are available online at electrical or electronic supply houses. LOL, the problem is digging through the catalogs online to find exactly what you need.
LOL, I have seen my friend repair some real messes caused by previous owners who were hacks at wiring. The worst job was a side car rig. It had everything from the factory wiring to three wire household wire in the mix to work lights and stuff. It kind of looked like a washing machine exploded.
Good luck on the repairs. St
My first Airhead is a 1971 R/75. When I press the starter button I get no movement in the switch. Should there be some discernable "click"? Should there be some movement
I have cleaned the unit with electronic cleaner and it didn't do anything.
The switch should push in a little when pressed with no sound. I had a similar problem and disassembled the switch. There are a half dozen or so wires soldered to the contacts and they were all corroded and cruddy almost to the point of not being connected. I cleaned the contacts and resoldered the wires; it's a fussy job but not too tough. That solved the problem and after 50 years of use its wasn't really a big deal. One caution, when you disassemble the switch there is a little e-clip holding the button in place and when you remove it there is a small, stiff coil spring which flies off the switch shaft like a rocket if you don't keep your finger on it. I spent 2 hours on my hands and knees with a flashlight looking for it and found it on the floor under and behind a work bench 20 feet away. The air was blue for a good 1/2 hour.
pglaves
#13338
The switch should push in a little when pressed with no sound. I had a similar problem and disassembled the switch. There are a half dozen or so wires soldered to the contacts and they were all corroded and cruddy almost to the point of not being connected. I cleaned the contacts and resoldered the wires; it's a fussy job but not too tough. That solved the problem and after 50 years of use its wasn't really a big deal. One caution, when you disassemble the switch there is a little e-clip holding the button in place and when you remove it there is a small, stiff coil spring which flies off the switch shaft like a rocket if you don't keep your finger on it. I spent 2 hours on my hands and knees with a flashlight looking for it and found it on the floor under and behind a work bench 20 feet away. The air was blue for a good 1/2 hour.
I do this kind of disassembly inside a transparent plastic bag.
gregfeeler
Dances With Sheep
The switch should push in a little when pressed with no sound. I had a similar problem and disassembled the switch. There are a half dozen or so wires soldered to the contacts and they were all corroded and cruddy almost to the point of not being connected. I cleaned the contacts and resoldered the wires; it's a fussy job but not too tough. That solved the problem and after 50 years of use its wasn't really a big deal. One caution, when you disassemble the switch there is a little e-clip holding the button in place and when you remove it there is a small, stiff coil spring which flies off the switch shaft like a rocket if you don't keep your finger on it. I spent 2 hours on my hands and knees with a flashlight looking for it and found it on the floor under and behind a work bench 20 feet away. The air was blue for a good 1/2 hour.
This is all correct in my experience. However, just to add to your options, there are new reproduction switches available, and I've heard they are of very acceptable quality.
beemerguru
Member
Don't have that switch in front of me but I THINK that side has an internal tab that goes to ground? The little top screw makes contact when screwed in so when you push the button, it completes the circuit.
Try taking the top and bottom screws out and pushing the harness into the switch holder and forcing the button out a little. Then you can see the wire connections and the little brass tab on top...clean all and reinstall.
Sorry if I'm remembering the wrong switch.
Try taking the top and bottom screws out and pushing the harness into the switch holder and forcing the button out a little. Then you can see the wire connections and the little brass tab on top...clean all and reinstall.
Sorry if I'm remembering the wrong switch.
olironrider
Member
I happened to stumble upon this thread by bigvic54 !
I recalled the several occasions while I was restoring a couple Slash 5s and did the “deep dive” into them, their perches and levers. The 1970, 1971 thumb buttons had screw & eye connections on the back of the switch; maybe when the Short Wheel Base Slash 5s got stretched to Long Wheel Base, the screw & eye connections were change to pin & socket.
Regardless, the electric contacts are really exposed to the weather, particularly as the “guts” of the switch face forward and capture everything !
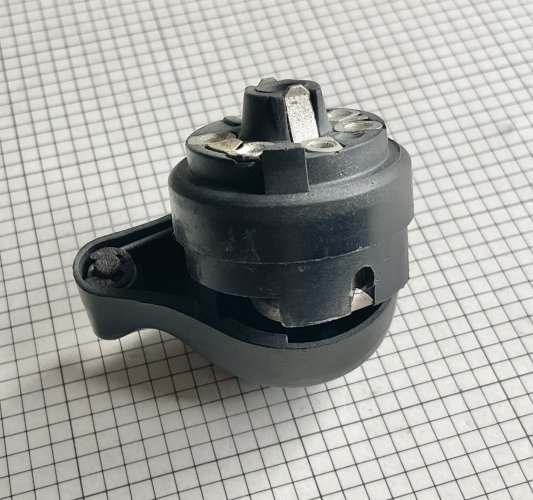
Here’s a typical initial disassembly picture…
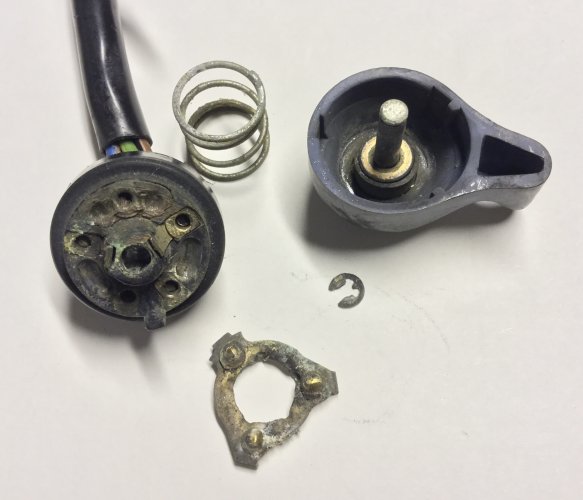
As alluded to in prior posts, corrosion has severely affected the contacts ! The spring is what gives the functional “feel” or “click” to the turn signals/high-low-flash headlight as well as, keeps the brass washer separated from the two(2) prongs in the base. Those prongs, contacting the washer, actuates the Starter Relay or Horn.
To disassemble the switch, that spring must be fully depressed, to extend the shaft out of the pocket in the backside of the base, to free the E-clip… you Star Trek fans might know this as, “the Vulcan Nerve Pinch”, by Mr. Spock, which causes intense pain and numbness of the thumb !
While tears of pain are running down your face, thumb and fingers crippled, the E-clip rockets to the Black Hole in the shop space ! Paul Glaves has it right: best to work in a dry cleaner’s transparent garment bag !
DANGER: THERE IS THREAT OF PERSONAL INJURY OR DEATH ! DO NOT PUT THE PLASTIC DRY CLEANER’S TRANSPARENT GARMENT BAG OVER YOUR HEAD, ARMS AND TORSO ! THE SUDDEN RELEASE OF THE E-CLIP MAY INJURE YOUR EYES; PROLONGED EFFORTS TO SERVICE THE SWITCH(S) MAY CAUSE SUFFOCATION ! ONLY WORK WITH YOUR HANDS, FORE ARMS, ELBOWS IN THE GARMENT BAG; VIEWING THE SERVICING FROM OUTSIDE THE GARMENT BAG !
I believe the triangular male contact piece was silver plated brass originally ? The corrosive “bloom” I’ve seen, has the green-blue look of silver oxide.
I clean all the components with Safety Solvent; use ultra-fine glass bead media at low pressure, to blast the base and button; lightly apply dielectric grease and, having “steeled” myself for Mr. Spock… reassemble. Perform a functional circuit test on the bench. Accidentally, I found that a light coating of silicon dielectric paste, applied to the Bakelite button, restores the nice, subdued “charcoal’ color without shine…
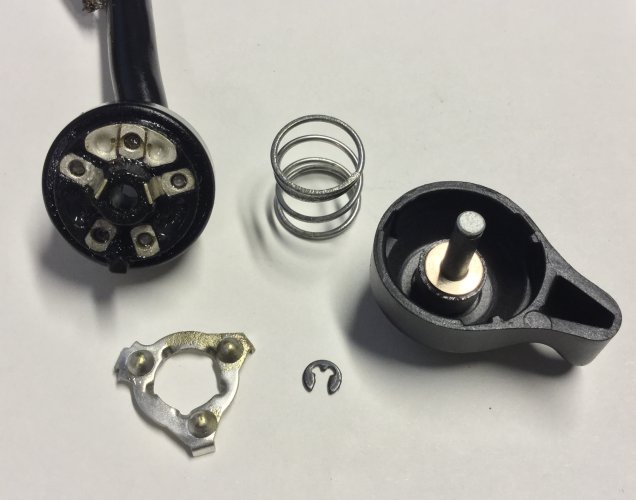
I noticed a design change within the switch when they transitioned to the “pin & socket” electrical connections: the brass washer now had three(3) tangs in the inner diameter to grip the pivot shaft. Earlier, the 1972 R 60/5 shown in my banner, would automatically engage the starter even with the engine idling ! Hours of troubleshooting later, I found the early brass washer was loose from the rubber cushion below it and… was welding itself to the two(2) raised tags. When system voltage dropped and the alternator light illuminated, the Starter Relay sensed a “start” condition ! I glued the washer to the ‘rubber baby buggy bumper’ and made a note to do that to all early switches going forward.
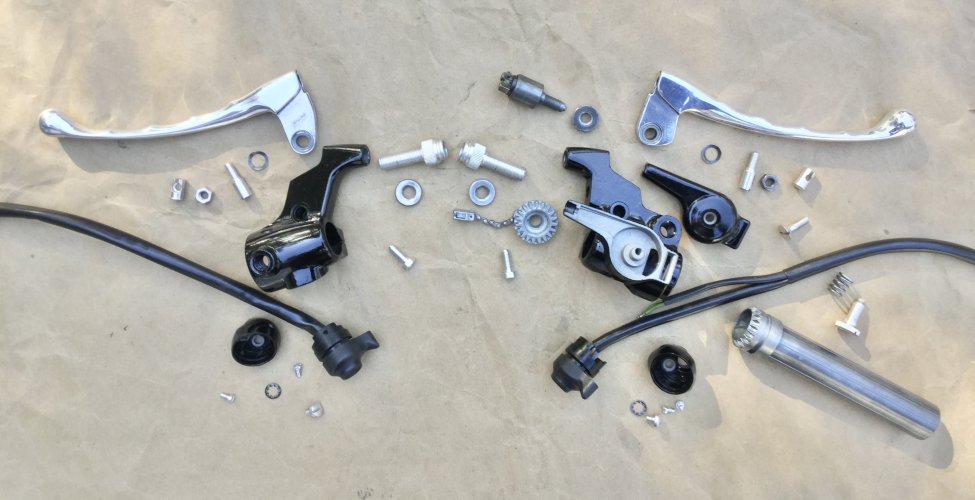
Here’s a picture of all the components; serviced, painted, polished, re-plated with Cadmium/clear-Chromate; ready for bars…
Anything Worth Doing, Is Worth Doing To Excess
I recalled the several occasions while I was restoring a couple Slash 5s and did the “deep dive” into them, their perches and levers. The 1970, 1971 thumb buttons had screw & eye connections on the back of the switch; maybe when the Short Wheel Base Slash 5s got stretched to Long Wheel Base, the screw & eye connections were change to pin & socket.
Regardless, the electric contacts are really exposed to the weather, particularly as the “guts” of the switch face forward and capture everything !
Here’s a typical initial disassembly picture…

As alluded to in prior posts, corrosion has severely affected the contacts ! The spring is what gives the functional “feel” or “click” to the turn signals/high-low-flash headlight as well as, keeps the brass washer separated from the two(2) prongs in the base. Those prongs, contacting the washer, actuates the Starter Relay or Horn.
To disassemble the switch, that spring must be fully depressed, to extend the shaft out of the pocket in the backside of the base, to free the E-clip… you Star Trek fans might know this as, “the Vulcan Nerve Pinch”, by Mr. Spock, which causes intense pain and numbness of the thumb !
While tears of pain are running down your face, thumb and fingers crippled, the E-clip rockets to the Black Hole in the shop space ! Paul Glaves has it right: best to work in a dry cleaner’s transparent garment bag !
DANGER: THERE IS THREAT OF PERSONAL INJURY OR DEATH ! DO NOT PUT THE PLASTIC DRY CLEANER’S TRANSPARENT GARMENT BAG OVER YOUR HEAD, ARMS AND TORSO ! THE SUDDEN RELEASE OF THE E-CLIP MAY INJURE YOUR EYES; PROLONGED EFFORTS TO SERVICE THE SWITCH(S) MAY CAUSE SUFFOCATION ! ONLY WORK WITH YOUR HANDS, FORE ARMS, ELBOWS IN THE GARMENT BAG; VIEWING THE SERVICING FROM OUTSIDE THE GARMENT BAG !
I believe the triangular male contact piece was silver plated brass originally ? The corrosive “bloom” I’ve seen, has the green-blue look of silver oxide.
I clean all the components with Safety Solvent; use ultra-fine glass bead media at low pressure, to blast the base and button; lightly apply dielectric grease and, having “steeled” myself for Mr. Spock… reassemble. Perform a functional circuit test on the bench. Accidentally, I found that a light coating of silicon dielectric paste, applied to the Bakelite button, restores the nice, subdued “charcoal’ color without shine…

I noticed a design change within the switch when they transitioned to the “pin & socket” electrical connections: the brass washer now had three(3) tangs in the inner diameter to grip the pivot shaft. Earlier, the 1972 R 60/5 shown in my banner, would automatically engage the starter even with the engine idling ! Hours of troubleshooting later, I found the early brass washer was loose from the rubber cushion below it and… was welding itself to the two(2) raised tags. When system voltage dropped and the alternator light illuminated, the Starter Relay sensed a “start” condition ! I glued the washer to the ‘rubber baby buggy bumper’ and made a note to do that to all early switches going forward.
Here’s a picture of all the components; serviced, painted, polished, re-plated with Cadmium/clear-Chromate; ready for bars…

Anything Worth Doing, Is Worth Doing To Excess
Last edited:
olironrider
Member
Don't have that switch in front of me but I THINK that side has an internal tab that goes to ground? The little top screw makes contact when screwed in so when you push the button, it completes the circuit.
Try taking the top and bottom screws out and pushing the harness into the switch holder and forcing the button out a little. Then you can see the wire connections and the little brass tab on top...clean all and reinstall.
Sorry if I'm remembering the wrong switch.
… the Thumb Switch with the built-in grounding tab is the left hand, Headlight/Horn Switch. Here’s a couple pictures of both the three(3) prong washer I mentioned above in Post #19, as well as the grounding tab, which connects via one(1) of the M3 screws holding the switch itself into the mount fastened to the perch and chassis ground…
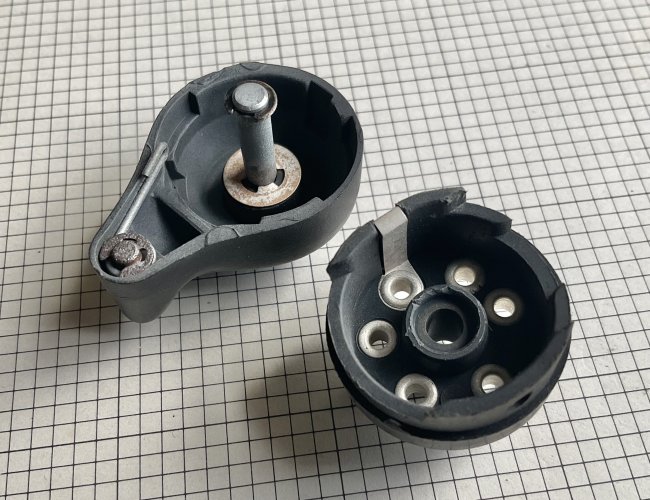
You can also see the “Pit of Misery” wherein the E-clip resides, when fully assembled. In this picture, the grounding tab has made the turn to the exterior and, is positioned where the screw will make electrical contact…
This is the grounding circuit for the Horn.
