• Welcome, Guest! We hope you enjoy the excellent technical knowledge, event information and discussions that the BMW MOA forum provides. Some forum content will be hidden from you if you remain logged out. If you want to view all content, please click the 'Log in' button above and enter your BMW MOA username and password.

    If you are not an MOA member, why not take the time to join the club, so you can enjoy posting on the forum, the BMW Owners News magazine, and all of the discounts and benefits the BMW MOA offers?

  • Beginning April 1st, and running through April 30th, there is a new 2024 BMW MOA Election discussion area within The Club section of the forum. Within this forum area is also a sticky post that provides the ground rules for participating in the Election forum area. Also, the candidates statements are provided. Please read before joining the conversation, because the rules are very specific to maintain civility.

    The Election forum is here: Election Forum

'04 K1200GT rear brake pad change - Clymer question

corey61

New member
Hi, all. The rear brake pads on my ‘04 K1200GT are getting pretty thin and, with the help of the trusty Clymer manual, I’m motivated to attempt their replacement.

Having read through the procedure discussed in the Clymer, I noticed something that is a bit confusing, and I wonder if anyone here can comment and set things straight:

First, we all know that the ’04 GT has the integrated ABS system (for better or worse!). The Clymer covers the iABS system in Chapter 15, while it addresses the ABS II version in Chapter 14.

So…: Chapter 15, section entitled “Rear Brake Pad Replacement,” subsection “RS and GT Models”. In my hard-copy Clymer, this is on p. 499. It says:

“The procedures to replace the rear brake pads on RS and GT models with Integral ABS are similar to ABS II models. Refer to Brake Pad in Chapter Fourteen while noting the following differences:
1. Do not remove brake fluid from the FRONT master cylinder.
… (etc.)”

So…: Chapter 14, section entitled “Rear Brake Pad Replacement,” subsection “RS Models”. Step 16 (in my hard-copy Clymer, this is on p. 460) says:
16. Remove the REAR master cylinder cover and use a syringe to remove and discard about 50 percent of the fluid from the reservoir. This prevents the MS from overflowing when the caliper pistons are compressed for reinstallation… (etc.)

So, here’s the confusion: Chapter 15 advises not to remove brake fluid from the FRONT master cylinder, while Chapter 14 says to remove brake fluid from the REAR MS. There are two possibilities here:

(a) the note in Ch. 15 is making sure that you don’t do anything with the front MS (since it is linked to both front and rear brakes), but you should do as Ch. 14 says and remove fluid from the REAR MS.

(b) The note in Ch. 15 is advising that you do NOT perform Step 16 in Ch. 14. But there’s a typo on p. 499 and it should read: “Do not remove brake fluid from the REAR master cylinder.”

My guess is that (a) is the correct interpretation, and Step 16 should indeed be performed. Question to the collective wisdom: which interpretation above is correct, (a) or (b)?

Many thanks for your patience in reading through my question and kindly coaching this newbie mechanic.
 
The reservoir at the front brake MC is for the iABS control circuit. Reservoirs for both front and rear wheel circuits are paired in a reservoir unit located behind a body panel just above the rear MC. Clymer doesn’t make that distinction clear. If your pads are quite worn and the reservoir has been kept topped up, when you push back the pistons on the rear caliper some fluid may be forced up and out the tube attached to the threaded reservoir cap, hence the suggestion to remove some fluid. The reservoirs are a bit difficult to access, especially the innermost cap that services the front brake wheel circuit. I find is easiest to just remove that piece of bodywork and the retaining bolt for the coolant reservoir whenever servicing brakes, so that the fluid levels in both halves of the reservoir can be set. Make sure the reservoirs are topped up before applying any brake to push the new pads out against the rotor, and observe the level as you do so. It’s all too easy to pull air into the system by running that reservoir too low- and the fluid level drops very rapidly with the whizzy pump engaged.

Best,
DeVern
 
The reservoirs are a bit difficult to access, especially the innermost cap that services the front brake wheel circuit. I find is easiest to just remove that piece of bodywork and the retaining bolt for the coolant reservoir whenever servicing brakes, so that the fluid levels in both halves of the reservoir can be set.
DeVern

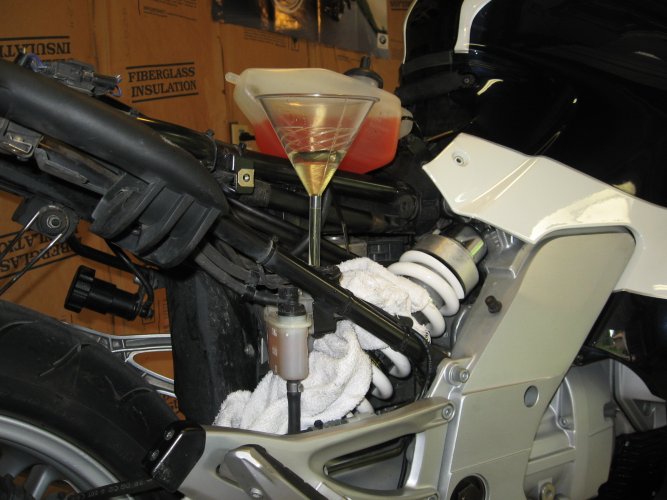
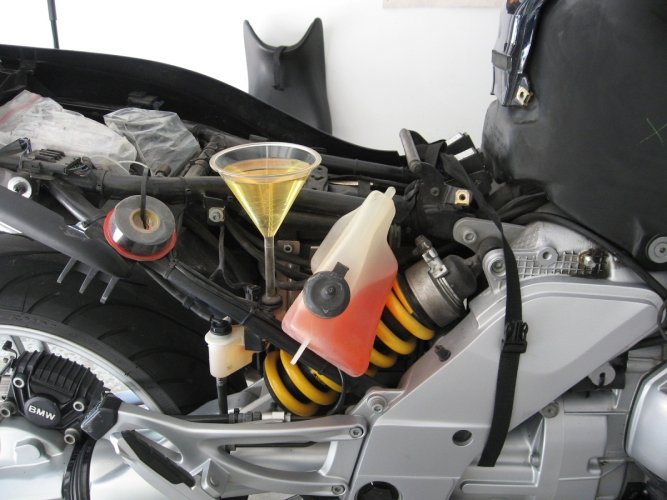
My pictures show the funnel in the chamber for the front brakes.
The outer chamber is for the back brakes. Correct me if my fuzzy memory is wrong :)

funnel (3).jpg

funnel.jpg
 
My pictures show the funnel in the chamber for the front brakes.
The outer chamber is for the back brakes. Correct me if my fuzzy memory is wrong :)
.....
...

Lee,
You memory is correct ... ;-)
Most inside chamber / section for Front Brake "Wheel circuit" . Most outer one for Rear.

Both "Wheel circuits" are bled using the battrey power (Ignition ON - Engine OFF) making sure you NEVER go below MIN mark during the process.

Each chamber / section has different shape and have its own MIN / MAX marks. The design is such that the DOT4 should be at MAX mark IF-AND-ONLY-IF you have installed brand new brake pads. This is to be checked WHEN YOU FINISH THE JOB after having pressed back the pads (using the servo motor power). Of course one does not always need new brake pads at every system bleeding, hence BMW shop manual suggest to use a tool to open the caliper pistons at appropriate distance equivalent to new brake pads material. You can make a wood piece of proper thickess or use many other simple methods to fill missing thickness gap (when bleed job is finished).

The same design is planned such that you will reach MIN mark just about when your brake pads are very thin (about 1 mm material) - assuming there is no leaks in system and no external fluid addition was done since pads install.

As Lee know very well I am sure, but maybe not the original poster of this tread:
on IABS models (servos assisted modulator) the front master-cylinder DOT4 fluid level does not change with brake pads wear - only the small 2 sections reservoir discussed earlier will move down with brake pads wear.
 
Gents,

Thanks for your thoughts on this. DeVern, you raise a good point - it's not clear what is meant in the Clymer by "front master cylinder" - whether that's the front wheel-circuit reservoir under the seat or the servo-circuit reservoir located on the right hand handlebar. Be that as it may, your input (and also having done some further reading about bleeding the brakes) confirms my suspicion that this simply means "don't touch either cylinder associated with the front brakes."

This time around, I'm not bleeding the brakes - only changing the rear pads. Duly noted that at the end of the procedure, the fluid level should be at the MAX mark in the rear wheel circuit reservoir. I will go ahead and follow that step in the Clymer to syringe out some fluid (from there) at the beginning of the process.

Regards,

Corey
 
...
.....

This time around, I'm not bleeding the brakes - only changing the rear pads. Duly noted that at the end of the procedure, the fluid level should be at the MAX mark in the rear wheel circuit reservoir. I will go ahead and follow that step in the Clymer to syringe out some fluid (from there) at the beginning of the process.

Regards,

Corey

In most cases there is no need to syringe out any fluid if changing the pads. Unless someone was there before you and filled to MAX with very worn pads, the fluid level will go up just a tad above MAX when pushing the Pistons in (if you remove / pull the Caliper out of the disc from top).

In fact the whole rear brake pads job can be done in-place without removing the Wheel or the Caliper. Of course, if you want to really clean the dust around the piston then it is easier to move Wheel and Caliper. For a quick job, the rear brake pins can be pushed from the inside across the rim without even removing the wheel OR the Caliper although a bit ackward to work from. Once ONE Pin is pushed out (toward right of bike), you insert a small screwdriver from right side to fill hole where the pin was, you push the other Pin out (your small screwdriver is holding the pads so they do not fall down). Piston can be pushed in very slighly and the both Pads can be pulled out from top.

When you are done with the job, BEFORE THE NEXT RIDE, make sure to turn ignition ON (do not start engine) wait 6 sec fro ABS internal self-check to finish, apply both front brake lever AND rear brake pedal for 3 seconds each. Then turn ignition OFF to save battery if you are not riding right away. RECHECK brake fluid level in 2 sections container below seat - it may have moved down a bit.

The goal here is to make sure the pistons and pads are sitting / pushed where they should AND avoid any delay surprise on 1st brake application as you go out on the street. This should be done every time the pistons are pushed in such as caliper AND/OR wheel removal. This is even more important on these iABS system (servo assisted) than on regular brake system (a bit too long to explain why iABS is a different animal for this issue).
 
Last edited:
I keep a copy of this document in my shop when I do the Whizzy brakes on our 2002 K1200RS.

All bleed nipples have been changed to Speed Bleeders on our bike...and that's a bunch of 'em.

I also have the Speed Bleeeder bag and the Beemer Boneyard funnel.
 

Attachments

  • K1200RS Brake Bleed.pdf
    984 KB · Views: 12
I keep a copy of this document in my shop when I do the Whizzy brakes on our 2002 K1200RS.

All bleed nipples have been changed to Speed Bleeders on our bike...and that's a bunch of 'em.

I also have the Speed Bleeeder bag and the Beemer Boneyard funnel.

Wow, that document looks to be one DETAILED piece of guidance!

I was going to say... now that I've completed the rear brake pad replacement, I feel a little silly having spent a whole $5 on a can of DOT4 brake fluid, merely so I could top up the rear reservoir (under the seat) - by about a teaspoon!

So, yeah, I'm wondering if I should put that brake fluid to good use and do a brake bleed - maybe the whole deal, both the servo pump circuit and the front and rear wheel circuits.

I've owned the bike for a year now. Bought it with 11.6k mi on the odo; it now has 16k. Maintenance records are sketchy, to say the least, and so far it's been smooth sailing - except for the pinion seal leak that has developed, but that's a whole 'nuther post. :brow I did the 12k mi periodic maintenance myself, but I didn't bleed the brakes since I was worried that I'd screw up the servo pump, and that's a costly mistake!!

Here's the thing: I was intimidated by the Clymer's insistence that for the iABS bikes, the system bleed should be done by a dealer and only by a dealer. So that resource (the Clymer), which I've come to rely on to guide me through routine maintenance, is both mute and cautionary on the topic of iABS bleeding. On top of that, though it's a long and complicated story, a year ago a service manager at a local dealership - who was coaching me through the 24k mi service on an identical '04 K1200GT, opined that I should forego a brake bleed for this very reason. Just a tiny speck of dust, according to his take, could clog the servo pump and result in a very unhappy situation.

So, yeah... intimidated. And yet... many people do it themselves.

I'll have a careful look at the 17 pages of guidance you posted. Thanks in advance! I may just be feeling confident enough to proceed. :uhoh

Best regards,
Corey

**********************************
UPDATE, 29 Aug 2020

I've been studying the document written by G. Hollinger and also the one written by D. Hager, et al. Along with two YouTube video series, I've gotten my head around the full operation.

Have ordered and received a set of Speed Bleeders and the filling funnel from Beemer Boneyard. Have coaxed a friend to make the special wrench tool to get to the bleed valves down in the crannies of the ABS control unit. And have made a wooden spacer block for the front calipers. No need for a spacer for the rear, since I've just installed brand-new pads and am satisfied to just use the piston spacing provided by these with the caliper installed around the rear brake disc.

Ready to have a go at it, will post my experiences and Q's in a separate thread.

Corey
 
Last edited:
In most cases there is no need to syringe out any fluid if changing the pads. Unless someone was there before you and filled to MAX with very worn pads, the fluid level will go up just a tad above MAX when pushing the Pistons in (if you remove / pull the Caliper out of the disc from top).

In fact the whole rear brake pads job can be done in-place without removing the Wheel or the Caliper. Of course, if you want to really clean the dust around the piston then it is easier to move Wheel and Caliper. For a quick job, the rear brake pins can be pushed from the inside across the rim without even removing the wheel OR the Caliper although a bit ackward to work from. Once ONE Pin is pushed out (toward right of bike), you insert a small screwdriver from right side to fill hole where the pin was, you push the other Pin out (your small screwdriver is holding the pads so they do not fall down). Piston can be pushed in very slighly and the both Pads can be pulled out from top.

When you are done with the job, BEFORE THE NEXT RIDE, make sure to turn ignition ON (do not start engine) wait 6 sec fro ABS internal self-check to finish, apply both front brake lever AND rear brake pedal for 3 seconds each. Then turn ignition OFF to save battery if you are not riding right away. RECHECK brake fluid level in 2 sections container below seat - it may have moved down a bit.

The goal here is to make sure the pistons and pads are sitting / pushed where they should AND avoid any delay surprise on 1st brake application as you go out on the street. This should be done every time the pistons are pushed in such as caliper AND/OR wheel removal. This is even more important on these iABS system (servo assisted) than on regular brake system (a bit too long to explain why iABS is a different animal for this issue).

Hi Jean,

Thanks for the detailed guidance. I failed to notice your post over this past week and in the meantime I went ahead with the procedure, following the Clymer. Removed the rear wheel (a first) and the brake caliper and it all went well. The experience was useful and, as it happens, I appear to have developed a pinion seal leak which left a mess on the swingarm and final drive unit during a recent trip (I've posted separately about that whole deal). Anyway, having the wheel and caliper off allowed me to get into the nooks and crannies of that area with a rag and clean up the mess very thoroughly. I'm going to zip-tie up the boot, ride it for 1000 miles or so, and see how much it leaks during that time. Next time I do the rear pads, I'll try your more streamlined approach.

Meanwhile, I'm contemplating a brake bleed. My novice mechanic's skills may be ready to tackle that job, and I'm having fun, learning by doing as I go, as well as from people such as yourself.

Below's the completed job, done and dusted.
(...Or should I say, not (brake) dusted, quite yet... :gerg)

Best regards,
Corey

Finished install - lo res.jpg
 
I keep a copy of this document in my shop when I do the Whizzy brakes on our 2002 K1200RS.

All bleed nipples have been changed to Speed Bleeders on our bike...and that's a bunch of 'em.

I also have the Speed Bleeeder bag and the Beemer Boneyard funnel.

UPDATE:

I've read through Gary Hollinger's document and have also seen some deeper discussion of the brake bleeding, which led me to a second detailed procedure written by Dana Hager, et al. (tried to attach the PDF; it's bigger than the size limit allowed by this forum! :dunno)

This may be putting too fine a point on it, but if I'm not mistaken there's a mistake in Hollinger's document:

He starts the discussion of bleeding the front control circuit on p. 10(bottom). That should involve the master cylinder on the right-hand handlebar. But, in that same section of the doc when cautioning to keep the fluid level above the MIN mark, the picture (p. 12, top) shows the clutch master cylinder, on the left-hand handle bar. Because the fluid level raises rather than drops as the clutch wears, the MIN level is at the top of the "bullseye" circle indicator, shown in that sketch. For the brake control circuit master cylinder (right handlebar), it's a different story and I think that sketch should show a different MIN level indicator (since, if I understand correctly, the fluid level in that reservoir neither raises nor drops as brake pads wear).

I know it's a minor thing and I'm sure others have noticed this over the years, but... just sayin'.
Now, if my understanding is flawed and this isn't an error, please do correct me!

Best regards,
Corey
 
First, we all know that the ’04 GT has the integrated ABS system (for better or worse!). The Clymer covers the iABS system in Chapter 15, while it addresses the ABS II version in Chapter 14.

So…: Chapter 15, section entitled “Rear Brake Pad Replacement,” subsection “RS and GT Models”. In my hard-copy Clymer, this is on p. 499. It says:

“The procedures to replace the rear brake pads on RS and GT models with Integral ABS are similar to ABS II models. Refer to Brake Pad in Chapter Fourteen while noting the following differences:
1. Do not remove brake fluid from the FRONT master cylinder....

I think that’s an error. ABS II is not linked so there would be no reason to remove fluid from the front MC in chapter 14. Does chapter 14 actually say to remove fluid from the front MC for a rear pad change?

As for the possibility that they are unclear about which fluid they refer to, to me there’s only one MC reservoir: that would be the reservoir feeding a particular MC. The reservoir for a wheel circuit (if separate from that of a control circuit) would never be correctly called a master cylinder reservoir.


Anton,

Thanks for your thoughts. I think it's a mistake in the Clymer, too. Chapter 14 does NOT say to remove fluid from the front MC when changing the rear pads; it was only the note I mentioned in Chapter 15 that referred to this. Hence my confusion.

I ignored the note and successfully completed the rear pad change-out. As others have noted here, syringing off fluid from the REAR wheel circuit reservoir at the start of the procedure wasn't critical, but it was something I did, anyway, per the Clymer's guidance. It all went well.

With that under my belt, I'm now preparing to do a complete bleed of the wheel brake circuits, ABS control circuits, and clutch. This'll be another new experience for me. I've owned the bike for a year and have no idea if/when this service was ever performed on it. Will probably post on that separately...

Best regards,
Corey
 
Brake flush - success

Just a quick update:

I successfully completed the full brake system flush last weekend. It went well, after one major bonehead move. First time I went to bleed the front wheel circuit, I was all dialed in on the left front caliper, with my homemade wooden spacer block in place (I had removed the pads and both front calipers from the bike frame) on the left caliper. After the hours spent absorbing the G. Hollinger 17-pg step-by-step guidance for the full bleed procedure, and watching a few decent YouTube videos, it hadn't dawned on me that... the two front calipers are on on the same fluid circuit and therefore I had to shim BOTH of them simultaneously with blocks. So, a few seconds into the left-caliper bleed, things started to get horribly messy at the right one. :cry

Oh, man, that was a head-slapper. :banghead
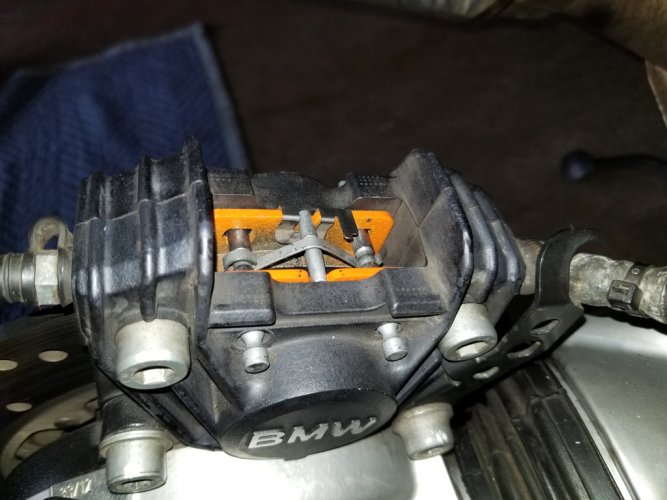
Fortunately, I'd draped rags around both calipers and the brake fluid that went everywhere out of the right caliper didn't drip on any bike surfaces. I'd managed to pop one of the four pistons completely out of its bore.
RFront Caliper - lo res.jpg

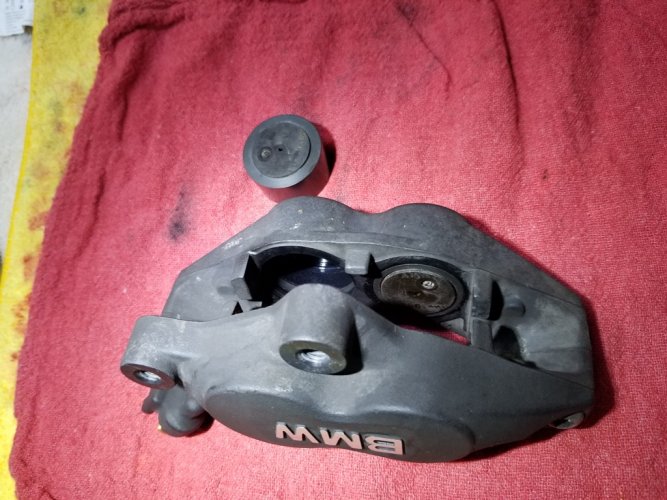
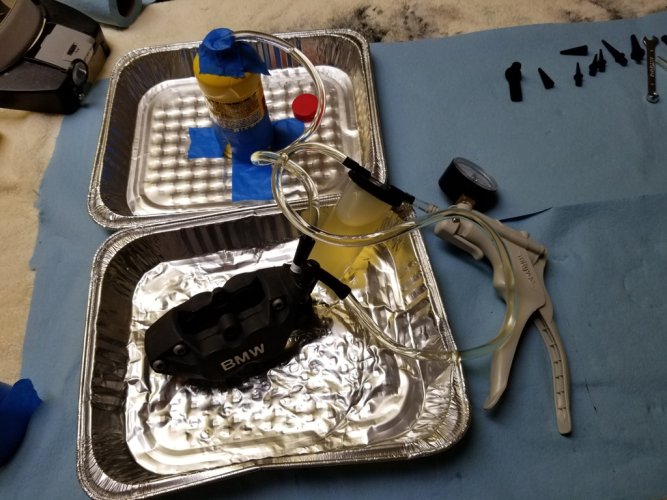
I removed the caliper completely from the bike, knowing that now I would have to learn how to do a true brake-line bleed, not just a flush, and wondering if I had to replace the piston or either of its seals. After a chat with the local dealership mechanic, I recovered: went to O'Reilly's Auto Parts and bought a hand vac pump, re-inserted the piston in the caliper, and did a bench bleed.Bench Bleed - lo-res.jpg

... And then, of course, I made up a 2nd wooden spacer block and stuffed it between the right caliper's pistons, re-connected the right caliper to its brake line, and again using the hand vac pump, did a bleed of the full front wheel circuit, to get the air out of the line. So much learning! :doh

After that, things went according to plan. I did the whole deal: front and rear wheel circuits, clutch and front filler adapter, draining and cleaning the two handlebar fluid reservoirs, and the six ABS circuits, in the correct order.

It's a funny thing: that experience, which at the time threw me into a panic, increased not only my knowledge but my confidence. Having messed things up way beyond what I thought might occur, and having realized that I could learn and think, and communicate and plan my way out of the mess... well, after that, why, the procedure was de-mystified and it went smoothly. Having seen that brake fluid could get all over the floor, that caliper pieces could disassemble, that air could get in the lines - all of that bad, amateur foolishness could occur and I STILL didn't damage the bike or incur hundreds of $ of shop service or face humiliation as a true squid of a home mechanic - but instead, I could re-group, consult an expert, and systematically work my way back to a known-good state of the vehicle... well, that's what it's all about, no? The unplanned depth of my dive into the brake system, needed to correct for my mistake, actually strengthened my knowledge and understanding and connection to the machine.

All's well that ends well.
 
[SNIP} It's a funny thing: that experience, which at the time threw me into a panic, increased not only my knowledge but my confidence. Having messed things up way beyond what I thought might occur, and having realized that I could learn and think, and communicate and plan my way out of the mess... well, after that, why, the procedure was de-mystified and it went smoothly. Having seen that brake fluid could get all over the floor, that caliper pieces could disassemble, that air could get in the lines - all of that bad, amateur foolishness could occur and I STILL didn't damage the bike or incur hundreds of $ of shop service or face humiliation as a true squid of a home mechanic - but instead, I could re-group, consult an expert, and systematically work my way back to a known-good state of the vehicle... well, that's what it's all about, no? The unplanned depth of my dive into the brake system, needed to correct for my mistake, actually strengthened my knowledge and understanding and connection to the machine.

All's well that ends well.


You have perfectly described the great benefits we receive when going outside of our comfort zone: emotional swings, increased self management skills, analysis, and problem-solving. You learn more about how to turn wrenches. And, most importantly, you gain self-confidence, and the knowledge that each time you take something on it will go better than the last.
 
You have perfectly described the great benefits we receive when going outside of our comfort zone: emotional swings, increased self management skills, analysis, and problem-solving. You learn more about how to turn wrenches. And, most importantly, you gain self-confidence, and the knowledge that each time you take something on it will go better than the last.

True dat! Well said...
 
Back
Top