•  

    Welcome! You are currently logged out of the forum. Some forum content will be hidden from you if you remain logged out. If you want to view all content, please LOG IN!

    If you are not an MOA member, why not take the time to join the club, so you can enjoy posting on the forum, the BMW Owners News magazine, and all of the benefits of membership? If you click here, you have the opportunity to take us for a test ride at our expense. Enter the code 'FORUM25' in the activation code box to try the first year of the MOA on us!


R1200 Valve adjust screw-up.

dmilan

New member
Hello All,

With the help of a local MC service garage recently adjusted the valves on my R1200 (RT)
Small shop. Immaculate. Harley stuff mostly. Good guys.

Wanted too see if my skill for drag on the feeler gauges was good.

Whilst we were in there we adjusted the rocker arm end play first then the valves on each side.
After the procedure we pushed the bike outside, I suited up and rode her home. It was a small window of riding opportunity so I had to go go go.
Sounded a bit noisey when I started her, surprised me, but I needed to get it out of the shop and back home that evening. This was a few weeks back.

Last weekend I decided to adjust the throttle bodies b-4 replacing all the tuperware.

Got the job done , but all along I was bothered by the noisy r/s valves.
Kept hoping... I don't know what.

Today, b-4 replacing the tupperware I decided to inspect the r/s valves once more. Just to be on the safe side.

CRAPOLA... ZERO free play on the exhaust valves.

Stripped the left side to check those.

Everything else was perfect.
L/S roker arm play, L/s intakes, left side exhausts.
All perfect.

Went back to the right side.
Rocker arm play is perfect.
Intakes valves are perfect.
Exhaust valve had to be loosened 2ish turns. Couldn't even get and .05 mm feeler in there. CRAPOLA...
Well, I adjusted the exhaust valves, and buttoned everthything back up.

Started her up. Very noticeable sharp metallic tick from the , you guessed it, R/S exhaust valves.

Can't explain what happened. We were in a bit of a hurry due to the rocker are freeplay adjustment procedure being foreign to both the tech and myself. It took longer than anticipated.
He was working the R/S mostly. Thought I double checked just about everything though.

If anything I bet I'm guessing that we made a TDC error. I really don't know what happened and anyway I'm not looking to blame anyone.
I was in on this.

Something is now broken.

Question is, What is it, most likely that I have broken?
Bent valve? Valve seat? Spring? Other?
CRAPOLA

Dmilan

'05 R1200RT / now broken
 
Last edited:
Dunno, and difficult to diagnose without being there.

The zero freeplay is a bit worrysome since it means the valve was opening further than it should, which raises the possibility of the head contacting the top of the piston (bending the valve), but I suspect you may be finding trouble where there wasn't any to begin with.

Question - are you absolutely certain you're at TDC for the side you're adjusting when you checked it this last time? You can only adjust 1 cylinder at a time.

The cylinder you're adjusting is on the top of the compression stroke - the other cylinder will have the intakes with some freeplay - and the exhaust with none (actually under tension) since it's on the exhaust stroke (as you described you found it.) IF you now adjusted it on the wrong stroke - I would expect to hear noise from the exhaust valves since the clearance on the compression stroke is now way too wide.

The engine has to be rotated between adjusting the two sides. One is done with the cam-position-sensors-lug sticking straight out, the other is done with the tiny arrow on the camshaft sproket sticking straight out.

I would start with checking your work again, or perhaps getting someone familiar with BMW valve adjustment to check it.

If they are adjusted correctly - next step would be a compression test - and see if there is a problem. If the compression is low on that side - then you know further disassembly will be needed.
 
Dunno, and difficult to diagnose without being there.

The zero freeplay is a bit worrysome since it means the valve was opening further than it should, which raises the possibility of the head contacting the top of the piston (bending the valve), but I suspect you may be finding trouble where there wasn't any to begin with.

Question - are you absolutely certain you're at TDC for the side you're adjusting when you checked it this last time? You can only adjust 1 cylinder at a time.

Yes. Arrow out. Throttle side valves. Intake valves were loose and perfectly gapped. Exhaust valves were imovable. Sinking feeling in my stomach. What on earth did we do? Guess I'll check it again this afternoon, just to be sure. I'm no expert, but I have done this before. Quite a few times on my '02 R1150RT in the course of trying to eliminate that machines surging problem.

The cylinder you're adjusting is on the top of the compression stroke - the other cylinder will have the intakes with some freeplay - and the exhaust with none (actually under tension) since it's on the exhaust stroke (as you described you found it.) IF you now adjusted it on the wrong stroke - I would expect to hear noise from the exhaust valves since the clearance on the compression stroke is now way too wide.

The engine has to be rotated between adjusting the two sides. One is done with the cam-position-sensors-lug sticking straight out, the other is done with the tiny arrow on the camshaft sproket sticking straight out.

I would start with checking your work again, or perhaps getting someone familiar with BMW valve adjustment to check it.

If they are adjusted correctly - next step would be a compression test - and see if there is a problem. If the compression is low on that side - then you know further disassembly will be needed.

Thanks Don, I'll post up this pm regarding my recheck
Think we goofed up the first time somehow and I've got a problem
Dmilan
 
I noticed you posted that you had done this on your 1150. The TDC procedure differs slightly from the 1200 in that on the 1200 with the arrow you adjust the right side, then 180 the arrow and do the left. I beleive the 1100/1150 states that you adjust whichever side is the loosest.

Hopefully it was just a case of adjusting the wrong side, resulting in extremely loose valves. I see no way of the valves touching the piston as long as you adjusted for clearance, even not at TDC. The result of this would be extremely loose valves. Only way you could have touched the piston is to have the intended side at TDC, and tightened them past Zero Clearance. This would have resulted in a symptom of popping from the exhaust and/or popping through the intake. I know your re-check resulted in a Zero clearance on one side, but make sure that side was at TDC. Maybe you did not have it at TDC, set clearance again (thinking it was TDC), and actually loosened them too much. Just throwing some thoughts out there for you to consider.

Try a re-adjust, what can it hurt? Also, did you retighten the rocker shaft nut after you set the rocker endplay??

Good luck.:thumb
 
I noticed you posted that you had done this on your 1150. The TDC procedure differs slightly from the 1200 in that on the 1200 with the arrow you adjust the right side, then 180 the arrow and do the left. I beleive the 1100/1150 states that you adjust whichever side is the loosest.
The 1200 has a lump of metal on the cam sprocket that is used to trigger the camshaft position sensors. This lump is 180 degrees from the arrow. Hence my instructions - arrow, then lump (or lump then arrow.) It's actually much easier to do than the 1150 was.
Hopefully it was just a case of adjusting the wrong side, resulting in extremely loose valves.
My guess also - probably not clearly expressed above.
I see no way of the valves touching the piston as long as you adjusted for clearance, even not at TDC. The result of this would be extremely loose valves. Only way you could have touched the piston is to have the intended side at TDC, and tightened them past Zero Clearance. This would have resulted in a symptom of popping from the exhaust and/or popping through the intake. I know your re-check resulted in a Zero clearance on one side, but make sure that side was at TDC. Maybe you did not have it at TDC, set clearance again (thinking it was TDC), and actually loosened them too much. Just throwing some thoughts out there for you to consider.

Try a re-adjust, what can it hurt? Also, did you retighten the rocker shaft nut after you set the rocker endplay??

Good luck.:thumb
What rocker shaft nut?

Unless I'm mistaken (I've done quite a few endplay adjustments) - there is no nut on the rocker shaft. The endplay is taken up by moving the bridge assembly on the bottom of the rocker assembly. It has three torx bolts and one head bolt holding it in position. The adjustment is a bit of a PITA since it's for both rockers at the same time, and it becomes a tad fiddly to get perfect, especially since tightening the bolts tends to move the bridge assembly a bit.

BTW - the arrow and lump (tab) are shown quite clearly in Luis' writeup: http://forums.bmwmoa.org/showthread.php?t=33462 - and the bridge assembly can be seen in several of the photos. Luis is working on the writeup for doing the rocker endplay adjustment, but got sidelined by a cranky appendix. Hopefully we'll have it ready to go soon.
 
Big Update

Well this is interesting.

Went out today and rechecked everything.
The Garsh darn exhaust valves on the R/S had no freeplay again.

WHAT the ...??>??

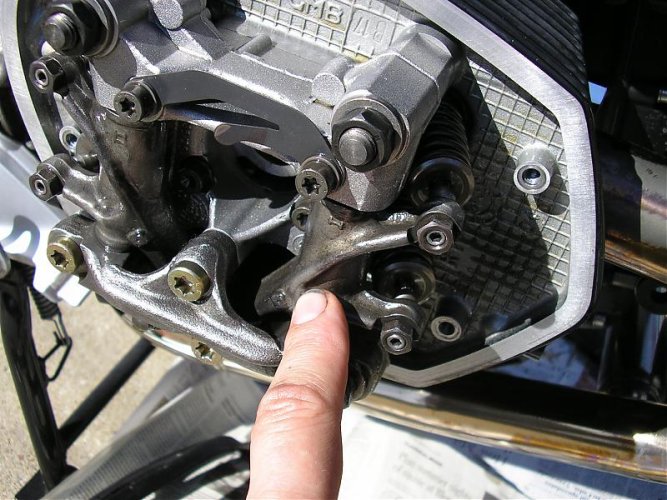
I realized that the reason that there was Zero freeplay in the R/S exhaust valves is that the front rocker arm was bound up. You know, the reason that you have free play in the valves is that the rocker arm is free to pivot a bit.

Not mine, at least not the R/S exhaust rocker arm.

Both rocker arms on the left side pivot.. And my valve adjustment on the L/S is just fine.

The intake rocker on the R/S pivots. My intake valve adjustment on the R/S is just fine.

The EXHAUST rocker is binding on the R/S.

Yes, we had adjusted the rocker shaft end play. By the book, and with the guidance of some nice, experienced, folks and vendors on the various BMW websites.
Went well, I thought.

We had adjusted both left and right side rocker arm freeply to more than minimum spec which is .05mm. We had adjusted them to between .10 and .15 mm. That spec was intact as of today.

Loosened the 3 rocker arm bolts, taped with a hammer. Still no exhaust rocker freeplay.

Loosened the head bolt, taped with a hammer. The exhaust rocker arm now moves freely. Like the other 3.

As this has unfolded another thought/rememberance comes to mind.
For the first mile or so after leaving the shop with my newly adjusted valves and rocker arms I heard another noise. Sounded like a fire truck siren. Must be something big going on I thought to myself. Seems like it following me. No lights anywhere... hmmm...
Realized fairly quickly that is was speed related. Not sirens at all. Chalked it up to wind noise and the lack of bodywork on my RT which had been removed for the service and was waiting at home.

I bet what I was hearing was the rocker arm shaft machining itself in side the carrier.
Well, I don't know where this gets me. Is anything damaged or not? Probably.

Still have a problem, still don't know the extent of the problem.

Super
Dmilan
 

Attachments

  • P1010459.jpg
    P1010459.jpg
    102.1 KB · Views: 534
This is one of the DIY risks.. and part of the reason I usually suggest that you try doing this sort of thing only with someone who is experienced in doing it at hand the first time.

The rocker arm endplay adjustment is fiddly - meaning - when you tighten the bolts and the head-nut that hold the bridge in place (the part you're adjusting), the adjustment of the end-play always seems to change. It usually takes me several tries to get the endplay correct. The bolts actually should be fairly snug when the adjustment is being done - that lessens (but doesn't eliminate) the movement.

I suspect when you torqued the head-bolt things tightened up - and that you didn't check the clearance when you were done torquing all the fasteners?

Just curious - what documentation are you using when doing this procedure?

One thing I observe from your photo - I've can't recall ever seeing the adjusting screws for the valve clearance with their heads below the surface of the lock-nut. (And I just did mine on Friday night.) To me - that means something may be wrong. It's possible at this point that some damage has been done that will require parts replacement (I can envision bent push-rods, or damaged cam lobes - all should be checked/inspected.)

I think it's time to have an expert on site, and further diagnosis via the Interwebthingie really isn't too good a thing to do. It needs hands-on at this point. It will probably require at least disassembly of the rocker arm assemblies to see if there is any damage to the bearings the rockers rotate on, or the shafts they turn on.

YMMV - and hopefully it does.

I would suggest that at this point - you need some expert assistance, someone very experienced with the hexhead valve train. This could be a knowledgeable friend, or a dealer or a good independent. You didn't mention where you're located - you might just to see if there is anyone in your area who might feel they could be helpful.
 
One thing I observe from your photo - I've can't recall ever seeing the adjusting screws for the valve clearance with their heads below the surface of the lock-nut. (And I just did mine on Friday night.) To me - that means something may be wrong.

I took one look at the picture and thought the very same thing!
 
The picture represents nothing other than to point out the rocker arm which was seized.

When the pic was taken this afternoon I had backed off the adjusters on the exhaust valves almost to the point of removing them. The rocker arm still would not budge. Likewise, the rockers arm adjusting bolts and the 1 head bolt had all been loosened..

Don, my local BMW dealers look at me as if I'm from outer space when I ask about something like rocker end play adjustment.
Never done it, never heard of it, never need it.
As far as the documentation, I followed the BMW R1200RT Repair Manual on CD. Along with a Haynes Manual and another private resource which mirrored the Repair manual.

It's like asking BMW corporate if they think that 1150s had a surging issue.

I screwed up somehow. My fault.

I'll fix it now or wait till I have the funds to do so.
Wish I would not have tried it ( rocker end play adjust) hind sight is 20/20
dmilan
 
Hi DMilan:

Messing up now and then has got me where I am now - totally overconfident, unwilling to pay anybody else to wreck my stuff 'cause I can do it way faster myself, and able to get myself out of every jam(so far), life intact.

You figgered out something was wrong, which puts you ahead of the curve. Now you gotta figger out what it is , and fix it.

From your posts I'm guessing you haven't run the engine much. If valves and pistons were trying to occupy the same space at the same time then there may be bent valves but lets go one step at a time.

You haven't said you released the rocker shaft end clearance. I'd do that and see if you can get the exhaust rocker freed up. Then you can try the valve clearance again and check compression as deilenberger suggests.

You're at a crossroads now, give up and let BMW have at it($$$$), or soldier on and fix the problem yourself. She may be a bit hurt but she ain't toast.
 
OOPS sorry:

Post #6 says you got the exhaust rocker moving again.

I'm still encouraging you to continue. This valve gear looks almost identical to my 1996 R1100 and apart from being a clever design, it's still simple in a brilliant way.

Oh, and about the dealer not knowing about rocker endplay. I suspect that's something we figgerred out reduced startup noise, not something the dealer would bother about(factory set and who cares if it loosens a bit and makes noise).

Take 2 beers and try again on the weekend.
 
Don, You seem to be especially active, involved, and interested so I thought to respond directly to your comments on the subject.

QUOTE=deilenberger;434742]This is one of the DIY risks.. and part of the reason I usually suggest that you try doing this sort of thing only with someone who is experienced in doing it at hand the first time.

I may be wrong, but I'd be surprised if any local dealer techs would adjust or even inspect rocker end play as part of a normal valve adjust maintenance. Don't get me wrong, I'm not really complaining about them. In any case, it seemed simple. Loosen 3 screws, 1 nut, tap to proper spec, torque/180 as specified..

The rocker arm endplay adjustment is fiddly - meaning - when you tighten the bolts and the head-nut that hold the bridge in place (the part you're adjusting), the adjustment of the end-play always seems to change. It usually takes me several tries to get the endplay correct. The bolts actually should be fairly snug when the adjustment is being done - that lessens (but doesn't eliminate) the movement.

I suspect when you torqued the head-bolt things tightened up - and that you didn't check the clearance when you were done torquing all the fasteners?

We did. Today, even when the rocker was still seized there was .10 -.15mm of clearence at both rocker arm check points. We double checked all gaps. On the valves as well. We did not check to see if the exhaust rocker was seized, never dawned on us/me.I wonder if the rocker shaft seized at the time we adjusted it or only once the engine was finally started

Just curious - what documentation are you using when doing this procedure?

BMW Repair Manual on CD, Haynes Manual and a private vendor info resource available thru various BMW rider sites.

One thing I observe from your photo - I've can't recall ever seeing the adjusting screws for the valve clearance with their heads below the surface of the lock-nut. (And I just did mine on Friday night.) To me - that means something may be wrong. It's possible at this point that some damage has been done that will require parts replacement (I can envision bent push-rods, or damaged cam lobes - all should be checked/inspected.)

The photo was only to point out the rocker in question. The exhaust valve adjusters, 3 rocker bridge screws, and the head bolt all had been slackened at this time. I ran the exhaust valve adjusters WAY out, sort of out of frustration. That is when i finally noticed the seized rocker arm. Maybe I'm grasping here but one thing that I noticed about the R/S rocker is that it looks to be slightly discolored... as if it got very, very hot.

I think it's time to have an expert on site, and further diagnosis via the Interwebthingie really isn't too good a thing to do. It needs hands-on at this point. It will probably require at least disassembly of the rocker arm assemblies to see if there is any damage to the bearings the rockers rotate on, or the shafts they turn on.

uhhhh

YMMV - and hopefully it does.

I would suggest that at this point - you need some expert assistance, someone very experienced with the hexhead valve train. This could be a knowledgeable friend, or a dealer or a good independent. You didn't mention where you're located - you might just to see if there is anyone in your area who might feel they could be helpful.

Northeast Ohio

Thanks again
DMilan
 
Last edited:
Hi DMilan:

Messing up now and then has got me where I am now - totally overconfident, unwilling to pay anybody else to wreck my stuff 'cause I can do it way faster myself, and able to get myself out of every jam(so far), life intact.

You figgered out something was wrong, which puts you ahead of the curve. Now you gotta figger out what it is , and fix it.

From your posts I'm guessing you haven't run the engine much. If valves and pistons were trying to occupy the same space at the same time then there may be bent valves but lets go one step at a time.

You haven't said you released the rocker shaft end clearance. I'd do that and see if you can get the exhaust rocker freed up. Then you can try the valve clearance again and check compression as deilenberger suggests.

You're at a crossroads now, give up and let BMW have at it($$$$), or soldier on and fix the problem yourself. She may be a bit hurt but she ain't toast.


Ahhhh.. Another fellow human, with ego in check.
Thanks Mike and others for your help thus far.
 
If you can, fill out your profile. You're much more likely to get some nibbles of help if people don't need to go looking for the question and answer of where you are.

Good luck with it. I'd get a seasoned set of eyes on it. Worst case, you have to replace a few pieces. It's only a machine and the next time, you'll know a little bit more. :D

I know I've never learned anything the hard way. :whistle

:ha
 
Don, You seem to be especially active, involved, and interested so I thought to respond directly to your comments on the subject.

This is one of the DIY risks.. and part of the reason I usually suggest that you try doing this sort of thing only with someone who is experienced in doing it at hand the first time.

I may be wrong, but I'd be surprised if any local dealer techs would adjust or even inspect rocker end play as part of a normal valve adjust maintenance. Don't get me wrong, I'm not really complaining about them. In any case, it seemed simple. Loosen 3 screws, 1 nut, tap to proper spec, torque/180 as specified..
Actually - it is supposed to be part of the 600 mile service when they retorque the head bolts.. but like you - I suspect none of them ever really do it. Every one I've ever checked has been at the loose end of the specification. All of them seemed to benefit from being adjusted - with owners saying "I didn't know it could be that quiet.."

As you say - it seems simple, but it usually takes me at least 1/2 hour per side to get both rockers to where I'm happy with them.

One thing I've done - is I don't bother fiddling with the measurement until I really think I'm done. If you take a rocker and move it up/down (with the valves fully closed so the rocker is unloaded), if it's too wide - you'll hear a rather loud CLICK. If it's about right - it becomes a very tiny click noise and you can see some oil squirt out from where the rocker and the bridge joint. If you hear no noise - it's too tight. Doing it this way usually helps get it into the range I want it to be rather quickly, and provides a check that nothing is binding (if you can move it up/down it's not binding.)

The rocker arm endplay adjustment is fiddly - meaning - when you tighten the bolts and the head-nut that hold the bridge in place (the part you're adjusting), the adjustment of the end-play always seems to change. It usually takes me several tries to get the endplay correct. The bolts actually should be fairly snug when the adjustment is being done - that lessens (but doesn't eliminate) the movement.

I suspect when you torqued the head-bolt things tightened up - and that you didn't check the clearance when you were done torquing all the fasteners?

We did. Today, even when the rocker was still seized there was .10 -.15mm of clearence at both rocker arm check points. We double checked all gaps. On the valves as well. We did not check to see if the exhaust rocker was seized, never dawned on us/me.I wonder if the rocker shaft seized at the time we adjusted it or only once the engine was finally started

Were the valves unloaded when the adjustment was done? IE - fully closed so no pressure was on the rocker?

I don't see anything funny colored in your photo.

Just curious - what documentation are you using when doing this procedure?

BMW Repair Manual on CD, Haynes Manual and a private vendor info resource available thru various BMW rider sites.
The BMW manual is written for pro mechanics - meaning - they don't tell the mechanic to do the "obvious" (to them, not to mere mortals..) I haven't seen the Haynes R12 manual (it didn't include the R12R last I checked..), so can't say how detailed it is.

One thing I observe from your photo - I've can't recall ever seeing the adjusting screws for the valve clearance with their heads below the surface of the lock-nut. (And I just did mine on Friday night.) To me - that means something may be wrong. It's possible at this point that some damage has been done that will require parts replacement (I can envision bent push-rods, or damaged cam lobes - all should be checked/inspected.)

The photo was only to point out the rocker in question. The exhaust valve adjusters, 3 rocker bridge screws, and the head bolt all had been slackened at this time. I ran the exhaust valve adjusters WAY out, sort of out of frustration. That is when i finally noticed the seized rocker arm. Maybe I'm grasping here but one thing that I noticed about the R/S rocker is that it looks to be slightly discolored... as if it got very, very hot.

OK - makes sense. Dunno on it being discolored, but if it make a siren like noise, it wasn't happy for sure.
I think it's time to have an expert on site, and further diagnosis via the Interwebthingie really isn't too good a thing to do. It needs hands-on at this point. It will probably require at least disassembly of the rocker arm assemblies to see if there is any damage to the bearings the rockers rotate on, or the shafts they turn on.
uhhhh

YMMV - and hopefully it does.

I would suggest that at this point - you need some expert assistance, someone very experienced with the hexhead valve train. This could be a knowledgeable friend, or a dealer or a good independent. You didn't mention where you're located - you might just to see if there is anyone in your area who might feel they could be helpful.

Northeast Ohio

Thanks again
DMilan
No problem. I got really interested because Luis (Semper-FI) and I are working on a writeup on doing the end-play adjustment, and this is a great reminder (albiet, painful for you) that things we take for granted really need to be documented - ie - checking for free rotation of the rocker when done doing the adjustment.

Hopefully someone in your area who has had a hexhead apart can give a hand. Or if you want to disassemble it yourself, someone here might be able to help.

Best, and good luck!

Quick edit: One other thing - I have never seen the need to do this adjustment more than once on a bike unless the head is disassembled for some reason. Seems like a very low wear area - and once put in spec on the narrow end of the spec, it seems to stay there a LONG time. So it's not something people should be doing at every valve adjustment (too many 180 degree torque cycles on the head stud is likely to pull it free from the crankcase..)
 
I had the bike trailered back to the repair shop today.

They are going to attempt to HELP resolve this issue. Some level of low cost assistance. As I stated in the opening post of the thread... reasonable guys.

First thing that I want to do/have done, is to dissasemble the rocker arms and inspect for damage. I might just chose to replace a few parts even if they look to be OK.
Such as the entire exhaust rocker which was stuck, jammed, no wanna move, and otherwise bound-up.

Hopefully the damage will be minor and up top... easily accessable. Knock wood.

Then, after reassembly, perhaps the compression test as suggested here earlier.

Keep the good thoughts
I'd like to be ridin' and smilin'
not
wrenchin' and spendin'

Appreciatively
David
 
Hopefully the damage will be minor and up top... easily accessable. Knock wood.

Then, after reassembly, perhaps the compression test as suggested here earlier.

Keep the good thoughts
I'd like to be ridin' and smilin'
not
wrenchin' and spendin'

Appreciatively
David
David,

Hopefully minor problem. Please do keep us informed of the outcome - everyone gets to learn that way, too bad the learning has to be at your expense.

Best,
 
Homework, my friend:)

The 600 mile service is the ONLY time the torqueing the heads is done, period! Rocker end play is checked only then and was a "regular service" ONLY on older R Bikes, Airheads I speak of:). You torque the new engine heads and pull studs from the block and BMW had "many many" do this, with engine warranty work being done. Many engines had to come apart for other reasons, retorqueing the heads and eventually the studs failed. The lower front one is the weak one! I had one R1100 do it. Even the older Airheads needed the end play checked and adjusted once in a great while. Almost never, once set...Randy:thumb :usa
 
Solution... I hope

Hello All,

As of this afternoon 3/18/09, I can hopefullly begin to wrap this event up.
Re-read post if you want the full story.

First off, let me say, I have my 2005 R1200RT back home in my garage. I am cautiously optimistic.
I RODE it home from my repair garage of choice, mentioned in the opening entry of this thread, Delzani's Cycle in Rocky River, Ohio.

Compression results from a warm engine, after repairs/resetting of rockers and valves are as follows.

LH Cylinder = 220 psi
RH Cylinder (the problem side) = 230 psi

Zero replacement parts were utilized to get the bike back on the rode.
Turns out that TDC was NEVER an issue in this adventure. I believe that we did everything very well... But, there were 2 little uninvited guests that tried to spoil the day.

Here's the deal...

When I arrived at the shop on Monday late afternoon , my RT was already up on a rack. Bruce was wrenchin' on the R/S head and a customer//friend of the shop was reading torque specs to him.

I walked up, armed with a copy of "Oilhead Rocker End Play For Dummies", downloaded from ADVrider and a few other select suggestions from y'all.

Well... what'dyafind Bruce?
(he was reassembling)
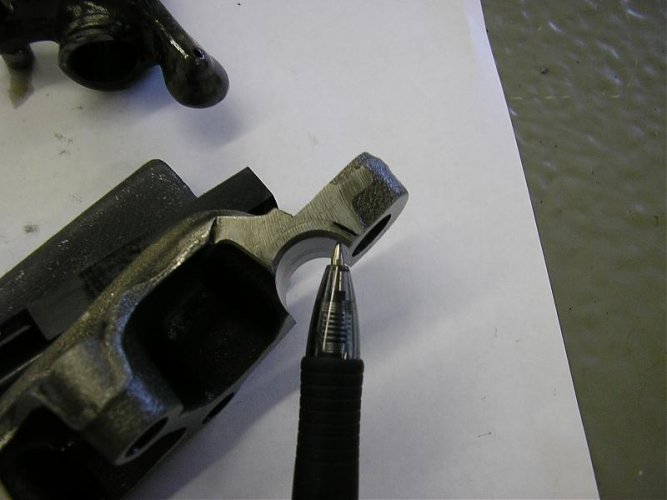
BURRS - 2 of 'em... NICKS... HUMPS (so to speak) On the lower mating surface of the exhaust rocker, where it comes in contact with the rocker holder.

Huh???
How'd that happen?
Bruce say's it looked as if they had been nicked. Like there was a basket of 'em at a manufacturer and that they had been aggressively josteled about. Or a manufacturing defect.
Who knows.

DANG. I DIDN'T HAVE MY CAMERA WITH ME!

He had already machined the BURRS off the plane. Got rid of the pimples, so I couldn't get a lok at the little f-ers.

HOWEVER... I did get a look at the Rocker Holder.
Those BURRS had machined a short channel, I don't know exactly, maybe 1/4 inch long and again, I don't know, but thousandths of an inch deep. Very clean cut. Like it was intended to be there.
Probably the Fire Truck Siren noise I heard as I rode away that first night after the original adjustments.

DANG. I DIDN'T HAVE MY CAMERA WITH ME!

THE MACHINED CHANNEL WAS AMAZING TO SEE.

Those BURRS screwed me up.

Lets say for example that I had measured, with my feeler gauge, right next to the BURRS. Hmmm.. .125mm... perfect.
Move over a fraction with the feeler. Which we did not, or, at least, we did not recognize as a significant problem. Put it up on the BURR, (the HUMP) and OOOOPPS, ya got .03mm... Your under spec for freeplay dude.
It may cause a problem.

Listen everybody... We measured freeplay at the top of the rockers. It was between .1mm - .15mm. Well within spec of .05 - .4mm. It was that way after our original adjustments, and it was that way when the exhaust rocker was bound.

I'm not a machinest, I can't find the words, don't quite understand the science to say how the BURRS messed this up, but they did.

For all I know, those BURRS may have been carving that channel even b-4 we closed the tolerance.
The beginning gap b-4 we started was prox .35mm. We took it down to about .1something. Again, supposedly safe, but certainly more snug. Didn't fly.

As of today we are still near that same gap. But with no DAMN BURRS.
I'm still nervous, but the engine sounds great. Like buttah.

I shot some pics of the left side pieces/parts this morning. We rechecked those as well. Interestingly, there was a little high spot on the lower exhaust rocker as well. No where near as pronounced as the R/S.

I inked in the approximate location of the channel, just for reference.

Moral of the story.

MEASURE ALL AROUND... LOOK FOR HIGH SPOTS WHEN SETTING YOUR ROCKER END PLAY.

Provided it doesn't grenade tomoorrow, as of right now, I'd say it's the nicest sounding oilhead I've ever owned.
I've owned 5.

Questions, comments, wellwishers welcome
DMilan
 

Attachments

  • P1010468.jpg
    P1010468.jpg
    41 KB · Views: 231
Glad to see you and your shop figured out what happened and that no other damaged has been done.
But I had been wondering if you had measured the clearance on the top or the bottom of the rocker arms. I noticed that when I did mine, it was easier to measure at the bottom of the rocker arm. I think that is where you should be measuring at, not the top.
 
Back
Top