• Welcome, Guest! We hope you enjoy the excellent technical knowledge, event information and discussions that the BMW MOA forum provides. Some forum content will be hidden from you if you remain logged out. If you want to view all content, please click the 'Log in' button above and enter your BMW MOA username and password.

    If you are not an MOA member, why not take the time to join the club, so you can enjoy posting on the forum, the BMW Owners News magazine, and all of the discounts and benefits the BMW MOA offers?

blocking crankshaft for rear seal replacement

kwb210

New member
The patient: 1977 R100/7 72,000 miles
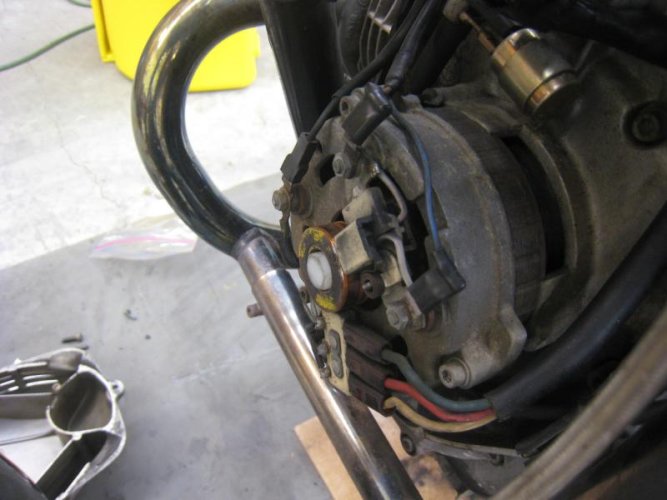
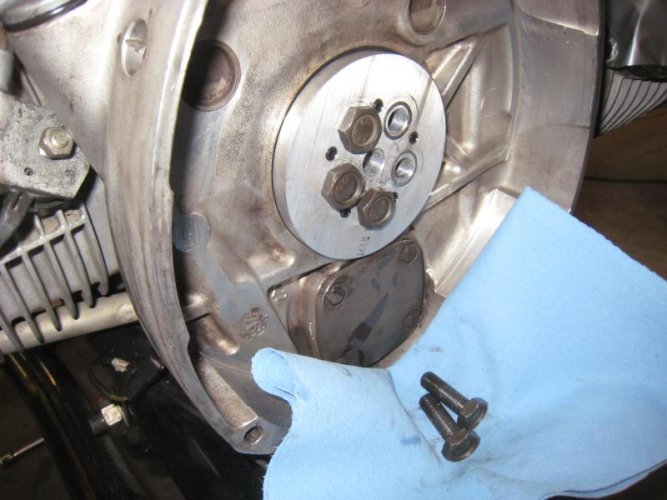
I'm in the middle of replacing clutch and of course the rear seal. I have the tool from Northwoods for blocking the crank and am confused. Where exactly does the crankshaft blocking bolt go? I am guessing I need to remove the alternator? First the allen in the middle, by the yellow marks, and then the three allens holding the alternator on after first removing a few wires. Will the alternator just easily pull forward ond off?
Then insert the bolt into the center where the first fairly long allen was, then replace the alternator so it holds the bolt in place?
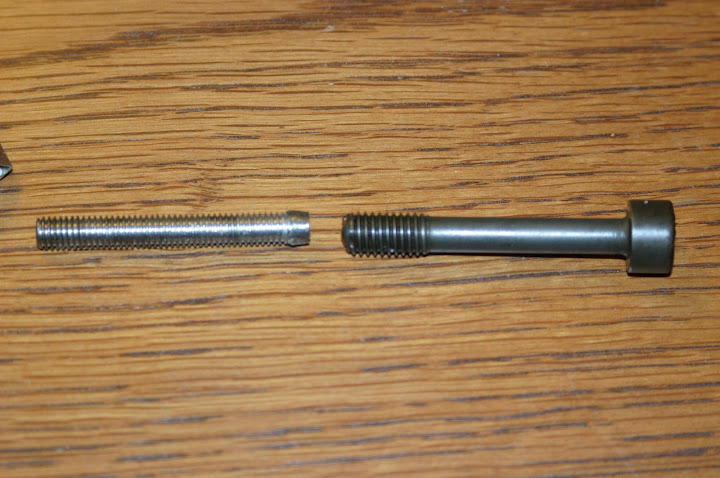
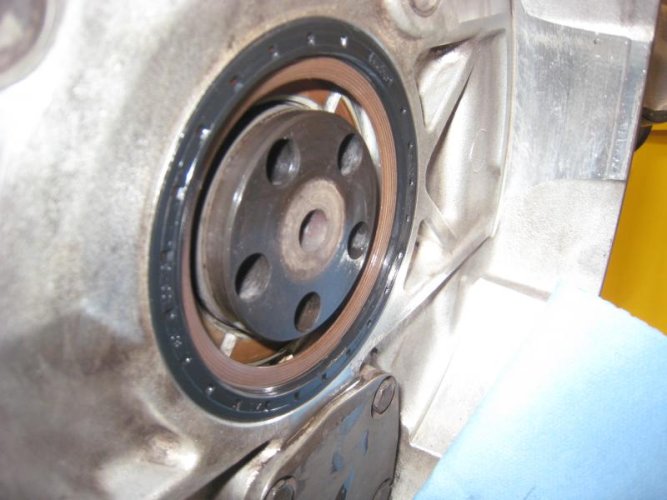
Replace the rear seal, I have Northwoods rear main seal installer, install flywheel, new bolts from Hucky's, and complete the clutch install, then remove blocking bolt and alternator back into place. Any repairs/maintenance needed on alternator?
Clutch was down to .19 inch and the spec said .177 inch, I happen to have a caliper in inches not mm like I would prefer.
Thanks!
Kurt
 

Attachments

  • IMG_0095.JPG
    IMG_0095.JPG
    61.4 KB · Views: 181
I'm not familiar with the tool you mention, but I suspect it replaces the bolt through the rotar. It should stick out far enough so that it contacts the front cover which you would reinstall. This would keep the crank from moving forward during your rear engine work. You should not have to remove anything from the front of the engine except to substitute the bolt. Don't forget to disconnect the negative battery cable.
 
So just remove the center allen, quite long, and replace with blocking bolt and then replace cover? That does make sense and simple too! So no problem pullng the long allen in the center?
That is great, thanks!

I'm not familiar with the tool you mention, but I suspect it replaces the bolt through the rotar. It should stick out far enough so that it contacts the front cover which you would reinstall. This would keep the crank from moving forward during your rear engine work. You should not have to remove anything from the front of the engine except to substitute the bolt. Don't forget to disconnect the negative battery cable.
 
If I remember correctly, which is possible, the bolt will unthread from the crank, pull out slightly and then unthread from the rotar. No problem. Of course, I could be remembering the rotar removal tool. You would think that after doing this once ten years ago, it wouldn't be that hard to remember. Oh well, good luck.
 
Hold on...I don't think you need to remove anything! I've not seen the Northwoods tool, but typically they just insert into the end of the rotor allen bolt and then you lightly put the front engine cover back on. Snowbum shows his homemade tool in Paragraph #8 on his website:

http://bmwmotorcycletech.info/tools.htm

Edit: Here's the description from the Northwoods site:

"This is a small nylon bolt that I've cut to length and modified the
end. Jammed into your rotor mounting allen bolt head and with
the generator cover put back on and snugged up it will block
your crankshaft when you remove the flywheel and clutch etc.
The generator cover bolts will not be able to be tightened all the
way up and that's the idea the pressure is on the crank. You can
jury rig something like this yourself. Like many of my tools this
is a convenience to save you time and headscratching"

This is just a small plastic item right?
 
your memory is fine...

yeah, you're right about the bolt, un-thread, pull out slightly and then un-thread again.
Your memory is perfect! And if I were you that's the story I'd stick with!

""Oh well, good luck.""
For what? Oh yeah, now I remember!! :)

If I remember correctly, which is possible, the bolt will unthread from the crank, pull out slightly and then unthread from the rotar. No problem. Of course, I could be remembering the rotar removal tool. You would think that after doing this once ten years ago, it wouldn't be that hard to remember. Oh well, good luck.
 
Now I'm confused. The Northwoods "tool" is threaded, so I assumed it is to be threaded into the threaded hole the allen is removed from, otherwise, and i have not tried it yet, it seems like it would just kind of sit there and maybe fall out of place. Now what?
Here is the snowbum comments:

quote:8. Tool to hold crankshaft from moving forward. If you remove your flywheel for any reason, be sure to set the engine to OT (top dead center, Oberer Totpunkt) first, and be sure that OT is STILL in the timing window when replacing the flywheel. It is a MUST to mechanically block the crankshaft from moving forward before removing a flywheel. This can be done in several ways, I recommend you do NOT use a towel in the timing chest! One of the neatest methods is likely to be to just make a tool out of a piece of 6 mm Allen wrench material, and weld a 1" (or so) steel disc or 'fender washer', maybe 1/16" thick, onto one end, making the length such that its Allen end fits into the alternator bolt, and the disc end presses against the outer timing chest cover. Usually 3/4 inch overall. The length should be such that some light pressure can applied by the cover, the cover being screwed back onto the engine LIGHTLY, but can't quite fully be brought back to the engine surface. For your home tools, or, since so small, carry it in the tool tray on the bike, but you are UNlikely to ever need it while touring. Weld it squarely to the straight piece of 6 mm Allen wrench. The last time I made one of these, I made it to fit my 83-84 bikes, and the OVERALL length was 3/4". I even put two opposing flats on the sides of the washer (see inside of timing chest outer cover, it has a slight recess in the middle). The flats are not important, just nice. There is a cautionary article on this website, dealing just with that crankshaft problem, with additional details in case you accidentally (?) goof-up. go to: article #81, here is a direct clickable link:

Hold on...I don't think you need to remove anything! I've not seen the Northwoods tool, but typically they just insert into the end of the rotor allen bolt and then you lightly put the front engine cover back on. Snowbum shows his homemade tool in Paragraph #8 on his website:

http://bmwmotorcycletech.info/tools.htm

Edit: Here's the description from the Northwoods site:

"This is a small nylon bolt that I've cut to length and modified the
end. Jammed into your rotor mounting allen bolt head and with
the generator cover put back on and snugged up it will block
your crankshaft when you remove the flywheel and clutch etc.
The generator cover bolts will not be able to be tightened all the
way up and that's the idea the pressure is on the crank. You can
jury rig something like this yourself. Like many of my tools this
is a convenience to save you time and headscratching"

This is just a small plastic item right?
 
Going off memory:

The crankshaft blocking "tool" for sale out "there" is silly.

I took a 2x4 and hit it on the ground really-hard-like and ripped off a piece. I duct taped it to the front center (of the slip ring section) of the rotor and put the front cover back on. I've see that some people just use a bunched up rag crammed in there with the front cover tightened onto it.

...

yeah, you're right about the bolt, un-thread, pull out slightly and then un-thread again.
Your memory is perfect! And if I were you that's the story I'd stick with!

This is true for rotor removal, which does require a special bolt.. but nothing has to come off (in terms of the rotor, to block the crankshaft from moving forward) during a rear main seal replacement.
 
I sued

Here is what I used

IMG_3605.JPG


a 6X45 bolt rounded the head to match the shaft and presto, worked like a champ.
 
So what did you do with it? remove the allen and replace it w/ your threaded rod? I'm confused as to how it works unless it sticks out far enough to be held in place by the front cover, if so that is a great tool, simple too.
I just removed the allen, and inserted Northwoods "silly" $4.00 tool, in lieu of a busted 2x4 on the floor, are you serious(?) and it seems like the tool does not stick out far enough to be held in place when the front cover is re-installed. I feel like I am making a mountain out of a mole hill, but do not want to let the crank shift forward.

Here is what I used

IMG_3605.JPG


a 6X45 bolt rounded the head to match the shaft and presto, worked like a champ.
 

Attachments

  • IMG_0108.jpg
    IMG_0108.jpg
    52.2 KB · Views: 129
I just removed the allen, and inserted Northwoods "silly" $4.00 tool, in lieu of a busted 2x4 on the floor, are you serious(?) and it seems like the tool does not stick out far enough to be held in place when the front cover is re-installed. I feel like I am making a mountain out of a mole hill, but do not want to let the crank shift forward.

That picture doesn't look anything at all like what's on Northwoods site. I'd check with them for the correct application. You're right, that's not going to do the job.

But in the end, you see what the Northwoods picture is supposed to be like. All you really need is something to do the same function.

How about this? Take a 2x4, and cut out a hole that can accept the alternator rotor bolt. Make the 2x4 wider than the engine, maybe as wide as the jugs. Then using rope, etc., secure both ends of the 2x4 by tieing it back around each of the jugs. That will hold the rotor bolt in place and prevent any forward movement.
 
So what did you do with it? remove the allen and replace it w/ your threaded rod? I'm confused as to how it works unless it sticks out far enough to be held in place by the front cover, if so that is a great tool, simple too.

Looks like he uses that piece as a spacer. I'm guessing he backed out the allen, put the little rod in, and inserted the allen to the point where it hit the rod. That would leave the allen bolt sticking out sufficiently far to bump up against the inside of the re-installed front cover. As long as it wasn't bumped, the rotor should stay stationary.. as I'd imagine that could be used as a rotor removal tool, too.

I just removed the allen, and inserted

but nothing has to come off (in terms of the rotor, to block the crankshaft from moving forward) during a rear main seal replacement.

That little plastic thing sticks in the end of the bolt, not in place of it. As seen on Northwoods own website:

IMG_1579-258x192.jpg


in lieu of a busted 2x4 on the floor, are you serious(?)

Yes.
 
A rag, a piece of 2x4 (busted, cut, whatever), the Northwoods tool, all will work. You want to place the "tool" onto the end of the rotor, then replace the front cover so there is pressure on the rotor and, therefore, on the crank. Now the crank is "blocked" and won't move back and forth when the flywheel or clutch carrier is removed. When the flywheel or clutch carrier is again firmly bolted to the crank, take off the front cover and remove the rag/2x4/whatever.
 
I just took an extra allen wrench of the proper size I had and cut off a straight portion and stuck it in the hole. Had to take it out and file a couple time to get the length just right.

Dave H
San Antonio, TX
 
Got the crank blocked!

thanks for all the comments. The Northwoods tool inserts just as in the pic on their website, duh. Once the front cover was on I finished installing the rear main seal. I placed the seal in some motor oil, didn't heat it up as one site suggested. I used the Northwoods tool for seating the seal, simple and placed the seal perfectly in the block, no damage or going in crocked, just turn in the bolts and press it in.
 

Attachments

  • IMG_0109.jpg
    IMG_0109.jpg
    62.3 KB · Views: 58
rear main seal in place

the tool places the seal perfectly. The price of the tool is certainly up there but I weighed the down side...if the seal leaks I'll be back in there, maybe replacing a brand new clutch disk, that would bum me out more than the price of the special tool. I'm sure you could make your own tool, but I could not, so I bought it!
 

Attachments

  • IMG_0113.jpg
    IMG_0113.jpg
    54.9 KB · Views: 58
Did you do the oil pump o-ring while in there?

During a seminar at the national this year, one airhead said that there's no point to putting the rear main in oil before installation.

Of course, like you, I did just that.. a couple days before the rally.

:blush
 
Yup, did the oil pump o ring. I figured I'd soak the seal in oil before installing, kind of a why not, considering it will live in an oily world and that its been sitting dry for probably years, a couple of days in oil seemed to make sense, heating it up, I dunno, might be good, probably no harm, I just did not feel like it. Seal sat in a small gravy tin type tray. I bought a small pile of them at a $1 store. They are perfect for setting small parts in after cleaning or before, they are shiny and easy to see whats in there. I also bought a new turkey/gravy baster, my wife was more than a bit mad when she found out I used the baster in the garage. I think it was because she saw it on the workbench and returned it to the kitchen. She should have asked why it was in the garage in the first place. thats the way i look at it.

Did you do the oil pump o-ring while in there?

During a seminar at the national this year, one airhead said that there's no point to putting the rear main in oil before installation.

Of course, like you, I did just that.. a couple days before the rally.

:blush
 
Back
Top