Navigation
Install the app
How to install the app on iOS
Follow along with the video below to see how to install our site as a web app on your home screen.
Note: This feature may not be available in some browsers.
More options
-
Welcome, Guest! We hope you enjoy the excellent technical knowledge, event information and discussions that the BMW MOA forum provides. Some forum content will be hidden from you if you remain logged out. If you want to view all content, please click the 'Log in' button above and enter your BMW MOA username and password. If you are not an MOA member, why not take the time to join the club, so you can enjoy posting on the forum, the BMW Owners News magazine, and all of the discounts and benefits the BMW MOA offers?
-
Beginning April 1st, and running through April 30th, there is a new 2024 BMW MOA Election discussion area within The Club section of the forum. Within this forum area is also a sticky post that provides the ground rules for participating in the Election forum area. Also, the candidates statements are provided. Please read before joining the conversation, because the rules are very specific to maintain civility.
The Election forum is here: Election Forum
You are using an out of date browser. It may not display this or other websites correctly.
You should upgrade or use an alternative browser.
You should upgrade or use an alternative browser.
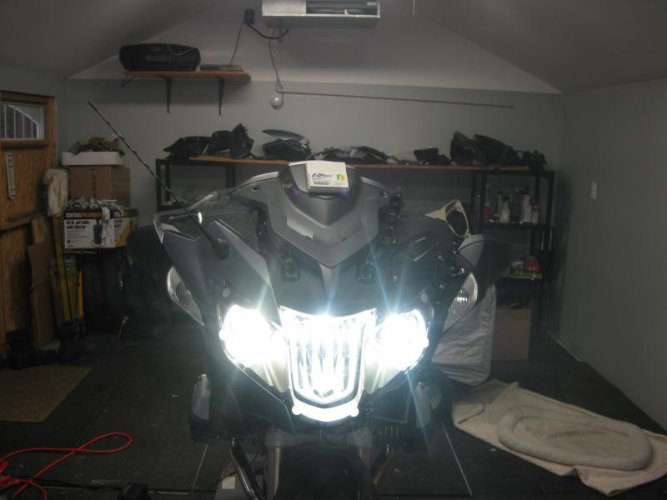
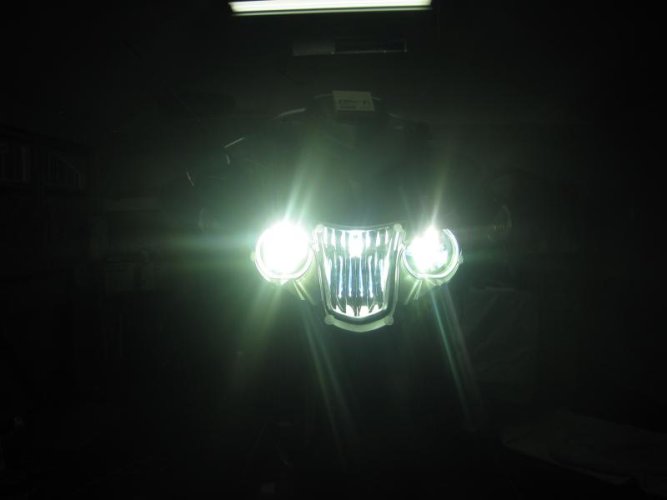
2014 RTW HID Headlight Installation
- Thread starter 80092
- Start date
80092
Member
Is that an after market kit or DIY?
Both you could say . I used this kit with Phillips bulb's.
http://www.kbcarstuff.com/Motorcycle-Xenon-HID-Conversion-Kits-s/34.htm
Order the motorcycle kit for the Low beam ( 1 kit ) and the auto kit for the HI beam ( 2 HID kit's. ) . For the RTW you need to also order there Low beam failure fix for the low beam only.
http://www.kbcarstuff.com/HID-Kit-Components-s/1501.htm
80092
Member
No auto manufacturer anywhere has used HID for lights used as flashers, as HID burner warm-up time is too slow.
Kent I'M not sure what you are implying, the subject matter is for the Headlight not Blinkers ?
jimvonbaden
Kool Aid Dispenser!
Kent I'M not sure what you are implying, the subject matter is for the Headlight not Blinkers ?
He means high beams when used as a flash to pass mode.
Personally I have done it on 2 R1200GS Hexheads and Camheads. The initial HID flash is pretty bright, enough to use as a flash to pass IMHO, though some disagree.
He is right that it is not done by any OEM though. With LEDs these days I am betting it never will as LED will take over for HID in mass market soon enough.
Jim

PS I am definitely interested in a photo tutorial of the HID conversion process. I have it for the GS, but not the RT.
He means high beams when used as a flash to pass mode.
Personally I have done it on 2 R1200GS Hexheads and Camheads. The initial HID flash is pretty bright, enough to use as a flash to pass IMHO, though some disagree.
He is right that it is not done by any OEM though. With LEDs these days I am betting it never will as LED will take over for HID in mass market soon enough.
Jim
PS I am definitely interested in a photo tutorial of the HID conversion process. I have it for the GS, but not the RT.
+1
me too
d'milan
Always interested in a good DIY. If you need help, let me know.Detailed report of installation to follow if interested.
OM
80092
Member
He means high beams when used as a flash to pass mode.
Personally I have done it on 2 R1200GS Hexheads and Camheads. The initial HID flash is pretty bright, enough to use as a flash to pass IMHO, though some disagree.
He is right that it is not done by any OEM though. With LEDs these days I am betting it never will as LED will take over for HID in mass market soon enough.
Jim
PS I am definitely interested in a photo tutorial of the HID conversion process. I have it for the GS, but not the RT.
I thought he may have been referring to the Autobon flash to pass . Yes the HID Hi beam will flash well when cold. I will put together a photo tutorial hopefully some time this weekend. LEDs do require a little warm up as well although much quicker than HID..
Headlight Upgrade
I kept it simple by changing the bulbs with Osram H1 Night Breaker Unlimited with a color temp. of 3700 deg. K And Sylvania Silverstar Ultra for the low / high beam. A modest investment and a noticeable improvement in light output and color. White with only a hint of blue. The Osram bulbs re shape the light pattern putting more light in the ditch. It helps, I do a bit of night riding in Deer country, the beam is further out there as advertised and I do not piss off on coming traffic as does my buddy with his LED driving lamps. I have LED's on my '83 RT and I do know how these miss shaped light patterns affect on comers.
I do think LED's will be the future but they have to be properly focused to put the light where it should be. I just want to smash the Harley LED head light but my brother in law won't let me, they are on his bike. That's OK though, he can't keep up anyways. I have had issues with HID ballasts in my wife's car as it ages so I see them gone as soon as LED's work properly. Nice light but expensive to maintain / fix.
I am mounting Motolights with halogen bulbs to the new RT, I had them on an F800ST and now I have a brake caliper mount to add them on to the RTW. More on that when the snow is gone.
Brian Mansky
1983 R100RT, 2014 R1200RT, the old RT will be an RS soon.
80092
Member
Detailed Installation
Here is my detailed installation of the RTW H-7 Low and H-1Hi beam installation . I sourced my HID products through KB car stuff , very high quality. I went with the Phillips Xtreme HID kit a@ 4300 Kelvin ,the 4300 K is true white light .
http://www.kbcarstuff.com/Motorcycle-Xenon-HID-Conversion-Kits-s/34.htm
Order the motorcycle kit for 1 low beam H-7 and the Automotive lighting package for 2 Hi beam H-1 systems. You will also need KBs Low Beam Failure Fix .
http://www.kbcarstuff.com/HID-Kit-Components-s/1501.htm
Without the RFIX the low beam turns off when switching to Hi beam and will not reignite due to a low beam fault. The fault is due to a reduction in power to the low beam when the Hi beam is switched on. Thus the Low beam requires a relay supplied in the kit.
Order od disassembly to do the job. Remove the following 13 items and in this order . Front Seat , Front Fender , R Battery Cover , Wind Screen , L & R Engine Spoiler , L & R Side Panel , L & R Knee Cover , L & R Speaker Cover , L & R Speaker , Cover for windshield adjuster , L Inside panel , L Storage compartment , Insturement Panel with bracket .

Front seat

Remove Battery cover R , no pic.

Here is my detailed installation of the RTW H-7 Low and H-1Hi beam installation . I sourced my HID products through KB car stuff , very high quality. I went with the Phillips Xtreme HID kit a@ 4300 Kelvin ,the 4300 K is true white light .
http://www.kbcarstuff.com/Motorcycle-Xenon-HID-Conversion-Kits-s/34.htm
Order the motorcycle kit for 1 low beam H-7 and the Automotive lighting package for 2 Hi beam H-1 systems. You will also need KBs Low Beam Failure Fix .
http://www.kbcarstuff.com/HID-Kit-Components-s/1501.htm
Without the RFIX the low beam turns off when switching to Hi beam and will not reignite due to a low beam fault. The fault is due to a reduction in power to the low beam when the Hi beam is switched on. Thus the Low beam requires a relay supplied in the kit.
Order od disassembly to do the job. Remove the following 13 items and in this order . Front Seat , Front Fender , R Battery Cover , Wind Screen , L & R Engine Spoiler , L & R Side Panel , L & R Knee Cover , L & R Speaker Cover , L & R Speaker , Cover for windshield adjuster , L Inside panel , L Storage compartment , Insturement Panel with bracket .
Front seat
Remove Battery cover R , no pic.


80092
Member
4 Continued


Last part to remove is the Horn , unbolt and leave wires connected.
Now the fun begins , the most difficult part is installing the bulbs. I started with the Low beam in the center. The bulb cover is removed with a slight CCW turn .The cover must be drilled to allow the HID bulb and + and - kit connectors to pass into the light housing. I used a step bit to drill a round hole 1.15 " large .Now pass through the HID bulb and blue and black kit wires into the cover, secure the gromet to the bulb cover .
Next disconnect the wires I used a pair of long needle nose pliers . Remove the low beam bulb note it's orientation , be very careful when unhooking the wire bale.
Insert the HID bulb , be sure to seat bulb properly , if not the focus will be off. Now time to hook up the HID and RFIX connections.
80092
Member
5 continued
BMW deviates the traditional wiring for lighting on the RTW . The 2 female plug connectors for the Low beam have a single black lead and a 2 wire black lead. WTH The single wire is + , plug the kit blue wire here, and the other wire goes to the double wire for ground. Stuff the wires into the light housing and install the cover. I do not have a picture of the LB cover installed due to lack of room for picture, it will look similar to the HI beam cover you will see.
Next we have to find a place for the Ballast , Igniter, RFIX , Relay and connectors . The Ballast was placed on top of the Headlight housing under the windshield motor and behind the dash. I used double sided tape supplied with the kit. Clean the housing with alcohol before applying tape. The Igniter and relay were zip tied to the ballast . Here is a picture of the dash with some kit wiring ( Ballast , Igniter , Relay not seen but under thus wiring sorry.
80092
Member
6 continued
Next is the placement of the RFIX Resister. Caution this resister will get extremely HOT and must be mounted out of the headlight housing or else the housing could melt. I used the strut the horn mounts to. Be sure to allow adequate clearance of the RFIX wires , if they touch the resister they could melt. I plan to install wire loom over the rear wire of the RFIX due to the clutch hose making minor contact.

Here is the RFIX displayed order of component connections.

Next is the placement of the RFIX Resister. Caution this resister will get extremely HOT and must be mounted out of the headlight housing or else the housing could melt. I used the strut the horn mounts to. Be sure to allow adequate clearance of the RFIX wires , if they touch the resister they could melt. I plan to install wire loom over the rear wire of the RFIX due to the clutch hose making minor contact.
Here is the RFIX displayed order of component connections.
80092
Member
7 Continued
The low beam install is almost complete, just 2 more wires to connect. The ground wire from the relay goes to the horn mount.
The 12 v power to relay is mounted to the jump start terminal by the battery with a 30 A fuse.

Route of 12 v power supply.


Low beam install complete , High beam next.
The low beam install is almost complete, just 2 more wires to connect. The ground wire from the relay goes to the horn mount.
The 12 v power to relay is mounted to the jump start terminal by the battery with a 30 A fuse.
Route of 12 v power supply.
Low beam install complete , High beam next.
80092
Member
& Continued Hi Beam HID
This is a plug and play install . Remove the H-1 bulb cover, Pull back the bulb cover it will release. Drill the 1.20 " hole in the cover for the bulb and spade connectors . Slip the bulb and spade connectors through the cover and secure the grommet .You have to replace the HID spade male connectors with smaller connectors. The kit connecters are to large . Standard male 14 gauge connectors work perfect.
Remove the H-1 halogen bulb wires ,once again these wires are not color coded. The insulated black wire is + and the non insulated wire is ground .

Insert the HID H-1 bulb into the housing . Now connect the kit white wire + to the insulated BMW plug . Black kit wire to the non insulated - wire. Replace cover , it snaps in place . Connect the ballast to the Igniter and Igniter to bulb .
I mounted the Ballast and Igniter to the left dash area above the bulb cover with 2 sided tape and zip ties , see picture.

Left side done, the right installation is the same . The R side is a tighter fit , you need to find similar mounting for the R side ballast and igniter . Do use 2 sided tape and zip ties.
Prior to reinstalling Tupperware run the bike and feel all connections , be sure they are not hot. If so something is not correct .
Hope this helps , you just need time and patients.
I will proof read and correct error's if found.
This is a plug and play install . Remove the H-1 bulb cover, Pull back the bulb cover it will release. Drill the 1.20 " hole in the cover for the bulb and spade connectors . Slip the bulb and spade connectors through the cover and secure the grommet .You have to replace the HID spade male connectors with smaller connectors. The kit connecters are to large . Standard male 14 gauge connectors work perfect.
Remove the H-1 halogen bulb wires ,once again these wires are not color coded. The insulated black wire is + and the non insulated wire is ground .
Insert the HID H-1 bulb into the housing . Now connect the kit white wire + to the insulated BMW plug . Black kit wire to the non insulated - wire. Replace cover , it snaps in place . Connect the ballast to the Igniter and Igniter to bulb .
I mounted the Ballast and Igniter to the left dash area above the bulb cover with 2 sided tape and zip ties , see picture.
Left side done, the right installation is the same . The R side is a tighter fit , you need to find similar mounting for the R side ballast and igniter . Do use 2 sided tape and zip ties.
Prior to reinstalling Tupperware run the bike and feel all connections , be sure they are not hot. If so something is not correct .
Hope this helps , you just need time and patients.
I will proof read and correct error's if found.
Last edited:


Similar threads
- Replies
- 29
- Views
- 3K
- Replies
- 5
- Views
- 874