Changing the front tire for the first time since I bought the bike and I am having some reservation about driving out the stack for service. Everything seems good and tight, left race is tight in the wheel and there is no corrosion on the bearing. What are the opinions on cleaning and greasing the bearings without removing the stack? And preload refers to how tight the axle nut is, correct?
Navigation
Install the app
How to install the app on iOS
Follow along with the video below to see how to install our site as a web app on your home screen.
Note: This feature may not be available in some browsers.
More options
-
Welcome, Guest! We hope you enjoy the excellent technical knowledge, event information and discussions that the BMW MOA forum provides. Some forum content will be hidden from you if you remain logged out. If you want to view all content, please click the 'Log in' button above and enter your BMW MOA username and password. If you are not an MOA member, why not take the time to join the club, so you can enjoy posting on the forum, the BMW Owners News magazine, and all of the discounts and benefits the BMW MOA offers?
You are using an out of date browser. It may not display this or other websites correctly.
You should upgrade or use an alternative browser.
You should upgrade or use an alternative browser.
/5 front wheel bearings
- Thread starter kjmcd13
- Start date
How many miles on the bearings? Duane Ausherman has a good section on his site for doing /2/5 bearings...I was a little concerned about doing my R69S but with a little bit of heat, the bearing stack came out...a steel hub helps. Freezing the bearings before insertion almost let them drop right in.
Preload relates to the tightness of the axle nut but only in a relative sense. There is a specific measurement as discussed on a /7 snowflake bearing installation here in the forum, but Duane talks about "shake the wheel" as a way to get a sense of the what the preload is going to be. As you tighten the axle nut, you stop tightening the axle nut as you approach the proper torque, then grab the wheel at say 9 and 3 and move the wheel around. Well below the torque, you should feel/see some relative movement of the wheel housing around the bearings/axle. Tighten some more, recheck the wheel movement. If you reach the axle torque and the wheel still moves, then you don't have the right preload...you have too little or none. If you partially tighten the nut and the wheel stops moving relative to the axle, then the preload is too much. You want the movement to disappear with that last little bit of axle nut torque. That would then be approximately the right amount of preload. This level of preload is adjusted by substituting different size wedding rings in the stack to achieve the right preload.
One thing you that you might consider doing is popping the seals and removing the bearings, but leaving the races in place. Clean everything up, the bearings as well as the races, then hand-lube the bearings, reinstall with new seals. Good grease in the bearings...the only question will be the preload, but you can try the "shake the wheel" test.
You mean that there are no spacers to keep the bearing races (cones) separated? That would need proper shimming to produce the correct bearing pre-load?
If they do, then the axle nut should be tightened to torque spec, and with the correct spacing and shimming between the bearings, the bearings would be properly pre-loaded. Correct?
If they do, then the axle nut should be tightened to torque spec, and with the correct spacing and shimming between the bearings, the bearings would be properly pre-loaded. Correct?
You mean that there are no spacers to keep the bearing races (cones) separated? That would need proper shimming to produce the correct bearing pre-load?
If they do, then the axle nut should be tightened to torque spec, and with the correct spacing and shimming between the bearings, the bearings would be properly pre-loaded. Correct?
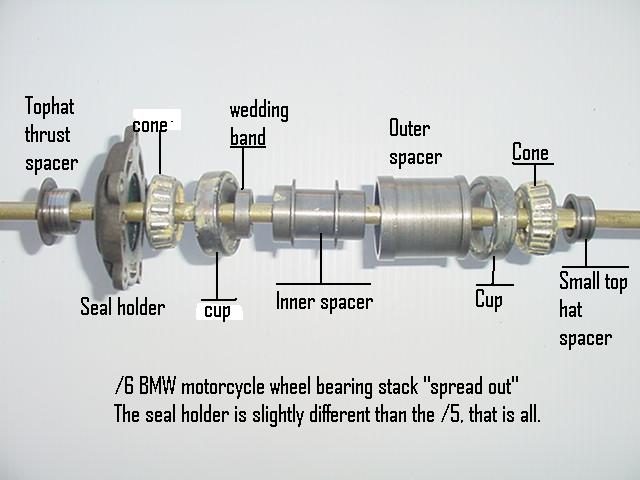
Not sure who the question is for. Duane shows what the stack basically looks like with this picture. But, yes, with the correct spacing and shimming, the preload would be correct with the axle nut is torqued. It takes some measurements/tests to figure that out.
Bearing Preload
I read Ausherman and Snowbums articles about bearings and I will try to drive out the stack today with the aid of a heatgun. Hopefully it all goes well. Anybody who may want to do this needs to read those articles. Very concise and Ausherman sells shims to achieve proper preload instead of changing the wedding band.
I read Ausherman and Snowbums articles about bearings and I will try to drive out the stack today with the aid of a heatgun. Hopefully it all goes well. Anybody who may want to do this needs to read those articles. Very concise and Ausherman sells shims to achieve proper preload instead of changing the wedding band.
Bearing change
Heatgun takes too long so a torch was in order. Also picked up new bearing/seals as the bearings were a bit sketchy. Races came out fairly easily with heat but there is some slight grooving in the center part of the hub, but not where the races ride. Should I worry about that? I will do the Ausherman/Snobum mod of grinding the inner spacer ridges so it can be removed thereby making the captive bearing serviceable without the need to drive out the stack.
Heatgun takes too long so a torch was in order. Also picked up new bearing/seals as the bearings were a bit sketchy. Races came out fairly easily with heat but there is some slight grooving in the center part of the hub, but not where the races ride. Should I worry about that? I will do the Ausherman/Snobum mod of grinding the inner spacer ridges so it can be removed thereby making the captive bearing serviceable without the need to drive out the stack.
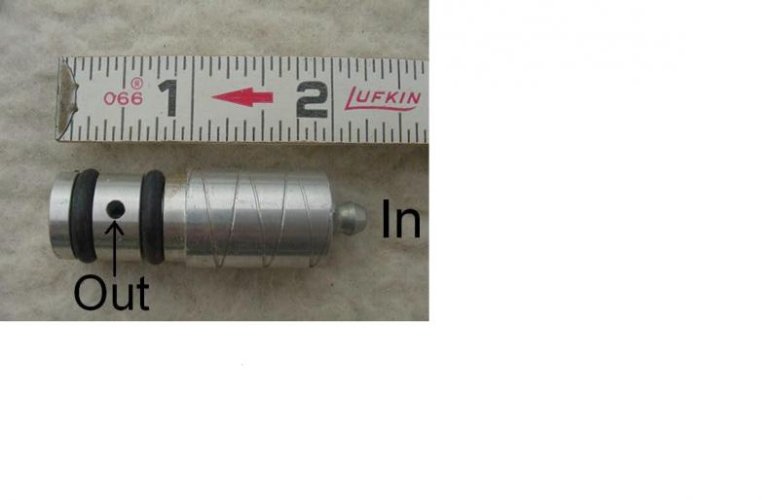
Cycle Works sells a tool for greasing the wheel bearings without having to remove the stack. I have one of these tools, but I've yet to use it. I'm thinking of giving the tool a try the next time I have the airhead wheel off. The best testimonial that I heard for this type of tool came from the late Fred Tausch. Fred indicated that his R60/5 had the original wheel bearing in place after over 600,000 miles. He said the he used a greasing tool on the bearings every 5,000 miles. His bike outlasted him.
link to cycle works tool -
http://www.cycleworks.net/index.php?main_page=product_info&cPath=29_33_53&products_id=48
pictures of Fred's bike -
http://www.bobsbmw.com/community/Fred.html
more info on Fred -
http://www.advrider.com/forums/showthread.php?t=69044
Following is a picture of the tool sold by Cycle Works - photo came from Duane Ausherman's page -
http://w6rec.com/duane/bmw/wheel_bearing/
Other testimonials for the wheel bearing greasing tool -
http://www.advrider.com/forums/showthread.php?t=563349
http://forums.bmwmoa.org/showthread.php?42122-Wheel-Bearing-grease-gizmo
Attachments
dennisdarrow
#4869 Earned Lifetime mem
Cycle Works sells a tool for greasing the wheel bearings without having to remove the stack. I have one of these tools, but I've yet to use it.
Following is a picture of the tool sold by Cycle Works - photo came from Duane Ausherman's page -
http://w6rec.com/duane/bmw/wheel_bearing/
Bought mine from Mr. Duane back in the 70's and it is still going strong. If I take off a wheel, the hub gets a shot of grease. It is no big deal to do it. Only about 400K miles of use on it...........God bless.......Dennis
I forgot to mention that Duane Ausherman also sells a set of shims to set the pre-load. The alternative is to replace or adjust the "wedding ring" to get to proper stack thickness yielding the desired pre-load. Re-Psycle BMW has a box of the wedding rings from which to chose the proper size, but I'd reckon that most BMW dealerships don't have these at all. The folks a Re-Psycle showed me how to take a slightly oversize "wedding ring" and get it to the proper size. This involves use of some plate glass and 400 grit sandpaper. One makes figure-eights on the sandpaper with the "wedding ring". Periodically the stack is reassembled and the axle and nut are fitted - there is a special spacer (also available from Cycle Works) and the nut is tightened to the proper torque. [If one had access to a lathe or milling machine the spacer could be made from a piece of plumbing pipe - hacksawing the pipe will not work!] The pre-load is checked - there should be a slight resistance to the rotation of the bearing. If the resistance is too large, then the "wedding ring" is removed and more figure-eights are traced on the sandpaper. I found that the written instructions for setting the pre-load to be insufficient in gaining in-sight in adjusting and obtaining the desired pre-load. Happily for me the folks at Re-Psycle (Mark, the owner) gave me a tutorial and demonstration.
I now have a set of Duane's shims that are very useful in getting the proper pre-load. This is usually a one-time operation, provided that the bearings aren't replaced. When the bearings are replaced, it is essential to adjust the pre-load. This is a popular item to demonstrate at an airhead tech-day.
I now have a set of Duane's shims that are very useful in getting the proper pre-load. This is usually a one-time operation, provided that the bearings aren't replaced. When the bearings are replaced, it is essential to adjust the pre-load. This is a popular item to demonstrate at an airhead tech-day.
If the resistance is too large, then the "wedding ring" is removed and more figure-eights are traced on the sandpaper.
If I remember the process right, if there's too much resistance, continuing to file the wedding ring will only make things worse. If there's too much resistance, that means that the torque is collapsing the stack more and more. The only way to correct that is to go to the next size thicker wedding ring, remeasure, and start the filing process again. Duane's shims could be used in the "too much resistance" situation.
Mike V. provide a very good pictorial on this process. He ended up using a small fish scale to measure the forces used to turn the bearings. I recall one long time mechanic, and I think Duane mentions it on his site, that when pushing sideways on the middle spacer, it should push with a modest amount of resistance. If it slides easy, not enough preload; if it takes a lot of force, too much preload. Just what that "modest" amount of force is turns out to be the $64M question!!
Well you can tell that it's been a while since I've done this. The previous note is correct. If the resistance is too loose then removal of some material from the wedding ring will approach the proper resistance. If the resistance is too great removal of more material will only make things worse - sort of like cutting a board. You can cut it a bit too long and gradually creep up on the proper length, but if you cut it too short, you can cut it again and again and it will still be too short ") . Duane's shims are just the ticket for those situations where the pre-load resistance is too tight - it only takes a few thousandths of thickness to make a world of difference in too loose and too tight.
. Duane's shims are just the ticket for those situations where the pre-load resistance is too tight - it only takes a few thousandths of thickness to make a world of difference in too loose and too tight.
. Duane's shims are just the ticket for those situations where the pre-load resistance is too tight - it only takes a few thousandths of thickness to make a world of difference in too loose and too tight.Hi,does any of his information apply to 78/7 bikes?
Yes. The only issue you're going to have (and I did on my /7) is that you can't just beat the bearing stack out. The bearings are in an aluminum hub...beating them out will likely destroy the hub. Bummer. What happened on my /7 bearing replacement at a Tech Day was a torch was used to heat the hub to a decent temperature, probably spit-sizzle, but it can be verified with an infrared thermometer gun or tempilstiks. When at the right temp, then the stack can be driven out. I'm sure glad I had some experts around! I'm not that good with flames!!
Going back in is somewhat easier. Again, the hub needs to be heated, but the stack was chilled in a freezer for an hour. The preload had been set on the stack. When ready, it almost just drops right in.
Bearings
Snowbums article explains the fish scale technique thoroughly. According to him it is much more accurate than Duane's "shake test". I am also getting new rubber and Bum says to have it balanced before putting the seals in or greasing the bearings. Just a few drops of light oil until it is balanced. Since getting my Airhead and joining this site I am starting to get some insight on how to maintain my Toaster. Since it is the only bike I own I would like to keep it going till I expire. I appreciate all the help and advice!
Snowbums article explains the fish scale technique thoroughly. According to him it is much more accurate than Duane's "shake test". I am also getting new rubber and Bum says to have it balanced before putting the seals in or greasing the bearings. Just a few drops of light oil until it is balanced. Since getting my Airhead and joining this site I am starting to get some insight on how to maintain my Toaster. Since it is the only bike I own I would like to keep it going till I expire. I appreciate all the help and advice!
So for a /7 can I pull and replace the seals, and pump some grease in there without an advanced degree in airheadoligy?
I did that recently on the front bearings on my /7...not so easy to do on the rears.
RE: the tool to grease the bearings in place...I bought one from Cycleworks but am not convinced that it really gets the grease where it needs to go. I've asked Cycleworks to explain the flow path of the grease but have yet to hear. On the Airheads email list, there was a discussion about a year ago and one of the prolific explainers on the forum even went so far as to draw a diagram about how the grease just fills the internal void and doesn't really help the bearings. I'd sure like be able to better visualize how it works. It would cool to see something like that at Airhead SuperTech that happens each February.

Definitely, on the front wheel, carefully pulling the seal gets you easily to the bearing. You've probably seen the method of putting a dollop of grease in your palm and then walking the bearing around the bottom circumference, pushing grease between the rollers until it oozes out the top. The one that is difficult is the inside captive bearing on the rear wheel. You can't get that bearing out...it has to be driven out as we've been describing. I believe I've read where Oak suggests putting the wheel over a barrel and very thoroughly cleaning the bearing out brake cleaners, etc. Then using small bits of grease on the finger tip, push grease back into the bearing through the axle opening. Never tried that myself...I'd have to look the next time I had the wheel off.
I'd be mighty careful about using brake cleaner on bearings. The brake cleaner can do a fine job of removing all of the grease and oil from the surface. I found that it only takes about 1/2 of a sandwich (between time of applying brake cleaner and inspecting bearing) for the bearing to rust and be ruined. Apparently I didn't learn this lesson well enough on a $4 bearing; it took a $25 bearing to be ruined before I fully learned my lesson. If you are going to attempt to use brake cleaner for an in-situ re-lube job, then I'd recommend use of a very light oil immediately after the application of the brake cleaner. Then you can go eat your sammich and come back and fully apply the grease. (I have a spray bottle that has a mixture of WD-40 and Marvel Mystery oil just for the purpose of giving recently cleaned parts a light oil coating to prevent rusting.)
Similar threads
- Replies
- 6
- Views
- 794