• Welcome, Guest! We hope you enjoy the excellent technical knowledge, event information and discussions that the BMW MOA forum provides. Some forum content will be hidden from you if you remain logged out. If you want to view all content, please click the 'Log in' button above and enter your BMW MOA username and password.

    If you are not an MOA member, why not take the time to join the club, so you can enjoy posting on the forum, the BMW Owners News magazine, and all of the discounts and benefits the BMW MOA offers?

  • Beginning April 1st, and running through April 30th, there is a new 2024 BMW MOA Election discussion area within The Club section of the forum. Within this forum area is also a sticky post that provides the ground rules for participating in the Election forum area. Also, the candidates statements are provided. Please read before joining the conversation, because the rules are very specific to maintain civility.

    The Election forum is here: Election Forum

Want to Learn to Recover My Own Seats

72r60/7

13278
I've got 3 Corbin seats that either need covering or will soon. One seat is ready for its 4th cover. All are K75 seats and all are different shapes.
My first attempt at a spare seat included about every mistake one could make. The sewing was fine, but despite the resulting mess, I did learn a lot.
Covering material is only $25-$60. Add 0 for labor and 5 times the time of someone who knows what they are doing and I may have something I am not too ashamed of.
I used a marine material from a "fabric store" and it had some stretch in 2 directions, but wanted to know if anyone has had experience with the material that stretches 4 ways, to cheat a wee bit on the first few.
I really want to learn to cover my own seats.
Any pointers will be greatly appreciated.
Charlie
 
You may find some help with your project(s) on the Seat Concepts site-
http://www.seatconcepts.com
There are a number of videos on the installation work that have some nice tricks.
For the actual sewing, the Sailrite site, has some great materials and videos-
http://www.sailrite.com
I just bought one of their sewing machines.
Gary
 
I've got 3 Corbin seats that either need covering or will soon. One seat is ready for its 4th cover. All are K75 seats and all are different shapes.
My first attempt at a spare seat included about every mistake one could make. The sewing was fine, but despite the resulting mess, I did learn a lot.
Covering material is only $25-$60. Add 0 for labor and 5 times the time of someone who knows what they are doing and I may have something I am not too ashamed of.
I used a marine material from a "fabric store" and it had some stretch in 2 directions, but wanted to know if anyone has had experience with the material that stretches 4 ways, to cheat a wee bit on the first few.
I really want to learn to cover my own seats.
Any pointers will be greatly appreciated.
Charlie

Did you contact Corbin about the problems? When the foam went soft in my old K75 corbin seat, the factory replaced the foam for free. However, I didn't need any repairs to the cover.
 
Seat recovering

There really aren't any problems with the seats. They are just plum worn out. All the covers will eventually dry and crack. Normal wear and tear, except for the hole the Keas donated. Nothing at all to do with Corbin.
I really like the seats and my pillion is happy. If I bought, say, a new GS twin I would seriously consider putting the '92 K75 BMW Importer Corbin option on it. For me, it is that comfortable.
Corbin has made some great seats, but in my opinion, outgrew its britches long ago. Personally, I'll never give them my business.
I just would like to try to put a cover on rather than go to my local upholsterers, who did nice work at only a bit more than a fair price.
Charlie
 
Does your local college or high school offer night school? You might be able to find a course in basic upholstery. While not specific to bike seats, some of the concepts and techniques might apply.
 
clowry
Does your local college or high school offer night school? You might be able to find a course in basic upholstery. While not specific to bike seats, some of the concepts and techniques might apply.
Well that's a good idea.
Thanks, Charlie
 
Watched Rocky Mayers crew build the seat for my 1600, they used some really serious sewing machines, don't think a home machine would work.
 
My 1951 Singer (inherited) sews all the seat material that I have tried so far with no problems. It will sew thin leather (deerskin) also, as I made a nice pair of gloves from a pattern of a worn out pair of Thurlow Deerskin gloves. Sorry to see them go out of business.
My first attempt at a seat was good enough to throw a full size sheepskin over. I definitely will keep at it, as I'm sure it will take a few, to many attempts, to get to a point where someone won't point and say "who covered that ! "
I'm just looking for a few pointers.
Charlie
 
First thing first. You need a walking-foot sewing machine. It will NEVER stitch right without one. Your Singer might be one. Older Singers are better. Different machines do different sewing. Can't say if your Singer is up to the task. You don't need a Juki, but having one is nice. Second, you need a Teflon foot. Once you have these two things, it will stitch properly. Then you need to get the tension set correctly for the thread and material you are sewing. Most people use a #18 needle for leather. But, it really depends upon other factors.

People who do this kind of work, replace the motor with a step-down motor. You want to move at a MAXIMUM rate of 2 stitches per second. You want to go SLOW! Even if you have to turn the wheel by hand, that is okay. Most people learning go way too fast.

If you want to use leather, you want 3 to 3-1/2 oz leather for the seat. There are places where you can buy it wholesale. Look around. When you buy the leather ask them for a recommendation for the thread. Don't use cotton thread - it will rot. Use upholstery thread, or something similar.

Foam is a whole another subject. There are many options. Most good seats are layered with different densities. The most dense foam on the bottom and softer foams on the upper layers. Most people buy foam that is too soft. If you can find an old vehicle where the back seat was rarely used, you can pull the foam out of it for your project. Cheap and more proper density. By, the way, Corbin used a very dense foam, and if I remember he had his own injector machine and mold. Oh, when I talk about density, I am really talking about firmness (ILD). Density and firmness are two different things, but I am trying to make it understandable.

That should get you started.
 
Last edited:
Post #9
First thing first. You need a walking-foot sewing machine. It will NEVER stitch right without one. Your Singer might be one. Older Singers are better. Different machines do different sewing. Can't say if your Singer is up to the task. You don't need a Juki, but having one is nice. Second, you need a Teflon foot. Once you have these two things, it will stitch properly. Then you need to get the tension set correctly for the thread and material you are sewing. Most people use a #18 needle for leather. But, it really depends upon other factors.

People who do this kind of work, replace the motor with a step-down motor. You want to move at a MAXIMUM rate of 2 stitches per second. You want to go SLOW! Even if you have to turn the wheel by hand, that is okay. Most people learning go way too fast.

If you want to use leather, you want 3 to 3-1/2 oz leather for the seat. There are places where you can buy it wholesale. Look around. When you buy the leather ask them for a recommendation for the thread. Don't use cotton thread - it will rot. Use upholstery thread, or something similar.

Foam is a whole another subject. There are many options. Most good seats are layered with different densities. The most dense foam on the bottom and softer foams on the upper layers. Most people buy foam that is too soft. If you can find an old vehicle where the back seat was rarely used, you can pull the foam out of it for your project. Cheap and more proper density. By, the way, Corbin used a very dense foam, and if I remember he had his own injector machine and mold. Oh, when I talk about density, I am really talking about firmness (ILD). Density and firmness are two different things, but I am trying to make it understandable.

That should get you started.

Posted by 23217

23217,
Thank you for responding with a lot of valuable information and tips. You managed to pack a lot of information into a small space. I have had a sewing machine for a while and there was a lot to learn about correct needles, threads and tensions. I think I have the basics down, but when you teach yourself, who knows. A lot of seats have contrasting thread to the color of the covering. I think it looks good, but I am not to the point where the stitching is good enough to show (stand out). I match the two because, while sewing is not too hard, it takes skill to do a nice job. First thing I did before this project was to test and practice with the materials to see if the machine and I were capable of acceptable fastening. We were.

Pattern making seemed to be challenging, with the first attempt, with the contours associated with the seats that I have. I'm not sure which way to use the material, since it only stretches a little in 2 directions. Or even if one should be using material that stretches 4 ways ? Or is material that stretches, important ? Any tips on that one ? I'd like to be armed with those answers before the second attempt.

Thanks again for your response (and any others out there).
Charlie
 
Recovering Your Own Seats

I'm just waving a little flag to show that I have not given up.

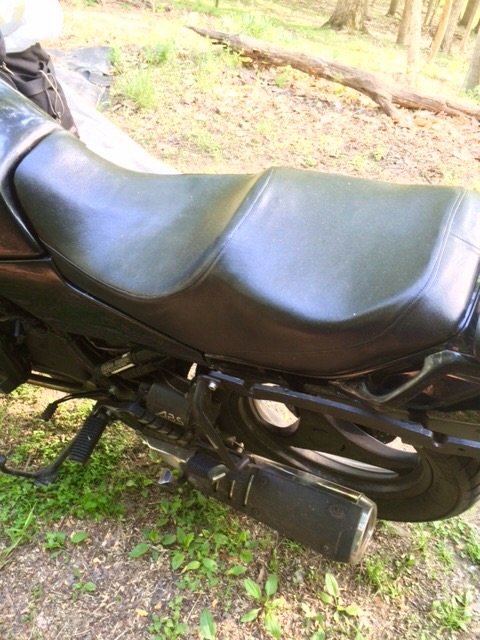
Second attempt and I got 2/3's of the covering right and not too ashamed to use the seat, although the right side has a few wrinkles. In fact, too many to show but not bad enough to use, till next time that seat needs covering.

I used a marine grade covering from a fabric store and total cost including glue, rivets, etc. was only
$50-$60 and time learning and doing.

Now I need to know how to fill in the voids in the foam from removing the old covering where it was glued, so that they don't show on a seat that has been recovered more than a few times. There were not large, but if you look close in person, you can see them and they may look worse later or hopefully better as the material shrinks from age.

Sewing was not a problem, but as always, hard for me to do a nice job.

It was a simple covering job and I hope the next one is not a complex cover, because I need more practice on the simple ones. A lot more practice. I am certainly open for more suggestions and information on recovering.

Charlie

image.jpg
 
Looks pretty good in the picture! My (somewhat limited) understanding is that upholsterers often use a thin layer of soft foam padding between the cover and the structural foam in the piece itself (the seat, in this case) to help hide any rough edges in the structural foam. Pull apart any automotive seat and you'll see a thin layer of foam stitched to the seat cover. The upholsterer that made the covers for the headrests in my Mazda did the same to help better shape the cover over the structural foam in the headrest. That might help in this case on the top of the seat to cover any imperfections in the seat foam. I seem to recall the last MC seat cover I purchased (many years ago for my Triumph) had a layer of thin padding stitched to the underside of the top of the cover.
 
Back
Top