•  

    Welcome! You are currently logged out of the forum. Some forum content will be hidden from you if you remain logged out. If you want to view all content, please LOG IN!

    If you are not an MOA member, why not take the time to join the club, so you can enjoy posting on the forum, the BMW Owners News magazine, and all of the benefits of membership? If you click here, you have the opportunity to take us for a test ride at our expense. Enter the code 'FORUM25' in the activation code box to try the first year of the MOA on us!


R90/6 instrument cluster F@%*

soflopro

SoFlo MoFo
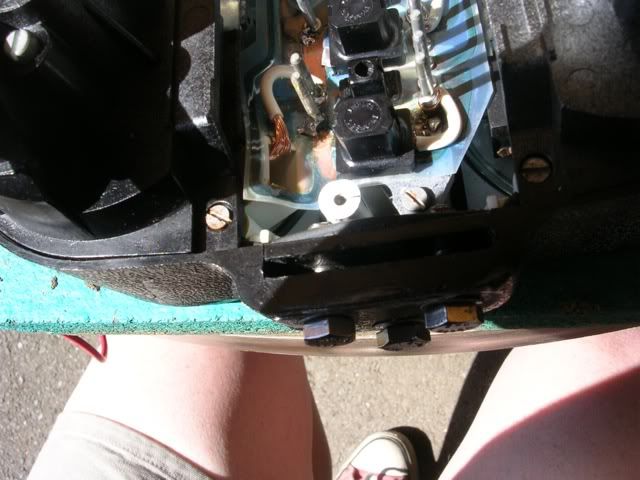
i recently checked some bulbs to swap in my cluster, and when i pull it apart i notice rust building up on the inside around the bulb sockets. as i pull the turn signal indicator bulb out i accidentally tear a piece of the copper connection in the socket. :scratch . i carefully take out the other bulbs and check them and try to clean them best i could. any suggestions on cleaning rust out of these sockets? i cleaned up with some q-tips and alcohol...? when i thought i cleaned up enough i put it all back together... now the gen light doesnt work... with the bike running i tapped the cluster a bit... and it came on for a second... i try that a few times... same thing.. on and off.. Could it be a Loose Socket? Bad Connection? now i have it apart again here's a pic...

Anyone now where i can get a new bulb socket circuit board thing?
 

Attachments

  • DSC_0966.jpg
    DSC_0966.jpg
    57.9 KB · Views: 463
Bob's BMW has the circuit board piece. I believe it is eighty some dollars. I replaced the one on mine several months back.
Bill
 
If your handy with wiring and micro soldering, you can complete the circuit or improve the circuit to the bulb with small bits of wiring around posts and wedged into the socket that the bulb goes. You probably opened up a trace on the plastic circuit and since the ends of that circuit are close together, rapping the instrument pod might make it work momentarily.
 
While I agree with Kurt that these things can be repaired, save yourself the trouble and get a new one if they are, in fact, still available. Sometimes this is the best way. You can plainly see in the picture where one of the tabs of copper leaf is broken where the bulb socket pushes in. It looks to me like the circuit for the "brake failure" indicator light. That flexible circuit sheet is delicate and it looks like your instrument cluster has been subject to the elements. (rust) Do yourself a favor and spend some money. While we all learn to make do with these old bikes and their parts, there is nothing better than new parts.
 
The bulb is part of charging circuit. Ie; battery will not charge if bulb not working. I think a new circuit board is cheap insurance.
 
If it was me, and I just had mine apart last week replacing the needle on the tach, I would remove the whole circuit board to replace bulbs. The tricky one is the high beam bulb; but the rest are designed for the bulb itself to be pulled straight out of the black little fixtures. The fixtures fit in the very delicate copper "holders" in the circuit board. All you need to do is pull those remaining 2 screws there in the middle of the board.

Kurt is pretty much right; but then there is the philosophy of replacement if available. In this case, looking at yours, I would replace; but if you have to use the one you have use a fine points/relay file to clean up the copper elements, use a 12V power supply to each bulb after replacing the bulbs back in the circuit board on the bench, and then after you find out what is wrong with a bulb not working........fix that with a wire/solder bridge................Got an ohmeter?.....Use that to check if the bulb is getting power or continuity of the circuit itself.......God bless.......Dennis
 
Got an ohmeter?.....Use that to check if the bulb is getting power or continuity of the circuit itself.......God bless.......Dennis
Just had mine apart to replace the high beam indicator. You can actually poke an ohm meter in the side of the socket to test the continuity. There are two vertical strips on the side of the socket that allow you to test the bulb in the socket. Just a thought. The other point I would mention is that the GEN bulb does in fact affect the charging IF someone has not done the Snowbum mod by adding a resistor to the circuit. So, if it is still charging with the GEN bulb inop, I would say that mod has been accomplished.
Bill
 
Bob's BMW has the socket assembly/circuit board listed for $75... I paid $65 when I replaced mine in '08 from MAXBMW, but MAX shows them as not available, so Bob's may be the best bet...

I had run some wire to complete a bad part of the circuit (speedo backlight) for a few years before finally replacing it outright. It worked fine, but I don't regret spending the $$ for the new one that works without any fuss. 30 years was enough for the first one- hopefully the new one will last as long...
 
I'd suggest that you replace the board simply because thatpart may not be available in the future and a replacement will last 30+ years.

At just over $2 per year, thats a cheap fix!
 
thanks for all the advice, the light has been intermiten, and the battery died... sooo off to the radio shack to see if i can rig it for now until i can order a new part. The copper tag that broke is for the turn signal indicator, and the high beam looks like its going too... would those broken tabs cause the circuit board to not work properly...cause the gen light to not work properly? or could it simply be a poor connection from the rust? is there any cleaning solution for electrical contacts?
 
boiling Vinegar

Boil some vinegar ( I do it in the microwave) Then use som Q-tips to work at the rust.

Sounds crazy but I use it to remove mineral deposits on expensive medial equipment. (Learned from the wife!!:love -new she was good for something!!)

you do have to soak it!!
 
What kind of vinegar? :brow i thought of using coca-cola? but it might attract bugs later vinegar sounds better
 
Circuit Board

In addition to your bulb circuit board, part # 62-11-1-243-439, about $65.00, I would replace the two little gaskets that go inside the speed/tach housing.

"Circuit Board Gasket", part # 62-11-1-356-669, about $2.00. And "Rubber Gasket", part # 62-11-1-356-671, about $2.00. Now your housing really will be ready for the next 30 years.

Denny Pink
R100/7
R1100/RSL
Thanks Denny,
That is very useful info since I am in the middle of fighting an intermittent issue myself with a verified broken tracing to the headlight indicator bulb. And my gaskets could use replacing as well. I agree with the comment above that for thirty years of service, treat yourself to new parts when available and relatively inexpensive.
As a side note: I replaced my speedometer and tac backlight lamps with green LED's from superbright, PN WLED-G_120. I got red and blue as well to check the effect. Blue was almost unusable, red was okay, green was as usable as the white AND looks cool. Pretty cheap as well.
 
I??ve the same ?¿pod?¿ as shown in the picture. Are the bulb sockets made to be pulled straight back and out, in order to change the bulb?
I??ve tried that, not succeeded. Afraid to wreck it.
Hans
 
I'd recommend removing the three screws that hold the light board to the pod. Then turn it over and put a drop of penetrating oil on each contact for each bulb. I've also taken to sliding a piece of thin metal (like a feeler gauge) between the bulb socket and contact to help free them, as corrosion often builds up and 'glues' them together. You don't want the contact coming up with the bulb or it can get ripped.

I've also found it works best to lift one side first and then the other as it puts less strain on the contacts.

Completely agree...I've had to deal with my 1974 /6 and 1975 /6, instrument lighting and that is exactly correct, pull out the bulb holder and put some marvel mystery oil on the tabs, walk away for a few minutes let it soak that should make it less likely not to tear the tabs....light touch.
 
The tabs can often be repaired with wee bits of alu foil, folded and bent.

Discontinuities at the pins can also be dealt with:

BMW351.jpg


There's plenty of room under the cover to wrap a wire around the pin and solder it into place.

Solder can also be applied to reestablish connection from pin to flexible circuit thingy. The pin at the top of the pic, left side, has a dot of solder for just that.
 
Back
Top