• Welcome, Guest! We hope you enjoy the excellent technical knowledge, event information and discussions that the BMW MOA forum provides. Some forum content will be hidden from you if you remain logged out. If you want to view all content, please click the 'Log in' button above and enter your BMW MOA username and password.

    If you are not an MOA member, why not take the time to join the club, so you can enjoy posting on the forum, the BMW Owners News magazine, and all of the discounts and benefits the BMW MOA offers?

  • Beginning April 1st, and running through April 30th, there is a new 2024 BMW MOA Election discussion area within The Club section of the forum. Within this forum area is also a sticky post that provides the ground rules for participating in the Election forum area. Also, the candidates statements are provided. Please read before joining the conversation, because the rules are very specific to maintain civility.

    The Election forum is here: Election Forum

1995 R100RT Fairing Bracket Failure

Scarletswirl

New member
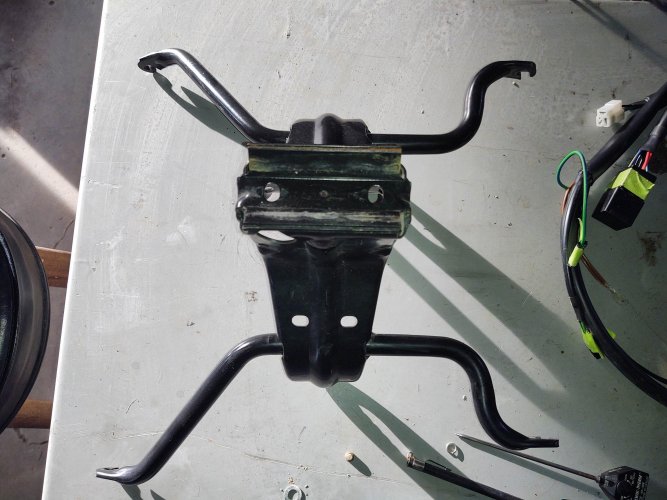
Yesterday I started hearing some awful noises from the front of the bike and realized that the fairing was loose. At first I thought one of the bolts had loosed up or fallen out, but when I started disassembly I realized that the upper bracket had detached from the frame. The plate where the fasteners go through separated from the rest of the bracket, probably due to fatigue failure. See attached picture.
The bike has less than 20K miles.
This leads to several questions:
1. Has anyone run into this before? Is this considered a 'common' failure? Anything that can be done to prevent it in the future?
2. I have a friend who is pretty good at welding and is willing to weld the fatigue cracks shown in the picture. Would that work, or should I look for a good used part?
3. The part is no longer available from BMW. However, it is available on ebay. Here's the rub. There are two parts numbers for it, one that goes on earlier bikes (46 63 1 237 932 up to '83?) and the other from '84 on (46 63 1 452 476). For some reason, the early ones seem more abundant and also cheaper. Does anyone know whether they are interchangeable and if one type is better than the other?

As always, thanks for any input.

Bracket2.jpg
 
Sorry I cannot answer any of your questions, other than I'd feel comfortable having a competent welder repair yours, if it were mine. Maybe some structural beefing up of the piece while at it. Makes me wonder if the later Airheads included some off shore parts.

Thanks for the heads up though. I will be partially disassembling my 1995 R100RT soon in order to inspect, replace fork seals and attend to the steering neck bearings. Thanks to you, I will be carefully inspecting my fairing bracket while at it.

Joe H
 
I agree with Joe. Give welding a try with some well placed strengthening straps. Study where the loads are coming from and strengthen for that loading.
 
Bracket

First, I can say in the many miles I have on my RT and RS bikes, I never have seen the main fairing bracket break. I have had the inserts the bolts mount into the fiberglass fairing pull out or bolts fall out. but never a broken main mount.

I am a bit confused with your picture, The only two mounting points of this bracket to the main frame are the two holes which you show next to the arrows you have in your picture. If the bracket was mounted any other way, it was not done at the factory. I am looking at your bracket and comparing it to one of my spares, and they seem the same except for the damage shown in your picture. Your damage does not make sense to me as it almost looks like something was welded onto each end of the bracket and it was that which broke off?

Are you the original owner? If you are the second owner, perhaps the PO installed the fairing? I have seen this done by a friend who put an RT fairing on an R90S. He however drilled and tapped the holes in the head tube of the frame in order to make the installation the same as the factory.

Main bracket.jpg.


The picture of my bracket shows the two mounting bolt holes. As I said, these are the two factory mounting points to the frame. It is possible I am not seeing your picture properly but to me it looks like someone added something else to the bracket to mount it to the frame.

All the brackets from 79 to 95 are interchangeable as far as I know. I do see the part number change from 932 in the earlier bikes to 476 in the later bikes.

With the number of RT and RS bikes being converted to custom cafe bikes, fairings and bits are showing up on the market cheap. I don't think you will have a problem finding one to fit your bike. Please let me know if I am correct or incorrect. I am very curious and do want to help. Cheers, St.
 

Attachments

  • Main bracket.jpg
    Main bracket.jpg
    323.5 KB · Views: 61
Bracket failure clarified

First, I'm not the original owner, but I've had the bike for two years and it's been very reliable, except for a couple of self-inflicted problems. The bracket was mounted correctly through the two holes next to the failure areas. As far as the construction of the bracket, I'll try to explain what I see in mine. The piece containing the mounting holes is bent to conform to the steering tube to which it is fastened. It is also bent so that, seen from the side of the bike, it forms a 'C' shape, with the two small legs of the 'C' welded to the rest of the bracket, top and bottom. The welded area is quite large and can't be seen from the picture. The failure is not along the weld, but immediately below the bend in the 'C'.
This makes sense if you consider that it occurred close to discontinuities in shape (i.e. stress concentration points) and also in the places where the cross-sectional area is smallest. What killed it is not the static load, i.e. the weight of the fairing, but the continuous up/down loading resulting from riding, that's why I suspect fatigue failure.

To Joe, I haven't lubed the steering head yet, but I did install progressive springs. In one of the internet sites suggested by another user, there is an explanation of a method to compress the spring using a 13 mm Allen wrench and a ratchet strap. Once you master that method, the job becomes much easier. As far as the oil volume, you can start with 300 ml and add accordingly. The instructions that came with my springs gave a level rather than a volume, but it turned out that 300 got me very close anyway. Shockoilgauge.jpg
If you need to check the level, a way to make a gauge for it is to use a piece of aluminum bigger than the diameter of the fork tube and drill it to receive a thin steel rod. You can make a 90 degree hole and thread it to accept a set-screw to keep the rod in place. If you really want to be fancy, knurl the end so the oil sticks to it a little better and put graduation marks as well. I know, I know, I should have replied to your original thread instead of here...
 
It looks like the sides migrated out. If this is the case, easy weld job.
If that is a bit of rust or discoloration I see on the low side, generally means the fracture started a while ago and has been “working”.
OM
 
Looks like lots of washboard roads, fairing pockets heavily loaded. Perhaps extra large windshield. Perhaps a corrosive liquid spill. This is very uncommon.
 
Glad to hear it's uncommon. I do have a tall windshield, one from Clearview, it was installed about a year ago. The only things I keep in the glove compartments are a pad of paper and a pen. As I say, I doubt it's the static load (weight), I'm more inclined to think it's the road bumps that cause a 'cyclic'-like load and ultimately result in fatigue. And yes, there is some rust, but it's along the sides. Those are either not welded, or resistance welded. The origin of the failure? Possibly. More likely a contributing factor. I do intend to clean the parts up and repaint before reinstalling.
Now that I think about it, lately I've had several fairing bolts loosen or fall off altogether. First it was one of the lower fairing bolts, on one of the lower L shaped brackets. Then the one on the other side. Also, the upper right hand bolt fell off, a real bear to replace, behind the secondary instruments dash. Finally, when I took the fairing off, I also noticed that the right lower one was missing. I think (and hope) the problem was that the failure had already started and was causing the fairing to vibrate much more than usual, resulting in all these bolts loosening.

As far as the repair, I decided that I'll let my friend take a shot at welding it back together, if I don't like the result, I'll buy a used one on ebay. I'll ask him if there's a way to reinforce the stressed area with gussets and such, but personally I don't see where they would attach to without interfering with the mounting holes. On the bright side, this is the perfect time to get the speedo recalibrated, put in a new headlight bulb, and replace the fairing-to-fork boots. Unfortunately, the bike will be out of commission for a while, but my list of things to do will get a bit shorter.
Thanks to all who contributed.
 
Nail on the head

Seeing further data on your problem leads me to think your problem was caused by loose fairing mounts. I mean the four main mounting points the fairing mounts onto the bracket. While I have never had a catastrophic failure such as you have, I have had two of the inserts pull out of the fiberglass, not at the same time but over a period of years. The first was the upper left mount, The second and most recent was the lower left side. Also over the years I have had bolts vibrate loose and in one case fall out. Dumb me, I have yet to make inspection of these bolts part of a maintenance plan ao bad on me the for the damage caused.

Over the years I have had various height windscreens on the bike from extra tall to medium. The extra tall shield didn't seem to matter much.

In all reality, the loose mounting brackets caused excessive vibration or perhaps bouncing of the fairing. While the fairing is not all that heavy, a long stretch of bouncing and such would not be a good thing.

Oh a reinstallation tip, replace the two bottom hex head bolts with comparable sized Allen bolts. It is a whole heck of a lot easier to get a ball end type of Allen wrench into the danged spot they are at to tighten them down. I have yet to find an easy way to get a regular wrench or hex head tool into that spot to easily turn the bolts. Bloody things get just so tight with my fingers, and are just loose enough to be a pain to wrench down tight with an open end or box end wrench. The ball style Allen works best. Of course, I could be missing something. St.
 
Back
Top