• Welcome, Guest! We hope you enjoy the excellent technical knowledge, event information and discussions that the BMW MOA forum provides. Some forum content will be hidden from you if you remain logged out. If you want to view all content, please click the 'Log in' button above and enter your BMW MOA username and password.

    If you are not an MOA member, why not take the time to join the club, so you can enjoy posting on the forum, the BMW Owners News magazine, and all of the discounts and benefits the BMW MOA offers?

  • Beginning April 1st, and running through April 30th, there is a new 2024 BMW MOA Election discussion area within The Club section of the forum. Within this forum area is also a sticky post that provides the ground rules for participating in the Election forum area. Also, the candidates statements are provided. Please read before joining the conversation, because the rules are very specific to maintain civility.

    The Election forum is here: Election Forum

Special tools for working inside /5 headlamp housing?

ultracyclist

New member
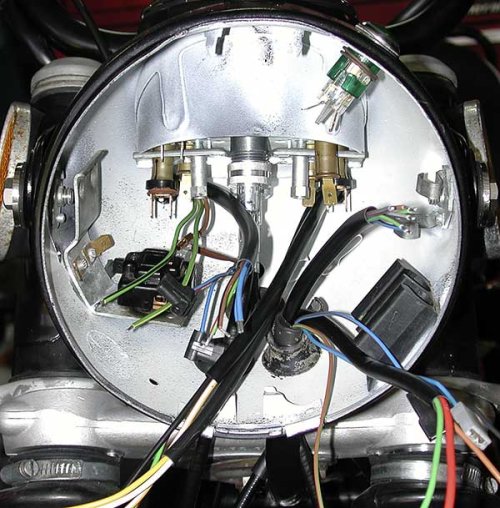
I spent a few hours today working inside the head lamp housing trying to lube both the speedo and Tach connections as well as a few other house keeping tasks.

There is not much space in there, and I am convinced that the former naval architects of the U-Boats probably found employment post-WWII in the German automotive and motorcycle industries.

Other than growing a prehensile tail about 5 feet long with the diameter of a ball point pen cartridge refill or surgically altering my fingers to look like those of an alien life form (three more joints in each digit, thin, with suction cups at the ends), what special tools to you use to make your wrenching in the headlamp easier?
 
A few things I recall: The terminal board that all of the running light/horn/ignition wires connect to is held to the bucket by a small screw on the outside of the bucket at about 8 o'clock as you face the open bucket. You can gain a little space by removing that screw and also pulling the horn relay. Take a picture or two before you pull anything apart. A pair of hemostats works pretty well, but the instrument lights will just pull out with the bulb holder, so you need to work carefully. The wires that attach to the main switch come out easily and will give you lots of room if you remove them. They are held in by the retaining screws, as I am sure you have seen already. Again, a picture is really helpful to get it all back together, but it is tight.

Best of luck!

Greg
 
Some helpful items:

Hemostats
Proper lighting
A seat that pus you at good working position to avoid back strain
Patience
Beer
 
Something I've read regarding any restorations...paint the inside of the headlight bucket white before installing the wiring. It helps to see things when digging into it later on. This would be hidden by the headlight in place so you still have a concours bike! :whistle
 
Something I've read regarding any restorations...paint the inside of the headlight bucket white before installing the wiring. It helps to see things when digging into it later on. This would be hidden by the headlight in place so you still have a concours bike! :whistle

I did this while restoring my 1953 R51/3, and while a /3 headlight bucket is nowhere near as complex as a /5, it's still an amazing improvement to do any kind of maintenance:

P4274279.JPG
 
nekkid /5 nacelle

The only advice I would offer is to take everything loose, check all of the "soldered" ends ( and resolder if necessary) and then start re-connecting from the rear, forward. By the time you get out to the front you should know what's going on in there like the back of your hand; which is a good thing, especially after dark, far, far, from home.
icon_wink.gif
 

Attachments

  • 2251-on-bike-harnesses-in.jpg
    2251-on-bike-harnesses-in.jpg
    67.1 KB · Views: 254
Back
Top