Navigation
Install the app
How to install the app on iOS
Follow along with the video below to see how to install our site as a web app on your home screen.
Note: This feature may not be available in some browsers.
More options
-
Welcome, Guest! We hope you enjoy the excellent technical knowledge, event information and discussions that the BMW MOA forum provides. Some forum content will be hidden from you if you remain logged out. If you want to view all content, please click the 'Log in' button above and enter your BMW MOA username and password. If you are not an MOA member, why not take the time to join the club, so you can enjoy posting on the forum, the BMW Owners News magazine, and all of the discounts and benefits the BMW MOA offers?
-
Beginning April 1st, and running through April 30th, there is a new 2024 BMW MOA Election discussion area within The Club section of the forum. Within this forum area is also a sticky post that provides the ground rules for participating in the Election forum area. Also, the candidates statements are provided. Please read before joining the conversation, because the rules are very specific to maintain civility.
The Election forum is here: Election Forum
You are using an out of date browser. It may not display this or other websites correctly.
You should upgrade or use an alternative browser.
You should upgrade or use an alternative browser.
F-Twins Tech - F800GS Renewing Fork Oil
- Thread starter drneo66
- Start date
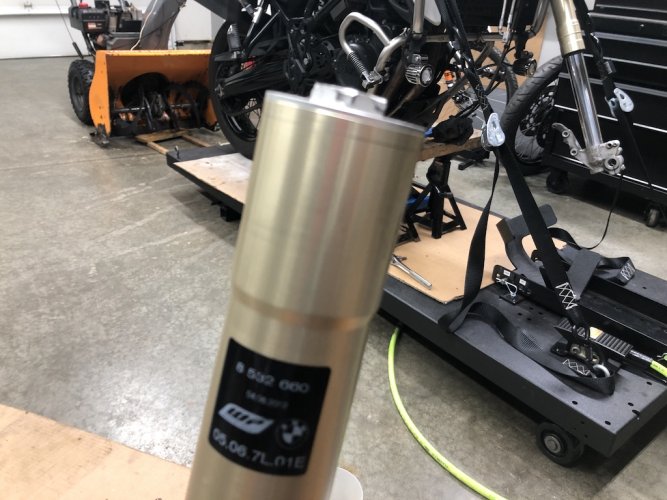
We can now put the top cover back onto the fork. Slowly meet up the bronze-colored upper tube to the fork tube and screw the cap down until it's about 80% complete. Using a bit of fork oil and your finger, lubricate the o-ring on the top cover with a bit of fork oil, then tighten the top cover to hand tight.

Last edited:
We can now install the fork leg back into the bike. You'll notice that the top of the fork has a single grove machined into it almost at the top of the fork; this is where the fork should sit on the triple tree.
The process to torque the pinch bolts on both the upper and lower portions of the triple tree is a bit unique.
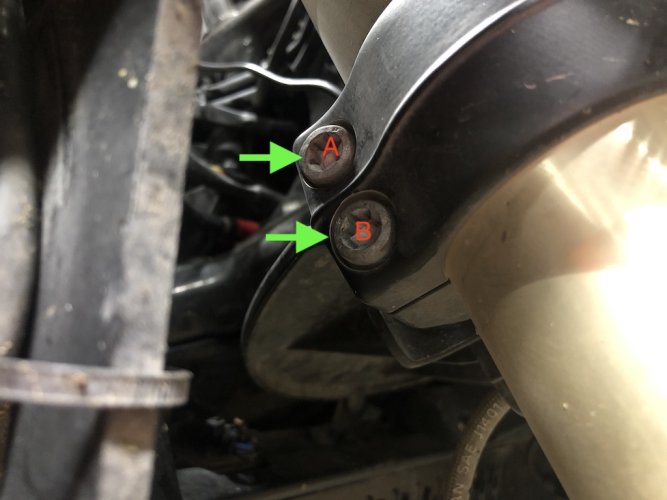
Tighten up the bottom set of two pinch bolts by using your T45 star bit. Each bolt is torqued to 19 Newton meters (14 Foot-Pounds, 168 Inch-Pounds) each time it is tightened. Starting on the top bolt, torque this pinch bolt, then torque the bottom pinch bolt, and continue going between each bolt for a total of six times (each bolt is torqued three times).
(In the picture below, you torque bolt A, then bolt B, then bolt A, then bolt B, then bolt A, and finally bolt B.)
and continue going between each bolt for a total of six times (each bolt is torqued three times).

Last edited:
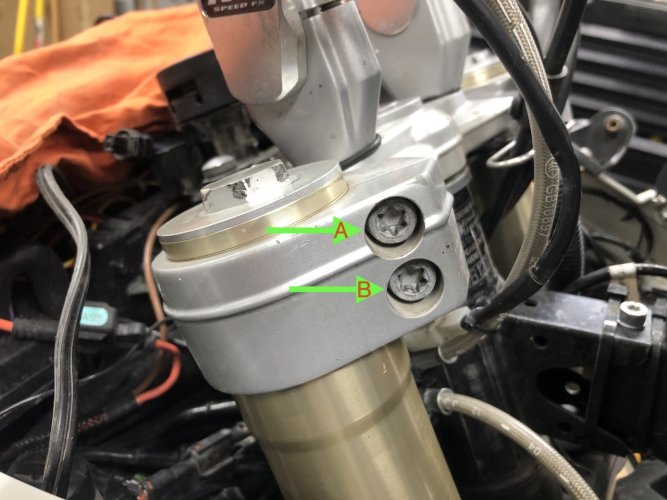
Tighten up the top two pinch bolts by using using your T45 star bit and torque wrench.
This process is the same as the bottom pinch bolts:
Each bolt is torqued to 19 Newton meters (14 Foot-Pounds, 168 Inch-Pounds) each time it is tightened. Starting on the top bolt, torque this pinch bolt, then torque the bottom pinch bolt, and continue going between each bolt for a total of six times (each bolt is torqued three times).
(In the picture below, you torque bolt A, then bolt B, then bolt A, then bolt B, then bolt A, and finally bolt B.)

Last edited:
Move on to the other fork leg and repeat the same process. (We will call this the "second fork" for the next process)
Second fork out, drained, refilled, and top cover screwed on hand tight.
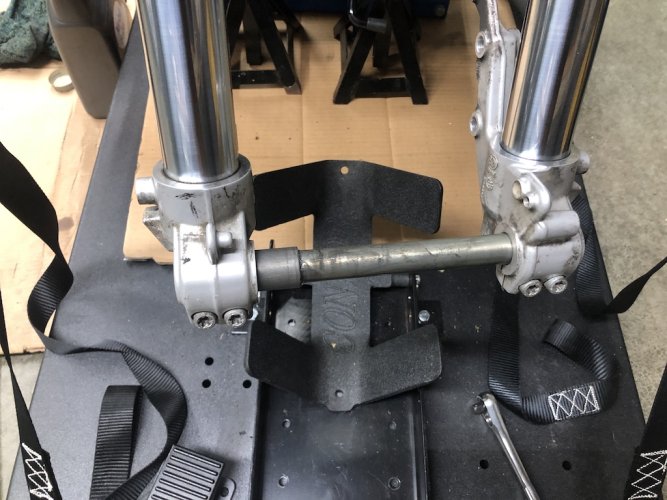
To prevent the forks from binding as we ride, we will use the front axle to make sure that everything is aligned properly. Install the second fork leg so it's again properly lined up with the machined groove on the top of the fork leg/steering head yoke, and hand tighten the top two pinch bolts. Then install the front axle.
Next, loosen, and then tighten the top pinch bolts using your T45 star bit and torque wrench. Again the unique process: Each bolt is torqued to 19 Newton meters (14 Foot-Pounds, 168 Inch-Pounds) each time it is tightened. Starting on the top bolt, torque this pinch bolt, then torque the bottom pinch bolt, and continue going between each bolt for a total of six times (each bolt is torqued three times).
(In the picture below, you torque bolt A, then bolt B, then bolt A, then bolt B, then bolt A, and finally bolt B.)
Then tighten the bottom set of pinch bolts using the unique process: Each bolt is torqued to 19 Newton meters (14 Foot-Pounds, 168 Inch-Pounds) each time it is tightened. Starting on the top bolt, torque this pinch bolt, then torque the bottom pinch bolt, and continue going between each bolt for a total of six times (each bolt is torqued three times).
(In the picture below, you torque bolt A, then bolt B, then bolt A, then bolt B, then bolt A, and finally bolt B.)
You should be able to easily draw out the front axle without any binding. If you notice any binding, then loosen up both top and bottom pinch bolts on the second fork leg and torque them back down.

Last edited:
You can now reinstall the front wheel. Directions are located here on the forum: https://forums.bmwmoa.org/showthread.php?99246-F-Twins-Tech-F800GS-Front-Wheel-Removal
Then you can reinstall the front brakes by gently guiding each brake caliper onto the brake disc, being careful to route the speed sensor located on the clutch side to the correct position. Using your external E12 star (Torx) socket to torque each upper and lower brake caliper bolts to 38 New Meters (28 Foot-Pounds, 336 Inch-Pounds).
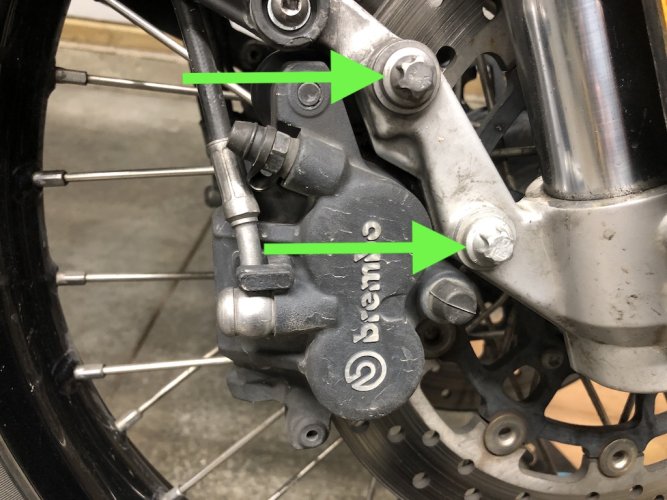
Then you can reinstall the front brakes by gently guiding each brake caliper onto the brake disc, being careful to route the speed sensor located on the clutch side to the correct position. Using your external E12 star (Torx) socket to torque each upper and lower brake caliper bolts to 38 New Meters (28 Foot-Pounds, 336 Inch-Pounds).

Last edited:
You can now reinstall the front fender - careful to route the brake lines and speed sensor wire to the correct locations. Using your T30 star bit to tighten each of the 6 total bolts of the fender to 4 Newton Meters (3 Foot-Pounds, 36 Inch-Pounds). Snap on the plastic pieces that cover the brake lines.
The speed sensor uses a T30 and is torqued to 8 Newton Meters (5.9 Foot-Pounds, 71 Inch-Pounds).
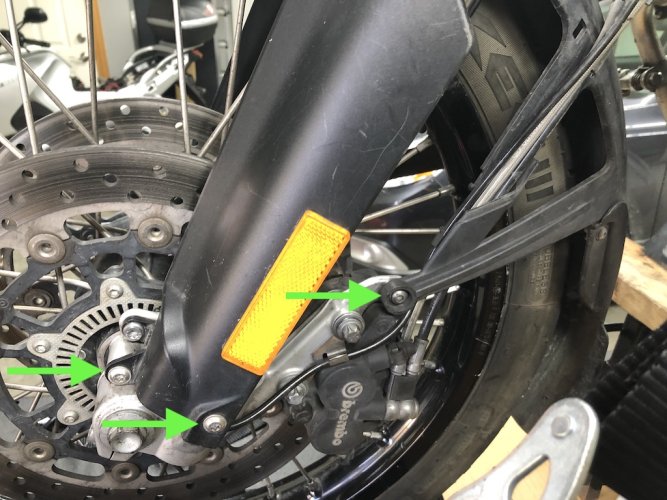
The speed sensor uses a T30 and is torqued to 8 Newton Meters (5.9 Foot-Pounds, 71 Inch-Pounds).

Last edited:
Similar threads
- Replies
- 43
- Views
- 13K
- Replies
- 9
- Views
- 8K
- Replies
- 14
- Views
- 8K
- Replies
- 15
- Views
- 3K
- Replies
- 7
- Views
- 5K

