Navigation
Install the app
How to install the app on iOS
Follow along with the video below to see how to install our site as a web app on your home screen.
Note: This feature may not be available in some browsers.
More options
-
Welcome, Guest! We hope you enjoy the excellent technical knowledge, event information and discussions that the BMW MOA forum provides. Some forum content will be hidden from you if you remain logged out. If you want to view all content, please click the 'Log in' button above and enter your BMW MOA username and password. If you are not an MOA member, why not take the time to join the club, so you can enjoy posting on the forum, the BMW Owners News magazine, and all of the discounts and benefits the BMW MOA offers?
-
Beginning April 1st, and running through April 30th, there is a new 2024 BMW MOA Election discussion area within The Club section of the forum. Within this forum area is also a sticky post that provides the ground rules for participating in the Election forum area. Also, the candidates statements are provided. Please read before joining the conversation, because the rules are very specific to maintain civility.
The Election forum is here: Election Forum
You are using an out of date browser. It may not display this or other websites correctly.
You should upgrade or use an alternative browser.
You should upgrade or use an alternative browser.
Best adhesive for rubber tank panels , 22l tank - 1975 R90/6?
- Thread starter THOMASPIN
- Start date
Here's a couple of past threads on this:
https://forums.bmwmoa.org/showthread.php?81898-gluing-rubber-knee-pads-on-5-tank
https://forums.bmwmoa.org/showthread.php?94980-83-R80-G-S-PD-Tank-Question
https://forums.bmwmoa.org/showthread.php?90434-Need-advice-kneepad-adhesive
I've used the 3M Super Weather Strip Adhesive to glue the engine badges back on to my /7 engine.
pglaves
#13338
I love 3M weather strip adhesive for small items. But I am not sure I would like it for this application because it takes several minutes to set enough to hold things. Thus if I can weight the item or tape the item firmly in place I like it. If not then not so much. I think this is a place I would prefer a simple contact cement. The issue there though is you have to be precise when placing the panel because the contact cement grips instantly and no sliding into position is allowed. Good luck.
I used 3M Window Weld. It’s a urethane caulk used for installing windshields. I put a dot on each of the squares, and a very small bead around the perimeter, except at the very bottom. I left a small gap so any water that got behind the pad can escape. Before I glued on, I ran the pads through the dishwasher twice. Worked really well to remove the release agent from the pads. When in direct contact with the sun, my pads never distort, always stay flat. About $30.00 a tube, and hardly any gets used, but it is a permanent fix.
THOMASPIN
Airhead
I used 3M Window Weld. It’s a urethane caulk used for installing windshields. I put a dot on each of the squares, and a very small bead around the perimeter, except at the very bottom. I left a small gap so any water that got behind the pad can escape. Before I glued on, I ran the pads through the dishwasher twice. Worked really well to remove the release agent from the pads. When in direct contact with the sun, my pads never distort, always stay flat. About $30.00 a tube, and hardly any gets used, but it is a permanent fix.
This sounds like the way to go. Thank you.
Three questions:
1 - did you use the primer (3M 08682)?
2 - what dishwasher temperature did you use?
3 - what did you use for a nozzle/gun as the 3M Window Weld comes with neither.
I used no primer. Just made sure tank was clean.
Heat is your friend in the dishwasher, we use Cascade detergent in ours. I ran mine through twice.
My caulk came with a nozzle, and used a good caulk gun, not the ratchet type. Purchased caulk at a independent auto parts store that sells to a lot of body shops.
Start small when cutting the nozzle, and practice on scrap material. Can always make the opening larger, and there is way more in a tube than you will need. I think I used about an 1/8” bead around the center of perimeter. You do not want it oozing out, caulk does not just wipe off.
Common sense and patience goes a long ways.
Hope all goes well!

Thank you.
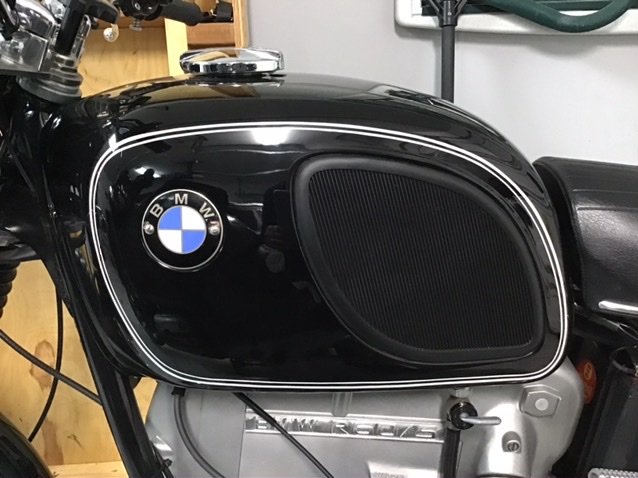
Also, why did the factory make those whorl-like indentations where the knee pads are attached?
At first I though this might be the manifestation of a German sense of humor, but quickly discounted that foolish notion:
View attachment 76242
Mucho nice repaint and pinstriping job. Local guy? Do you know what paint was used?
")
beemeruss
Member
Thank you.
Also, why did the factory make those whorl-like indentations where the knee pads are attached?
At first I though this might be the manifestation of a German sense of humor, but quickly discounted that foolish notion:
[/ATTACH]
Could they be for storing spare Bratwurst? Seriously though, I believe that they are stiffening ribs located in the hidden spot. The sides of the tank are the largest and least curved surface and that would prevent their flexing on a hot day with high fuel vapour pressure. That sure is some gorgeous paint and pins.
Russ
dennisdarrow
#4869 Earned Lifetime mem
I love 3M weather strip adhesive for small items. But I am not sure I would like it for this application because it takes several minutes to set enough to hold things. Thus if I can weight the item or tape the item firmly in place I like it. If not then not so much. I think this is a place I would prefer a simple contact cement. The issue there though is you have to be precise when placing the panel because the contact cement grips instantly and no sliding into position is allowed. Good luck.[/QUOTE
Use wax paper for keeping "instant" adhesives from bonding together. The adhesives do not become attracted nor attached to the wax paper. One slips the wax paper in place between the two, align them properly, slide the paper out a bit to begin attaching, and then finish the job.....Works great on this, furniture veneers, or counter-tops...……….God bless.....Dennis
pglaves
#13338
I love 3M weather strip adhesive for small items. But I am not sure I would like it for this application because it takes several minutes to set enough to hold things. Thus if I can weight the item or tape the item firmly in place I like it. If not then not so much. I think this is a place I would prefer a simple contact cement. The issue there though is you have to be precise when placing the panel because the contact cement grips instantly and no sliding into position is allowed. Good luck.[/QUOTE
Use wax paper for keeping "instant" adhesives from bonding together. The adhesives do not become attracted nor attached to the wax paper. One slips the wax paper in place between the two, align them properly, slide the paper out a bit to begin attaching, and then finish the job.....Works great on this, furniture veneers, or counter-tops...……….God bless.....Dennis
Thanks Dennis.
THOMASPIN
Airhead
The knee pads are handed, thus:
Left: 12300482R
Right: 12300482L
Interestingly, the MaxBMW fiche lists only one part number (16 11 1 232 235) but mine arrived as above.
The purpose of the raised squares defeats me. Fewer than half of them will be in contact with the tank's sides, owing to the 'bratwursts'.

Thus, unless you care to figure out which ones will be in contact, the optimal glue application strategy would appear to be to apply a layer around the periphery of the pad (avoiding getting too close to the edges in case of squeeze-out) then apply additional glue to the surface of the tank where it is not indented.
The work was done by Spooky Fast Customs, a local Scottsdale, AZ place which does custom bike work and high end corporate furniture. They sub-contracted out the relining of the interior which I wanted done as it was flaking, and flakes of old paint in the carbs are likely not a winning strategy. The lining finish is gloss smooth and orange/red:

They told me that most of the cost was incurred on the relining but did not know the process well enough to explain it to me.
I do not know the maker of the paint, but the reputation of this shop is so high I simply trusted them to do the right thing. All I asked for was 'Avus Black'.
I was offered the option of stick-on stripes. After a suitable stream of invective made it clear to the salesman that the ladies in Berlin did the originals by hand, I explained that I expected no less. The charming imperfections in the hand pin-striping are very much like the ones on my original 18 liter tank. Simply stated they announce: "Done by hand".
Left: 12300482R
Right: 12300482L
Interestingly, the MaxBMW fiche lists only one part number (16 11 1 232 235) but mine arrived as above.
The purpose of the raised squares defeats me. Fewer than half of them will be in contact with the tank's sides, owing to the 'bratwursts'.
Thus, unless you care to figure out which ones will be in contact, the optimal glue application strategy would appear to be to apply a layer around the periphery of the pad (avoiding getting too close to the edges in case of squeeze-out) then apply additional glue to the surface of the tank where it is not indented.
The work was done by Spooky Fast Customs, a local Scottsdale, AZ place which does custom bike work and high end corporate furniture. They sub-contracted out the relining of the interior which I wanted done as it was flaking, and flakes of old paint in the carbs are likely not a winning strategy. The lining finish is gloss smooth and orange/red:
They told me that most of the cost was incurred on the relining but did not know the process well enough to explain it to me.
I do not know the maker of the paint, but the reputation of this shop is so high I simply trusted them to do the right thing. All I asked for was 'Avus Black'.
I was offered the option of stick-on stripes. After a suitable stream of invective made it clear to the salesman that the ladies in Berlin did the originals by hand, I explained that I expected no less. The charming imperfections in the hand pin-striping are very much like the ones on my original 18 liter tank. Simply stated they announce: "Done by hand".
THOMASPIN
Airhead
Job completed
Here's the installation process.
As I had to take out a second mortgage to pay for the repaint etc., I took special care not to mess this up.
3M masking tape is applied with each piece marked with a thin straight line. The tape is then cut with a sharp blade at the pad periphery, taking care not to damage the painted surface underneath:

The 3M adhesive tube is installed in a caulk gun. The provided nozzle is already open at the business end. Old pad shown:

I did the work indoors, 77F, at which temperature the adhesive has 50lb shear resistance after 4 hours and is fully cured (250 lbs) in 24 hours. 3M has an excellent technical sheet on the web. The working time is 10 minutes, allowing a little 'wiggle room'.
I did a test run of how much to apply to avoid squeeze out, using one of the old pads and a sheet of aluminum:

Perfect for the circumference.
After going through two hot dishwasher cycles to remove all traces of mold release agent, both the pad and painted tank surface are cleaned with isopropyl alcohol (91%) before applying the circumferential adhesive bead to the pad:

The wobbles are not the result of the DTs; the trigger on the caulk gun is quite stiff owing to the high viscosity of the adhesive. When the pad is positioned for placement, it's a simple matter of aligning the index marks scribed on the masking tape for perfect alignment.
Before the pad is emplaced, the non-bratwurst surfaces are generously coated with adhesive, avoiding the depressions and the periphery. Glue inside the brats serves no purpose:

The parts awaiting replacement - a 24mm wrench is required to remove and replace the petcocks. The mesh stockings have their own crush filters so no fiber washer is required. The correct period petcocks are straight through, not right-angled like mine, but these work fine. The crush washers on the socks were in good shape, so I reused the socks:

The fuel filler cap is attached by a rod which is serrated on the left hand side. It is removed and replaced from the left as you sit astride the bike, using a small punch and hammer:

The new roundels are self-adhesive:

Here's my machine with the 18 liter tank, as shipped from the factory in 1975, original finish except for the roundels:

And here it is now, in my 30th year of ownership:

The 22 liter capacity, or 5.8 gallons, computes to a 250 mile range at my average of 43mpg.
Many thanks for all your suggestions, with special thanks to 'drost' for the dishwasher and glue tips.
Here's the installation process.
As I had to take out a second mortgage to pay for the repaint etc., I took special care not to mess this up.
3M masking tape is applied with each piece marked with a thin straight line. The tape is then cut with a sharp blade at the pad periphery, taking care not to damage the painted surface underneath:
The 3M adhesive tube is installed in a caulk gun. The provided nozzle is already open at the business end. Old pad shown:
I did the work indoors, 77F, at which temperature the adhesive has 50lb shear resistance after 4 hours and is fully cured (250 lbs) in 24 hours. 3M has an excellent technical sheet on the web. The working time is 10 minutes, allowing a little 'wiggle room'.
I did a test run of how much to apply to avoid squeeze out, using one of the old pads and a sheet of aluminum:
Perfect for the circumference.
After going through two hot dishwasher cycles to remove all traces of mold release agent, both the pad and painted tank surface are cleaned with isopropyl alcohol (91%) before applying the circumferential adhesive bead to the pad:
The wobbles are not the result of the DTs; the trigger on the caulk gun is quite stiff owing to the high viscosity of the adhesive. When the pad is positioned for placement, it's a simple matter of aligning the index marks scribed on the masking tape for perfect alignment.
Before the pad is emplaced, the non-bratwurst surfaces are generously coated with adhesive, avoiding the depressions and the periphery. Glue inside the brats serves no purpose:
The parts awaiting replacement - a 24mm wrench is required to remove and replace the petcocks. The mesh stockings have their own crush filters so no fiber washer is required. The correct period petcocks are straight through, not right-angled like mine, but these work fine. The crush washers on the socks were in good shape, so I reused the socks:
The fuel filler cap is attached by a rod which is serrated on the left hand side. It is removed and replaced from the left as you sit astride the bike, using a small punch and hammer:
The new roundels are self-adhesive:
Here's my machine with the 18 liter tank, as shipped from the factory in 1975, original finish except for the roundels:
And here it is now, in my 30th year of ownership:
The 22 liter capacity, or 5.8 gallons, computes to a 250 mile range at my average of 43mpg.
Many thanks for all your suggestions, with special thanks to 'drost' for the dishwasher and glue tips.
 Still one of the best looking motorbikes ever built, IMO.
Excellent preservation of a Mid 70’s Twin. You should feel like an owner and a custodian.
I totally agree with Chunk (previous post).
And for me, the large tank makes the Model an Iconic 2 Wheeler.
Even if I/we are a little BMW biased. The smaller tank just doesn’t quite do it for me.
(And I had a small tank).
Charlie
I totally agree with Chunk (previous post).
And for me, the large tank makes the Model an Iconic 2 Wheeler.
Even if I/we are a little BMW biased. The smaller tank just doesn’t quite do it for me.
(And I had a small tank).
Charlie
Similar threads
- Replies
- 4
- Views
- 1K