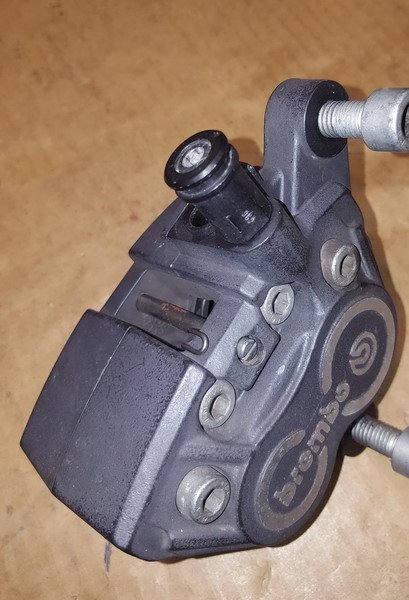
So, I took a first shot at bleeding a few weeks back after installing new pads and saw there was no bleed nipple on the right hand caliper. Also, the end result is that after pushing the pistons all the way back in the bores the pads drag a little even after over 500 miles. I have ordered stainless lines and caliper rebuild kits. Just curious about bleeding the right side.
Navigation
Install the app
How to install the app on iOS
Follow along with the video below to see how to install our site as a web app on your home screen.
Note: This feature may not be available in some browsers.
More options
-
Welcome, Guest! We hope you enjoy the excellent technical knowledge, event information and discussions that the BMW MOA forum provides. Some forum content will be hidden from you if you remain logged out. If you want to view all content, please click the 'Log in' button above and enter your BMW MOA username and password. If you are not an MOA member, why not take the time to join the club, so you can enjoy posting on the forum, the BMW Owners News magazine, and all of the discounts and benefits the BMW MOA offers?
-
Beginning April 1st, and running through April 30th, there is a new 2024 BMW MOA Election discussion area within The Club section of the forum. Within this forum area is also a sticky post that provides the ground rules for participating in the Election forum area. Also, the candidates statements are provided. Please read before joining the conversation, because the rules are very specific to maintain civility.
The Election forum is here: Election Forum
You are using an out of date browser. It may not display this or other websites correctly.
You should upgrade or use an alternative browser.
You should upgrade or use an alternative browser.
1999 R1100RT Front Brake Bleed
- Thread starter chrisinsc
- Start date
pglaves
#13338
Correct me if I'm wrong but doesn't the plumbing come down to the right hand caliper, then cross over to the left hand caliper with a pipe/hose that connects where the right bleed screw would be if there were one? If so, then bleeding at the left side bleeds the entire system. If not, then there must be a blanking plug or something in the right caliper where the bleeder would be if there was one.
gsaddict
Pepperfool
Later bikes had a special filler used at the factory to initially charge the braking system** from the right side.
https://shop.maxbmw.com/fiche/NotesParts/34212330310_1.pdf
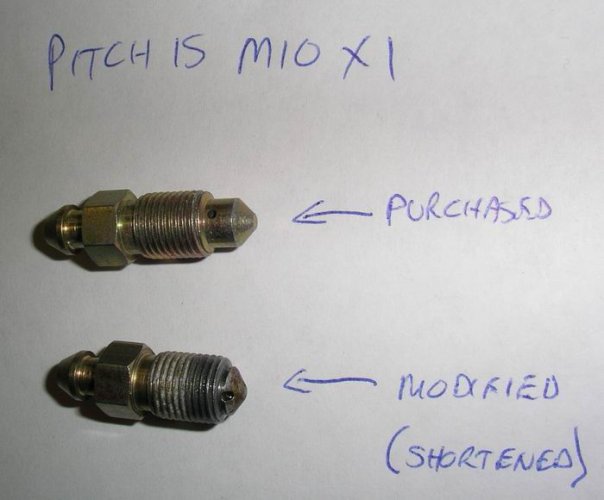
You can purchase a bleed screw from BMW 34 21 2 330 310 VENT SCREW or you can make your own - see below
The screws are available at NAPA etc.
To bleed, remove the grub screw and thread in the bleed screw until it depresses the ball, bleed the system and remove. Replace the grub screw.
Some people chose to remove the filler and just replace with the bleed screw.
**this same system is used on 1150/1100S hydraulic clutch actuation systems
Attachments
I sourced some Stahlbus brake bleeders and replaced the fittings on both the front calipers. I caution that removing the fitting on the right caliper should be done carefully and possibly heated as it looked as if red locktite was used at the factory. Only as I got it moving did I realize this and it was enough force that it could have pulled out the threads in the caliper.
Further update here is that I did an experiment and just cleaned up and rebuilt the calipers with the original seals and cups just to see if that would fix the release issue. I also put on Goodridge PTFE/Stainless lines as well. I had already fitted the Stahlbus brake bleeders. The seals in the calipers did look a little worn but they were much smoother when I cleaned and put them back in. Here's what I found with all this including the brake bleeding:
- Brakes release better but not fully so when I put in new seals and cups this weekend it will be interesting to see how much better they release.
- The Stahlbus bleeders have two stages; open a little you can push fluid out with the brake lever, open more and you can pull fluid through with vacuum
- The ABS is easy to bleed, the main culprit for air pockets is the calipers I think. I will try preloading them with fluid from both the line connection and the bleed ports after using air pressure to push the pistons out when I put new parts in them.
- It really took quite a bit of bleeding at the calipers both vacuum and then classic pull lever etc to finally get some spongy feel. I rode it and engaged the ABS and got more feel.
- The winner move though was time and pressure! On side stand with full left lock, bound the lever and came back a couple hours later, much better. Did the same overnight and it was done. Did it the next night again just to be sure.
I am not sure I would replace pads again without taking apart and cleaning the calipers. Perhaps if I can get the exposed piston surfaces clean enough before taking them off it would preclude that. Certainly any time you remove the calipers you need to get the pistons clean before pushing them back into the housing.
dieselyoda
Active member
Before I push the pistons back in I remove the pads, spray with Simple Green, scrub with an old toothbrush and gently blow dry.
Then I put the old pads back in place and lever the pistons in.
A touch of 500 grit can be helpful to determine if you have ridges/rolls on the pistons.
Ok so final on the front brakes. I installed new pistons and seals as well as new pads and new stainless retaining pins. I sanded ridges off the two bolts in each caliper that also act as rails for the pads to ride on and lubed them as well with the silicon grease provided with the rebuild kits. All is good now, full release of the pads from the discs.
I am also going to rebuild the master cylinder as when I bind down the lever to help get last air out of the system sometimes its soft before I take the binding off which makes me feel fluid is leaking past the seals in the master cylinder. Looks like an easy and inexpensive job to get the whole the system rebuilt. Anton has a nice little instruction I found.
Thanks for everyone's input. Appreciated for sure.
Similar threads
- Replies
- 6
- Views
- 2K
- Replies
- 0
- Views
- 979


