Navigation
Install the app
How to install the app on iOS
Follow along with the video below to see how to install our site as a web app on your home screen.
Note: This feature may not be available in some browsers.
More options
-
Welcome, Guest! We hope you enjoy the excellent technical knowledge, event information and discussions that the BMW MOA forum provides. Some forum content will be hidden from you if you remain logged out. If you want to view all content, please click the 'Log in' button above and enter your BMW MOA username and password. If you are not an MOA member, why not take the time to join the club, so you can enjoy posting on the forum, the BMW Owners News magazine, and all of the discounts and benefits the BMW MOA offers?
-
Beginning April 1st, and running through April 30th, there is a new 2024 BMW MOA Election discussion area within The Club section of the forum. Within this forum area is also a sticky post that provides the ground rules for participating in the Election forum area. Also, the candidates statements are provided. Please read before joining the conversation, because the rules are very specific to maintain civility.
The Election forum is here: Election Forum
You are using an out of date browser. It may not display this or other websites correctly.
You should upgrade or use an alternative browser.
You should upgrade or use an alternative browser.
Determining which handlebars I have on '95 K75 Std.
- Thread starter walnutz
- Start date
-
- Tags
- k75 handlebar
Nutz,
K75s came with three different handlebars;
Short which had a 2 3/4" rise and only came on the K75S (and the K100RS). These are known as the S bars.
Medium which has a 4" rise and came on some K75 standards, Ts, and Cs. These are known as C bars.
Tall which has a 7 1/2" rise and came on all RTs, some standards, Ts and Cs. These are known as RT bars.
If you don't have an S or an RT, it will have C or RT bars depending on how it was ordered.
It was a common swap for less flexible (read older) S riders to add C bars for a more upright riding position.
Thanks guys!
It looks like I have the 7 1/2" Rt's based on what you guys told me if I measure from curve to curve. Now I have have an issue with routing the cable correctly because the moron who replaced it with the wrong one Mickey Moused it and routed this one all on the left side. Do any of you know where I can possibly find a routing diagram or something? Sorry about the upside down pic. I don't know why that is happening.
It looks like I have the 7 1/2" Rt's based on what you guys told me if I measure from curve to curve. Now I have have an issue with routing the cable correctly because the moron who replaced it with the wrong one Mickey Moused it and routed this one all on the left side. Do any of you know where I can possibly find a routing diagram or something? Sorry about the upside down pic. I don't know why that is happening.
Attachments
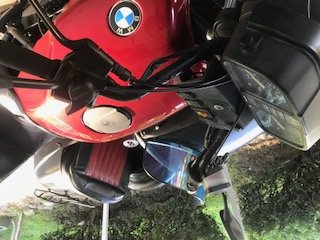
Can U give the year and model of your K75. A pic of your handle bar helps. BMW riders change bars at the drop of a hat, uh helmet.")
barryg it's a 95 straight K75
'95 K75 clutch cable improperly routed & wrong cable
I determined which bars I have in another thread thanks to you guys. Now on to the next problem. Some moron mickey moused the cable. Not only is it too short but he did not route it properly. It is all on the left side of the bike. Now I have to find the right way this cable is supposed to go. Does anyone know of a routing diagram or photos of how this cable is supposed to go? I am now going to have to take my tank off but hopefully nothing else.
I determined which bars I have in another thread thanks to you guys. Now on to the next problem. Some moron mickey moused the cable. Not only is it too short but he did not route it properly. It is all on the left side of the bike. Now I have to find the right way this cable is supposed to go. Does anyone know of a routing diagram or photos of how this cable is supposed to go? I am now going to have to take my tank off but hopefully nothing else.
This looks like the correct cable for high bars:
https://www.euromotoelectrics.com/product-p/clutchcable960.htm
https://www.euromotoelectrics.com/product-p/clutchcable960.htm
Nutz,
Yes, those are the RT bars.
To route the cable the first time you should remove the fuel tank. After the first time, you can just tape the cable to the old one and just pull it through.
The cable goes on the right side of the steering head and then between the air filter box and the intake plenum, then behind the coils to the left side. Do not put any cable ties on the cable so that you can easily fish a new one through by just taping the new one to the old one and pulling it through.
Nutz,
Yes, those are the RT bars.
To route the cable the first time you should remove the fuel tank. After the first time, you can just tape the cable to the old one and just pull it through.
The cable goes on the right side of the steering head and then between the air filter box and the intake plenum, then behind the coils to the left side. Do not put any cable ties on the cable so that you can easily fish a new one through by just taping the new one to the old one and pulling it through.
Awesome! Thank you!
Yeah I really wish they didn't re-route the cable so I could just pull it through but nope! That's exactly why I want to re-do it right just in case I need to do it again but I don't plan on that happening with proper installment and maintenance.
Nutz,
Yes, that is the correct cable.
I am going to combine this thread with your original one to keep the train of thought going.
Thanks for doing that. I wasn't sure if I should make a separate post or not.
Update on my clutch issue
Okay so I got the new cable and routed it based on the suggestion above and some common sense. After installing the cable I went to make the necessary adjustments first at the top and then the bottom. At the bottom I could not get the 75-80mm
required and where the cable connects to the clutch release lever was still slamming onto the tailpipe. There was no adjustment I could make to stop that which lead me to believe that maybe the other cable was the right one because it is a bit shorter. I thought maybe it was tight because it wasn't routed properly so I switched them again, now using the shorter one.
Well now although I got the clutch release lever to stop slamming, I still do not get that 75-80mm length at the bottom and it does not move at all when I make the adjustment at the lever. It didn't with the new longer cable as well. Also it is way too hard to squeeze the lever but with the new cable it was fine. Now it will not even go in gear at all which before it did when it was slamming on the tailpipe but it was not disengaging all the way. The cable I replaced is definitely the wrong one but I don't understand why neither one gives me the 80mm even with adjustment.
My first thought not being familiar with this bike yet is that this release lever may have slipped off it's original axis and but I don't see how that could happen looking at the diagram in my service book.
Any ideas? I'm stumped. Would a burnt out friction disc be the problem? Even if that were the case why can't I get this clutch release lever to stop slamming onto the tailpipe in order to get it in gear?
Walnutz,
Disconnect the cable from the bellcrank under the transmission. Use a long screwdriver stuck through the tiedown/lifting loop on the left peg plate to pry up on the bell crank to release the cable.
Measure between the tip of the METAL part of the cable sleeve to the cable edge of the barrel while pulling out on the cable. Adjust to the 75-80mm dimension with the adjuster at the lever. Do not let the cable sheath turn while making this adjustment (it may weaken the cable itself).
While you are at this point, disconnect the cable from the lever and clean and grease the barrel in the lever. A barrel sticking in the lever is the leading cause of broken clutch cables.
Rehook the cable to the bellcrank. Make your clutch free play adjustment underneath the transmission at the opposite end if the bellcrank with the 10mm bolt. It has a 13mm locknut.
If you can not get adaquate freeplay after doing the above adjustments, your clutch disc is worn thinner than spec.
So you are saying I need to do the 75-80mm measurement with the cable disconnected and pulling on it? If that’s the case I did not do that. I thought it had to be connected because that’s the way I saw it done on a Youtube video or so I thought. I will go through the process again and follow up most likely tomorrow night.
Thank you!
Thank you!
Walnutz,
I suggested you do it disconnected because you said you we having trouble getting that dimension. By disconnecting it from the bell crank, you are eliminating everything that could be preventing that. You are only dealing with the cable.
If you have trouble connecting the cable back to the bellcrank after adjusting the cable to the correct length, back off the clutch adjustment bolt on the other end of the bellcrank. If you are still having issues, back off the sidestand retract adjuster (half moon shaped chrome nut on the chrome rod under your sidestand pivot).
Then adjust for proper free play at clutch adjustment bolt on end of bellcrank.
Then adjust sidestand retract for proper operation.
Well here’s another question.....my sidestand retract adjuster rod was removed because of the sidecar subframe and also the sidestand is no longer needed. The retractor lever is still there though. I don’t think this is the case but by any chance would that have any part in preventing the clutch release lever from hitting the tailpipe if it were still connected?
Actually that would be stupid if it did. I think I need to rebuild the whole release lever system because I saw there is a spring, bearing and push piston that must be worn.
Actually that would be stupid if it did. I think I need to rebuild the whole release lever system because I saw there is a spring, bearing and push piston that must be worn.
This may also help (if you haven't ran across this yet)
https://ibmwr.org/index.php/1998/04/01/sidestand-and-clutch-adjustment/
https://ibmwr.org/index.php/1998/04/01/sidestand-and-clutch-adjustment/
This may also help (if you haven't ran across this yet)
https://ibmwr.org/index.php/1998/04/01/sidestand-and-clutch-adjustment/
Thank you! I did do this procedure but with the cable fully connected. I am going to try doing it with it unconnected from the release lever this weekend. I am almost pretty sure though that I need to rebuild the whole release system because it is not releasing the clutch at all with the lever all the way down now. It's like the rod is pushed into the clutch and does not spring back anymore. I think what I am going to do is make a Youtube page so I can make videos and post the links to properly show everyone what is going on. This will be useful for me as I go through the whole bike.

Similar threads
- Replies
- 1
- Views
- 244