• Welcome, Guest! We hope you enjoy the excellent technical knowledge, event information and discussions that the BMW MOA forum provides. Some forum content will be hidden from you if you remain logged out. If you want to view all content, please click the 'Log in' button above and enter your BMW MOA username and password.

    If you are not an MOA member, why not take the time to join the club, so you can enjoy posting on the forum, the BMW Owners News magazine, and all of the discounts and benefits the BMW MOA offers?

  • Beginning April 1st, and running through April 30th, there is a new 2024 BMW MOA Election discussion area within The Club section of the forum. Within this forum area is also a sticky post that provides the ground rules for participating in the Election forum area. Also, the candidates statements are provided. Please read before joining the conversation, because the rules are very specific to maintain civility.

    The Election forum is here: Election Forum

Cyclops LED Replacement Kit

Thanks Rainman48 for the extra info. I have recieved some further instructions from Cyclops and combined with your advice, I now have sufficient info the wire in the new lights before I reassemble the bike. The Cyclops instructions are not very clear on the matter of connections, and some better model specific instructions for the wiring connections would be helpful for electrical wombles like myself.

Now to get on with the reassembly and get some long rides in before it get too hot down here.
 
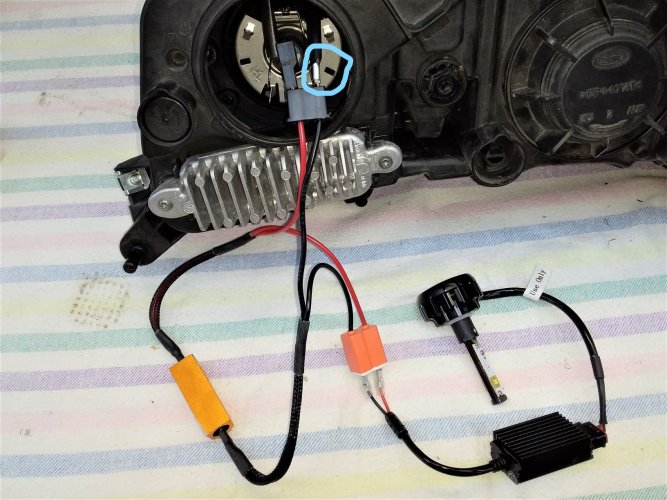
Just double checking that I have got it right before I get on with bike reassembly. The right side is connected and shown in the accompanying photo. The connection that is circled with blue is the "earth" from the reflector base plate.
This electrical stuff is just beyond my comfort zone.
Cyclops Right Connections 2.jpg
 
I tried a Cyclops on mine and it worked fine without a resistor. Is there difference between Camhead <-> Wethead CanBus current sensing? Seems to me it should work without them.

PS - Since the CanBus system limits current automatically (a.k.a. digital "fuses" that reset once the short is gone) I would suggest just plugging the housing back into the main harness connector, start it, and see if it lights up. There no risk of arcing or other issues. It'll either work or not.

PPS - that's a lot of clap-trap to stuff into the housing. Keep in mind that the resistor might get hot (you can check that via the test I recommended above) so be a little careful about where you place it in there.
 
Just double checking that I have got it right before I get on with bike reassembly. The right side is connected and shown in the accompanying photo. The connection that is circled with blue is the "earth" from the reflector base plate.
This electrical stuff is just beyond my comfort zone.

Yep, that's correct. Carefully stuff all that in there, then put it on the front end, plug the main connector back up as pappy said and test it before putting any other body parts on. I would start with the resistor because it is the largest piece and the twisted wires on it make it more difficult to place it deep and away from the fan. Ignore his comments about his cheap automotive lamp choice, you've already made your choice and this is strictly a thread about how to install that choice. If you were asking which brand lights to install that would be more appropriate, but he ignores that and continues to add his choice to all headlight threads in all forums no matter what. And yes pappy, according to Cyclops there was an ecu change where the canbus sensitivity was tweaked so they supply difference configs for different models and years.

Wishing you good luck with the reinstall and happy riding.

Fantastic. I can now make a start on reassembly. The Haynes manual was very difficult to follow, so I defered my disassembly and I finished up getting the BMW workshop manual on DVD. It was very easy to follow, with specific and detailed instructions and images, which made the job a simple but long winded step by step process.
 
...or you could've installed one of these and not needed any control drivers or resistors and only paid $40.

Thanks for the suggestion pappy35. I did consider other LED globes, but chose the Cyclops based upon the pattern they throw from the RT reflectors. My previous ride was a Honda ST1300 and I went through about four different LED globes until I found a set that worked well with the ST reflector, so I went straight to the Cyclops kit for which I had seen images of the beam pattern on a Beemer the same as mine. :thumb
 
I tried a Cyclops on mine and it worked fine without a resistor. Is there difference between Camhead <-> Wethead CanBus current sensing? Seems to me it should work without them.

There have been posts in various threads about LED conversions that Some/Most/All (not sure which) 2016 and later RTs require this resistor with the Cyclops kit or there are codes thrown and possible dashboard lights triggered.
 
While it might seem like I'm down about them, I'm truly not. The folks at Cyclops are a class act and I'm sure that if they sold them to you they are needed. I was just curious about it.
 
I have successfully fitted the Cyclops LED Headlight Kit and ressembled the bike without loosing any bits or having screws left over. I took the RT for a night run last night and am pretty happy with the result. Thanks to forum members for the help and advice.

If you are going to fit one of these kits, I would certainly remove the headlight assembly, to make everything readily assessible. I found the Haynes manual difficult to follow for the headlight removal procedure, and finished up getting the BMW RT Manual on DVD befre tackling the job. The Beemer Manual provided step by step and screw by screw instuctions and illustrations, which made the job long winded but relativley simple.
 
Last edited:
Cyclops Black Friday 15% Off

I wasn't quite sure where to post this, but since time is of the essence, I hope its OK to put this here.
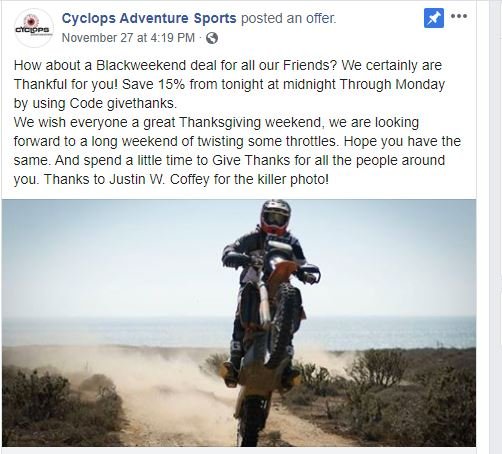
15% off from Cyclops! Started midnight Wednesday. Pulled the trigger on the 3 H7 LED bulb headlight kit for my '09 RT. Saved about $30. Woo! Hoo!
Deal ends this Monday. Use the most generous discount code "givethanks" (all lower case) when you check out.
1.JPG
 
Last edited:
I wasn't quite sure where to post this, but since time is of the essence, I hope its OK to put this here.
15% off from Cyclops! Started midnight Wednesday. Pulled the trigger on the 3 H7 LED bulb headlight kit for my '09 RT. Saved about $30. Woo! Hoo!
Deal ends this Monday. Use the most generous discount code "givethanks" (all lower case) when you check out.
View attachment 76450

Thanks for the heads up! I ordered my kit yesterday. I'll wait until my factory warranty expires in mid January and then do the installation on a rare rainy winter weekend in SoCal.
 
I installed the headlight bulbs today. My goodness....they sure are WHITE and BRIGHT! Can't wait to see how they perform on a dark night.
 
I installed the headlight bulbs today. My goodness....they sure are WHITE and BRIGHT! Can't wait to see how they perform on a dark night.

Did you take the headlight unit out or manage to get it done with the bike all put together?

I am asking because the kit is in the box and I will be doing this job next month...
 
Just sayin, we recently installed two LEDs in Mrs-K's F650GS. It's a tight fit, but we got all the bits inserted into the bulb-bucket. Big improvement in her Lo-beam lighting situation. :thumb
- - Now she has excellent visibility & conspicuity with her add-on Clearwaters...
Ciao! HSV-Phil & HSV-Karen
 
After doing the install on my '16RT, I can't see how it would be possible to do it without taking out the headlight unit. Far too inaccessible and fiddly for me to even attempt it with the headlight unit in the bike.
 
Did you take the headlight unit out or manage to get it done with the bike all put together?

I took the nose off the bike (2009 RT). This is the second time I've done this. Its not real complicated to do at all. No exaggeration...20 minutes to get it off; 20 minutes back on. Maybe a dozen or so bolts to remove, 4 windshield arm clips and one electrical plug. That's about it.

A word of advice about the LED installation before you get going (well really three):

(1) The low beams go in easy and the LED control box and all its wiring fit with plenty of room. I did them first. The high beam was a bit of a tight fit to get everything inside, but everything will fit. It was also a tight fit to rotate the high beam to lock it in place as its physically closer to the edge of the housing's hole opening than the low beams. Just go slow, don't force anything, and there will actually be room left over. There kind of needs to be a little wiggle room inside in case you ever use that headlight adjuster thing to raise them to compensate for a heavy load.

(2) Unscrew the LED bulb wire from the control box wiring. There's a little threaded cap thing and an o-ring that just un-thread and pull apart. First, place the new LED bulb black plastic collar in. It only fits in one way due to the different tab sizes on it. Then clip the 2 retaining springs on the sides of the collar. Then plug it in the OEM power plug, place the LED control box and wiring inside the housing, leaving the threaded end sticking out. Then place the LED bulb in the collar, and twist it into the collar to lock it in place. Then re-connect the twist cap to the wiring and shove it gently into the headlight housing. Its much easier this way, and much more room to maneuver compared to trying to squeeze everything in once the bulb and fan unit are installed.

(3) Due to the thickness of the black plastic collar (even though its really not that thick), the retaining springs don't seem to fit the same as with just the OEM bulb. In order to get the "loop" of those springs back on the hooks they loop around, it took a bit of "prodding". Careful not to break the springs. Be firm but gentle is the best advice I can give. If you're too gentle, the straight part of the spring will be in the hook, and I'm not sure that's enough to keep them from popping out with vibrations and all. So I worked on them until I got all the loops in place correctly.

BTW, the new LED plug has a tiny "+" and "-" on it so its easy to not screw up polarity, which I think LED bulbs do have. Both low beams and the high beam are brown for "-".

Also, I did get the "bulb out" icon on my dash the first time I started the bike. Haven't seen it again since.

Lastly you can plug the main (and only) electric plug back into the rear of the headlight housing before reassembling the front of the bike to see if they work. And don't be a dumb-ass like me and stare at them in amazement, or you'll be seeing spots in front of you the rest of the day.

Any help or advice you need, just ask. Glad to help any way I can.

Edit: Remember my bike is an '09 RT. Not sure any of this is valid for your year and model.
 
Back
Top