• Welcome, Guest! We hope you enjoy the excellent technical knowledge, event information and discussions that the BMW MOA forum provides. Some forum content will be hidden from you if you remain logged out. If you want to view all content, please click the 'Log in' button above and enter your BMW MOA username and password.

    If you are not an MOA member, why not take the time to join the club, so you can enjoy posting on the forum, the BMW Owners News magazine, and all of the discounts and benefits the BMW MOA offers?

  • Beginning April 1st, and running through April 30th, there is a new 2024 BMW MOA Election discussion area within The Club section of the forum. Within this forum area is also a sticky post that provides the ground rules for participating in the Election forum area. Also, the candidates statements are provided. Please read before joining the conversation, because the rules are very specific to maintain civility.

    The Election forum is here: Election Forum

1973 R75/5 Back-to-road Project

One note on the final drive fill, it will help to add about half the oil - and really, it is grease with some pretty good viscosity - and turn the wheel to allow the heavy grease to settle into the final drive. It is possible to get an airpocket which prevents the final drive from taking a full fill. Turn the wheel or give it a little time. Then fill to the lowest thread of the fill plug.
 
One note on the final drive fill, it will help to add about half the oil - and really, it is grease with some pretty good viscosity - and turn the wheel to allow the heavy grease to settle into the final drive. It is possible to get an airpocket which prevents the final drive from taking a full fill. Turn the wheel or give it a little time. Then fill to the lowest thread of the fill plug.

Ok, will ride around the block tomorrow then unscrew the fill plug and see if I can get more in there. Thanks.
 
Successfully completed 50 mls test run, I hope I am ready for Harvest Classic next weekend. Is anyone from the area going?
2dfb7eb3589942a0d500352a57483e79.jpg
512b944410b15c11dcea905cfb08f773.jpg
63662e2a2ce80acb7b7178e469ef00f0.jpg


Sent from my iPhone using Tapatalk Pro
 
Fuelfilter

Are you running fuel filters on your bikes? I think I need one (or two) at this point, because the bike has sat for so long and I am not sure what's going on deep down inside the tank. I will empty it completely at some point, but not before my next week-end trip to the Harvest Classic (200 mls total).

I already put 100 mls on the bike with no issues, except that I have a hard time getting all the 14! fuel line connection points leak free. I am using a tiny lawn mower filter since there is no room for anything bigger. I could remove the crossover connection that would help. Does it serve any other purpose than supplying gas to both carbs even if one petcock is clogged up? What is everyone else doing? As always, thanks!
 
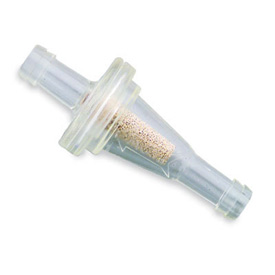
Are you running fuel filters? .......... I could remove the crossover connection that would help. Does it serve any other purpose than supplying gas to both carbs even if one petcock is clogged up? What is everyone else doing? As always, thanks!

There’s no way that each side of the gas tank will draw down exactly at the same time. Your bike will stop running as soon as one side runs out, no matter how much gas is in the other side.

Or, if one petcock isn’t allowing enough gas for full throttle you could run lean or stop running on one side. With the crossover you’re more likely to get enough gas.
 
Last edited:
I am using a tiny lawn mower filter since there is no room for anything bigger.

Leave the cross over where it is.

With regard to "tiny lawn mower filter", I've been running these for years; one on each side (1/4" fuel line size fit OEM cloth covered fuel line)), mounted between the petcock and the cross over fitting.

visu_inlinefilter.jpg


ATTACH]
 
Leave the cross over where it is.

With regard to "tiny lawn mower filter", I've been running these for years; one on each side (1/4" fuel line size fit OEM cloth covered fuel line)), mounted between the petcock and the cross over fitting.

visu_inlinefilter.jpg

Those look like a better solution than mine.
 
Crashbars

Is it possible to put on the crashbars without taking the header off? It appears to me that I can't wiggle them into position with the headers on. I don't have the tool to remove the header ring nut and I don't want to mess up that ring.
 
Is it possible to put on the crashbars without taking the header off?

I'm assuming you're talking about the bars shown in your first post. Methinks that with the cutout at the top, there might be a way of holding things just right and maneuvering it on/off. Hard to say. There were other varieties that are individual parts and bolt on from the sides...my /7 has a set like that.

Some don't like the case guards (sounds better than crash bars!!) and suggest that in the event of a real crash, they will do more harm than any kind of protection they offer. Duane Ausherman has his "statement" about it here:

http://w6rec.com/crash-bars-are-very-dangerous/

It's a personal choice. Seems to me that if you're going down, there are a lot of things to have to worry about. But certainly they protect from the rash in parking lot fall-overs.

I'm sure you've read about taking those exhaust nuts off. If they haven't been off in a while, they could very well gall and ruin threads. It needs the special tool, along with time and penetrating fluid. If you try and turn them off and they start but then grab or tighten up, better stop and reassess. Likely the best thing at that point would be to cut them off and install new ones.
 
I'm assuming you're talking about the bars shown in your first post. ......

I'm sure you've read about taking those exhaust nuts off. If they haven't been off in a while, they could very well gall and ruin threads. It needs the special tool, along with time and penetrating fluid. If you try and turn them off and they start but then grab or tighten up, better stop and reassess. Likely the best thing at that point would be to cut them off and install new ones.

Yes, those are the ones I am talking about.

I actually took one of the nuts off when I replaced the dented header, came off relatively easily, however I used pliers with a rag underneath and I scratched them a bit. I want to avoid doing it again that way. Definitely want to buy the tool at some point.

Thanks!
 
Bottom of fork plastic cover

I cannot pull up Part #14 on the micro fiche. Does anyone know if this is still available? It fell apart when I took it out to drain the fork oil.
 

Attachments

  • Capture.jpg
    Capture.jpg
    81 KB · Views: 159
Don't see why not, but you'd have to check with a dealer. Or you could check with Mikey at Airhead Salvage down in Martindale...he might have some used parts. Other used part places out there.
 
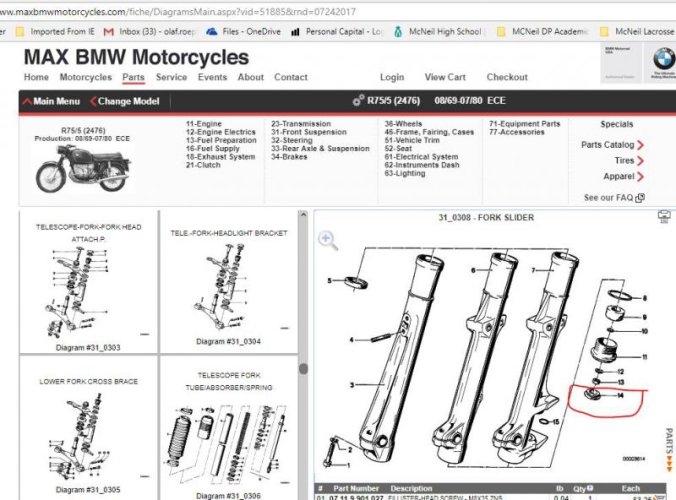
You found the part but didn't pursue it to the next diagram frame. You'll find the part number thee. That part is still available.
 
Bob's BMW has the whole fork rebuild kit: seals, rubber bumper doofers that turn to mush inside the forks, new progressive springs, all the crush washers (small and large), new 13 ring rubber gators, and the bottom rubber dust caps.
 
BoxerBruce pointed you right at it. You are looking at diagram _0308. Now go to the next diagram, _0309 and you will see parts 8 thru 14.

14 31 42 2 000 381 CAP $3.47

Ok, got it. When I looked yesterday that was after two beers, now after a double espresso I found it :)

And while I am at it, forks are pretty mushy, changing fork oil didn't do much, what would you recommend as a next step? Add some spacers on top of the springs? Thanks!
 
OEM springs were not much when new. Do a fork rebuild with new (progressive) springs and be done with them for 5 years.
 
Back
Top