• Welcome, Guest! We hope you enjoy the excellent technical knowledge, event information and discussions that the BMW MOA forum provides. Some forum content will be hidden from you if you remain logged out. If you want to view all content, please click the 'Log in' button above and enter your BMW MOA username and password.

    If you are not an MOA member, why not take the time to join the club, so you can enjoy posting on the forum, the BMW Owners News magazine, and all of the discounts and benefits the BMW MOA offers?

  • Beginning April 1st, and running through April 30th, there is a new 2024 BMW MOA Election discussion area within The Club section of the forum. Within this forum area is also a sticky post that provides the ground rules for participating in the Election forum area. Also, the candidates statements are provided. Please read before joining the conversation, because the rules are very specific to maintain civility.

    The Election forum is here: Election Forum

2003 K1200RS - Power for Garmin Zumo GPS

skeive

New member
I picked up a Zumo 595 GPS and am trying to figure out the best way to permanently wire the power for it. I was hoping not to actually splice into a wire up by the instrument cluster/controls. But I also can't see a great way to run wires from the controls back to either a SAE plug for a battery tender or the powerlet outlet; without having to remove the tupperware ideally. If I have to splice into lines by the controls I will. If I have to pop off the tupperware I will. Just trying to figure out what the best approach really is.

Temporarily I will just run the wires over the top of the tank and connect to the battery tender plug. Gaffer tape should keep the wires from flapping :)
 
Grit your teeth and pull the tupperware. While you're at it, if you don't know when it was done last, get a replacement air filter. Once the tank comes off, the air filter's easy to get to.

You can tie the Zumo to the battery but! You must, must, must put a fuse as close to the battery as possible. If the hot lead wears through between the fuse and battery, it will get ugly fast. If one of the fuse has a terminal tying it to the battery (+), you're good to go. The ground can be any good ground. It doesn't need to be a wire back to the (-) terminal.

Bingo! Running a 660 on an '02 K1200RS for almost 10 years now. This is a bike specific GPS and that's how the Garmin instructions said to do it. And don't forget that fuse!
 
I also can't see a great way to run wires from the controls back to either a SAE plug for a battery tender or the powerlet outlet; without having to remove the tupperware ideally.

On our 03 K1200RSs I ran the GPS power cable directly to the battery.
I realize taking the tupperware off looks like a chore but it's not difficult.
 
OK, thanks for the advice. Going to be a couple of weeks before I have the time to pop the tupperware.

I can find out when the air filter was last changed before tackling it. I bought the bike from my uncle, so easy to get history :)
 
Grit your teeth and pull the tupperware. While you're at it, if you don't know when it was done last, get a replacement air filter. Once the tank comes off, the air filter's easy to get to.

You can tie the Zumo to the battery but! You must, must, must put a fuse as close to the battery as possible. If the hot lead wears through between the fuse and battery, it will get ugly fast. If one of the fuse has a terminal tying it to the battery (+), you're good to go. The ground can be any good ground. It doesn't need to be a wire back to the (-) terminal.

Yep on the fuse. Beens soldering and wiring things since I was 10 and learned that lesson early :)
 
OK, thanks for the advice. Going to be a couple of weeks before I have the time to pop the tupperware.

I can find out when the air filter was last changed before tackling it. I bought the bike from my uncle, so easy to get history :)

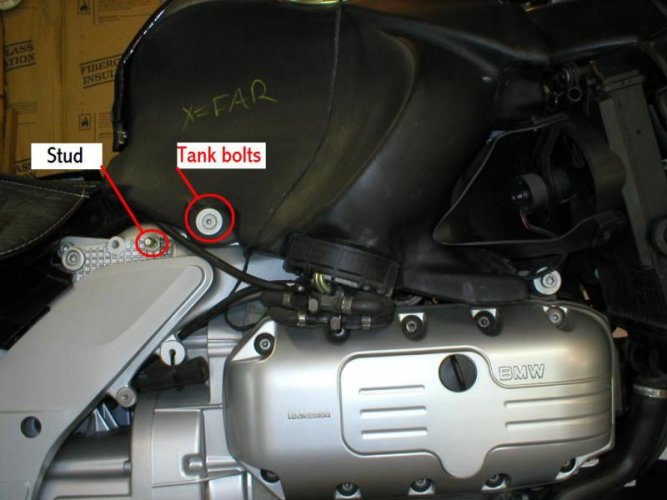
When removing the tank, only the back bolts need to be removed.
If your fuel line quick disconnects are black plastic like the ones in the picture, they need to be replaced with metal ones.

stud and tank bolts.jpg


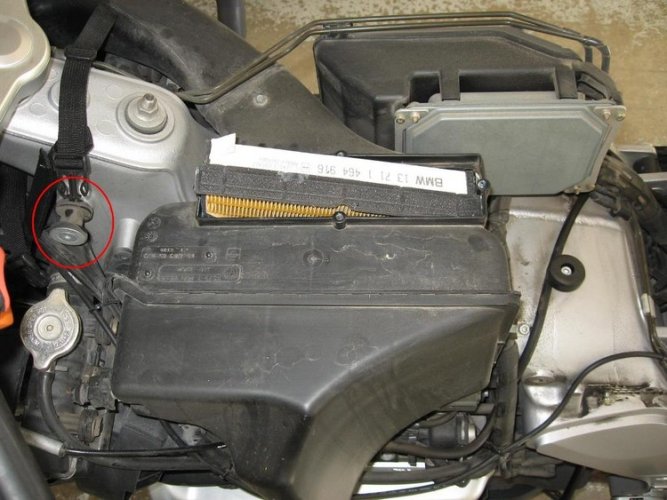
The front mounts can stay in place and the tank will pivot up from those.
You can see the air filter part way out in this picture.
Front_mount.JPG


If you need to change the fuel filter it looks like this.
IMG_0097.jpg


Picture of metal quick disconnects
IMG_0102.jpg
 
Last edited:
And go ahead & change the internal tank fuel lines, they're 14 years old! I've found a little lube (white lithium grease) on the front mounts let the tank slide on easier.
 
OK, I will see what I can accomplish when work settles down a bit. Thanks for the advice and the pics!
 
When removing the tank, only the back bolts need to be removed.
If your fuel line quick disconnects are black plastic like the ones in the picture, they need to be replaced with metal ones.

View attachment 62244


The front mounts can stay in place and the tank will pivot up from those.
You can see the air filter part way out in this picture.
View attachment 62245


If you need to change the fuel filter it looks like this.
IMG_0097.jpg


Picture of metal quick disconnects
IMG_0102.jpg


A very late reply on this post, but finally got around to tackling the air filter change and routing of the Garmin mount wiring. Took about 3 hours from start to finish, but went without issue. I ended up with one extra screw that should be in the fairing somewhere, but damned if I can find a hole without a screw.

The quick disconnects had been swapped over to the metal ones already so no need to do that one. I will likely tackle changing the fuel filter and internal rubber hoses this winter since I have proven I can disrobe the beast and remove its belly without killing it. :)
 
I have to admit that prior to looking at Lee's photos, it never occurred to me to leave the belly pan in place when removing the tupperware.
Duh!
Learn something new every day.
 
Back
Top