• Welcome, Guest! We hope you enjoy the excellent technical knowledge, event information and discussions that the BMW MOA forum provides. Some forum content will be hidden from you if you remain logged out. If you want to view all content, please click the 'Log in' button above and enter your BMW MOA username and password.

    If you are not an MOA member, why not take the time to join the club, so you can enjoy posting on the forum, the BMW Owners News magazine, and all of the discounts and benefits the BMW MOA offers?

  • Beginning April 1st, and running through April 30th, there is a new 2024 BMW MOA Election discussion area within The Club section of the forum. Within this forum area is also a sticky post that provides the ground rules for participating in the Election forum area. Also, the candidates statements are provided. Please read before joining the conversation, because the rules are very specific to maintain civility.

    The Election forum is here: Election Forum

Locking the Navigator V on an RT

NAV RT Security Fix - FREE!

I am surprised that nobody has come up with this method of making the NAVx more secure on the new RT mount. Cost = -0- or at the most about $3.00.
Just remove the pushbutton!! This can be done within a few minutes.

1. Remove NAVx (so you can see the mount)
2. Remove windshield and under support.
3. Remove the instrument cowl under windshield mount with 2 screws and 2 grommets. (careful!!)
4. With a flashlight shining into the NAV mounting and pushbutton location, find the molded in barb on the pushbutton shaft that keeps the button from popping out and carefully push it in with a screwdriver or other dangerous tool at the same time extracting the button.
5. File down or cut off the retaining barb so that it no longer can lock the pushbutton into it's mounting hole.
6. Reinsert the pushbutton, which should now slide in and be removable without hindrance.
7. Reinstall cowl, windshield parts, etc.
8. The removable button, now becomes your "Key" which can be stored in either of the lockable fairing pockets or other hidden location.
9. Get a common black rubber "stopper" (or not) and with a knife or razor blade, carefully trim down 2 sides to fit in the oval pushbutton opening so it looks like the button except it doesn't 'push' on anything.

Now I understand that nothing will deter the determined removal of the GPS is someone really wants it. And no matter what, if I am on a trip and parking overnight or out of bike sight for any long period, I always remove EVERYTHING that looks like it could be boosted, luggage included. But if you want basic protection, and at no cost, this is a worthwhile idea.
Even if you screw up the button, a new one is $3.00 us.

I'm sorry I don't have a good pix to show at this point and the parts fiche of the button is not detailed enough to show the 'barb' but next time I'm digging around up there, I will take a pix and post. :):)

I think you have come up with a WINNER! Thanks for sharing

Jay
 
Can you still stick a finger in there and push the button inside the mount to release the GPS with the button removed?

Sent from my Nexus 6 using Tapatalk
 
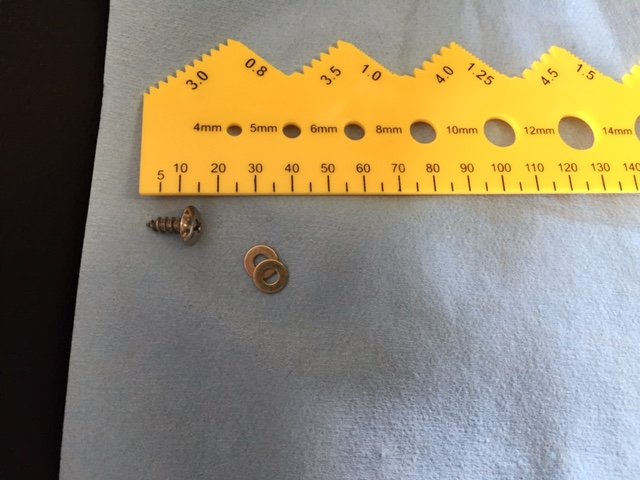
Still think my sheet metal screw is the simplistic fix. Max cost .25 cents
Pm me with your email address for pics

Jim
 
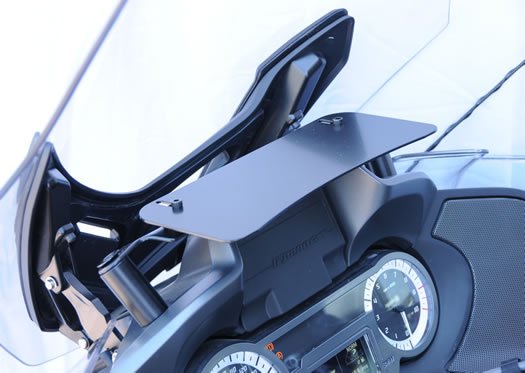
I've been wondering about the RCU Shelf (RCU 00072), it mounts to existing holes and there is no drilling needed. Might serve a triple/quadruple purpose. Aside from being a shelf for the typical culprits, and acting as a shade for the GPS, it might also cover the release button.

I'm wondering if anyone has it and can advise if it will adjust to be sufficiently flush with the windscreen when the bike is turned-off (where it is in the fully retracted position) to preclude anyone getting their hand down between the two? Or would one need to drill another set of mounting holes? Likely still possible to reach in from the right side and depress the release button. If so, it might be an easy build to add a section to that does cover the button with the windscreen fully retracted/lowered but allows for access with the windscreen extended/raised.
RCU00072_2014-laterR1200RT_AccessoryShelf.jpg
 
Simple Fix

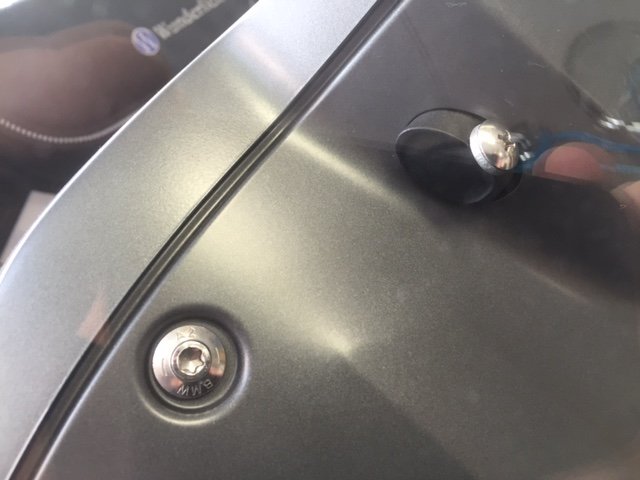
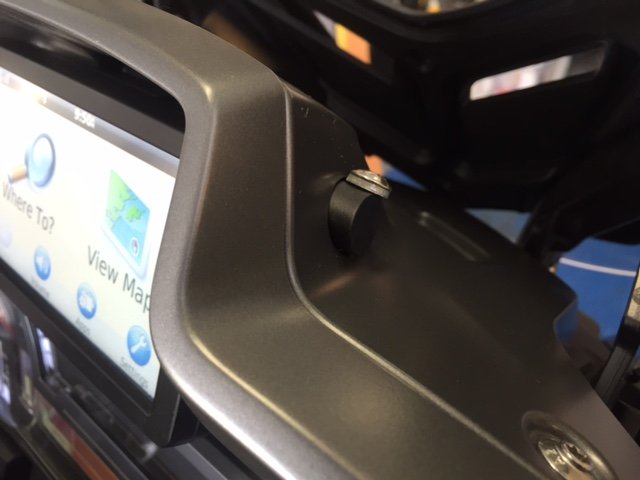
Jim (t6pilot) sent me the photos of his solution - which seems pretty simple and effective to me - and has asked me to post them here.

When the windscreen is down, the screw can't be removed and the release button can't be pressed in. Simple and effective. Now, someone needs to make a farkled-up screw ... :)

IMG_1239.JPG

IMG_1240.JPG

IMG_1241.JPG
 
Simple and clean. Thank you for posting and, Jim, thank you for the idea! Now...I just need to paint a roundel on the screw head... :)
 
Simple and clean. Thank you for posting and, Jim, thank you for the idea! Now...I just need to paint a roundel on the screw head... :)

Jeff
You got it

Black sharpie helps to hide screw, but then when you drop the screw makes it harder to find, ask me how I know!
 
I've been meaning to integrate a lock with the on-board central locking system for some time. I even acquired a spare actuator off of a wrecked K1600. There was a post I had found with instructions for doing this but my actuator ended up being slightly larger and therefore requiring relocation under the front cover and that's what's held me up (need to fabricate an arm to get the interference part lined up properly). I'd love to see details on how you did it with a cable when you get a chance. Please feel free to post it up here. Oh, and welcome to the forum!
 
... I'd love to see details on how you did it with a cable when you get a chance. Please feel free to post it up here. ...
The lock motor in the left stowage compartment in the fairing is used to move the home-made latch in the navigator mount with the help of a cable.
Details of mounting the cable are shown in picture no. 6 from the top, it shows the bottomside of the left stowage compartment.
The inner cable, a Reely 10405 bowden cable, is attached with a 2 mm drilled hole in the housing of the stowage compartment.
The inner cable is available from http://www.conrad.com/ce/en/product/221971/Bowden-Cable-Reely
The outer cable is attached to the arm of the actuator with 2 tie wraps 4 mm (kabelbinder).
 
Last edited:
My solution, with pictures, to include the navigator mount in the BMW central locking system.

http://www.motor-forum.nl/forum/list_messages/426847/BMW-Navigator-lock-op-BMW-R1200RT-LC-1.html

It's in Dutch and I can make an English version when needed.
For the outher cable I used a general gearbox cable for a bicycle.
Remarks and questions are welcome.

Please post an English version! This seems like a more elegant solution than others have shared.


Sent from my iPad using Tapatalk
 
Is here an app for locating "better places" or since I'm so fine, do I just populate places where people look like me? Does "better place" refer to food options, weather, income, annual rainfall, average temperatures or what. I'm confused. At the "Where To" prompt I entered, Better Place, and got no useful guidance. :wave
 
Please post an English version! ...
I will try to do my best and remember English is not my native language.
I already explained the cable and mounting to the left stowage compartment in the fairing in a previous post.
The latch is shown in picture 1 and 2 and is made by glueing together 2 pieces of 15 x 2 x 50 mm aluminium strips with 2-component metal glue.
The metal strip is available in any do-it-yourself store here in the Netherlands.
The result is that the latch is 4 mm thick and 15 mm high.
The connector to the inner cable is the brass inside of a screw terminal and glued to the latch with 2-component metal glue.
https://en.wikipedia.org/wiki/Screw_terminal
The guidance slot for the latch is a modified existing slot in fairing and is shown in picture 3 and 4.
A piece of the 15 x 2 mm aluminium strip + a piece of ~0.6 mm thick hard plastic of a blister package (out of my garbage can) are used to reduce the width of the existing slot in the fairing.
These 2 pieces are attached with 2-sided tape into the existing slot.
To adjust the height of the slot a piece of 2 mm thick (green) hard plastic is glued with general 2-component glue in the existing slot (see picture 4).
In picture 5 the latch is mounted in te modified slot.
Picture 7 shows the mounting of the outer cable to the fairing with a tie wrap and a tie wrap mounting block.
Picture 8 and 9 shows the final result with 'open' = unlocked state and 'gesloten' = locked state.

The advantage of this solution is that the lock of the navigator mount can be controlled with the Central Locking switch on the right handlebar or the Radio-Operated key.
I hope this short description + the pictures wil do the job.
Remarks/additions/questions are always welcome.
 
Last edited:
Back
Top