Ken,
I'm sorry I didn't jump back in on this thread earlier. I've been dealing with a pinched nerve in my neck that affects my whole right side and typing does not help it.
Going back through this thread, my comments are as follows;
The air filter SHOULD have kept any debris caused by the mouse from affecting the air flow meter itself. But, if enough debris was present under the filter, it could affect running, but I would expect it to affect high rpm first just by virtue of reduced airflow capacity.
The fact that the motor runs poorly at low rpm, but fine at high rpm suggests good fuel and air flow and good spark (IF your spark plug gap is correct. Too large a gap will have trouble firing at low rpms). Another possibility is exhaust valves that are too tight.
If the plugs are good and gapped correctly, the exhaust valves are correctly adjusted, and the fuel pressure is correct, it suggests a vacuum leak, or more accurately, unmetered (unseen by the computer) air entering the intake tract. If more air is entering the cylinders than the computer knows about, the computer does not inject the appropriate fuel and the bike runs very lean. Since the excess air remains relatively constant throughout the rpm range, the proportion of excess air at low rpm is high and the proportion of excess air at high rpm is low. The bike will run poorly at low rpm and ok at high rpm.
The possible sources of this vacuum leak are (roughly in order of probability or ease/cost of correcting:
#1 crankcase breather hose 11 15 1 460 480 VENT HOSE $15.94 Use ONLY BMW original. Aftermarket ones are weaker than originals and originals can go bad in 1-2 years. They will crack just below the upper and just above the lower hose clamps.
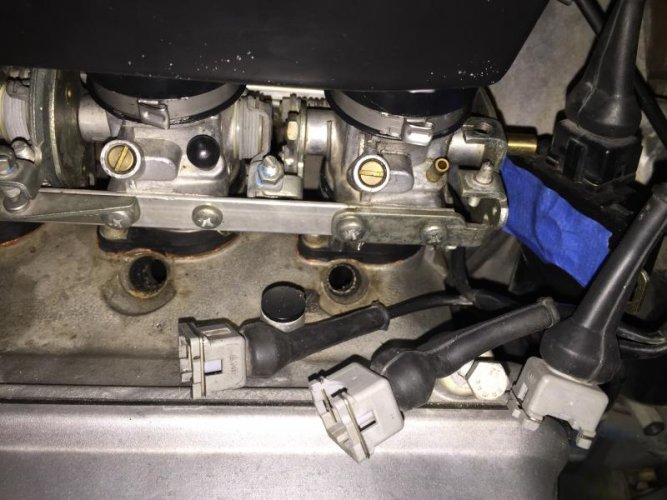
#2 throttlebody vacuum caps on #1 and #2 cylinders (+#3 on K100s)
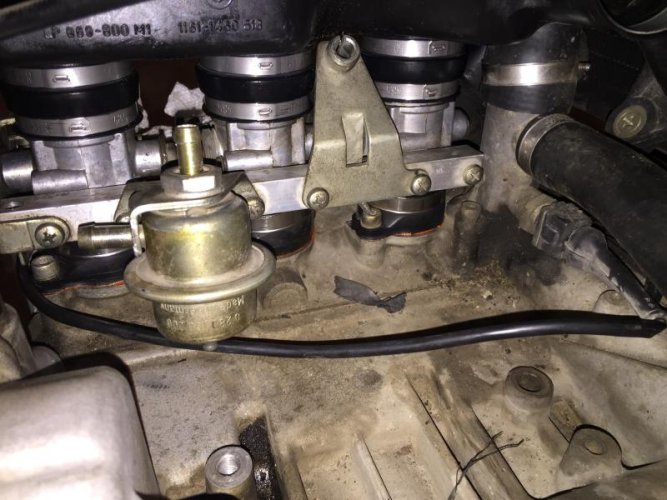
#3 an unplugged or cracked hose or plug to the nipple at the front top of the engine just below the fan. This is where the fuel tank was originally vented. In reventing, many previous owners either did this wrong or poorly so that a leak develops.
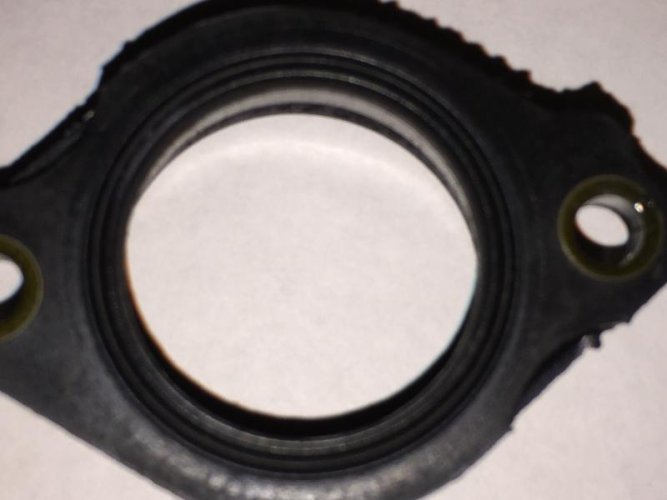
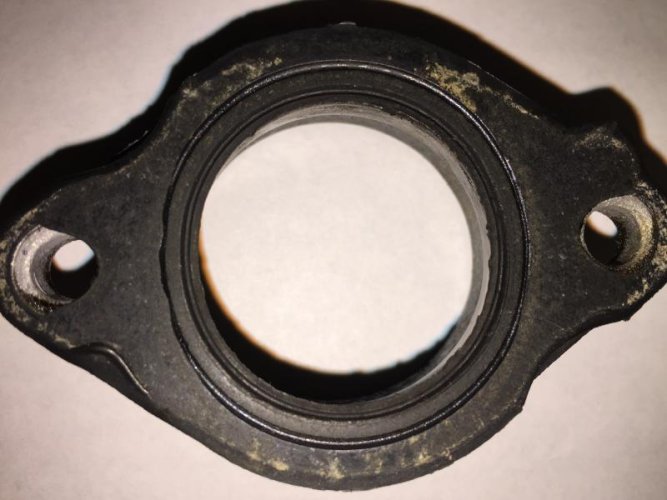
#4 the oil filler O-ring. This O-ring never gets any thought, but it hardens and then instead of o-ring to crank cover you get plastic cap to cover with some air leakage. Cheap insurance; if you feel the cap hit the crankcover when you tighten your oil filler cap, replace the O-ring. I use a thicker crosssection O-ring that gives me a lot longer life before it no longer seals.
Now we get to the things that take more work or $$$ to replace:
#5 the vacuum line between the #3 (or #4 on a K100) cylinder and the fuel pressure regulator. This is just bulk vacuum hose, nothing special.
#6 the 2 1/2" rubber elbow between the air flow meter and the intake plenum 13 31 1 460 563 HOSE ASSY $31.17 If this hose has ANY cracks, it will cause a MAJOR running problem.
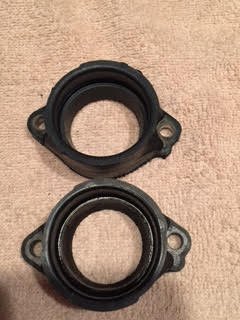
#7 the throttle body upper and lower boots (manifolds). If anyone of the six (or 8 on a K100) are bad, replace them all because of the labor involved to get at them. 11 61 1 460 408 INTAKE MANIFOLD 3 required $55.41ea. plus 11 61 1 460 755 BUSHING 3 required $5.39 ea.
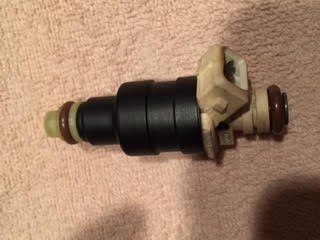
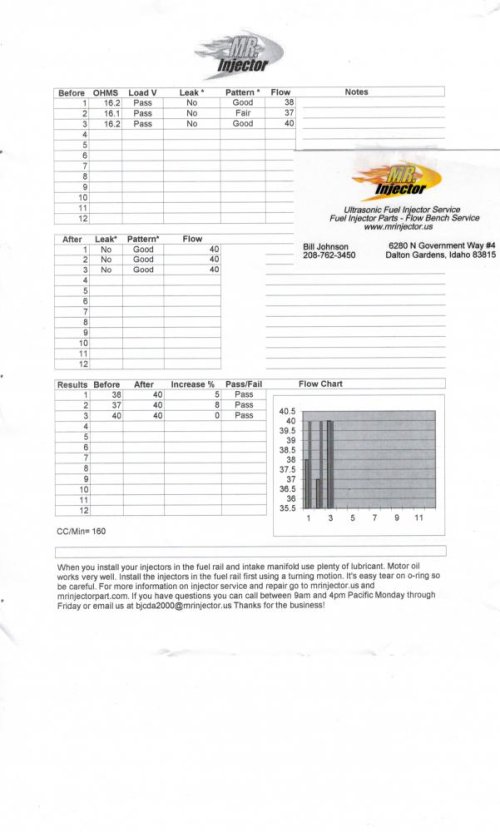
#8 a bad fuel pressure regulator. This can either cause a vacuum leak because of a bad diaphragm, or it can cause too high a fuel pressure which COULD cause the exact problems that you are experiencing. Too much fuel for the air at low rpm but liveable at higher rpm. This is not as likely as a vacuum leak, but IS possible. You can test with a gauge Tee'd into the return hose between the rear of the fuel rail and the fuel pressure regulator with the bike running. Should be about 38psi +/-.
RETURN hose between the Fuel Pressure Regulator and the tank MUST be the factory premolded hose, otherwise it WILL kink when the tank is moved forward into position. 13 31 1 461 011 HOSE $21.30
Hose from rear of fuel rail to fuel pressure regulator can be bulk INJECTION RATED hose.
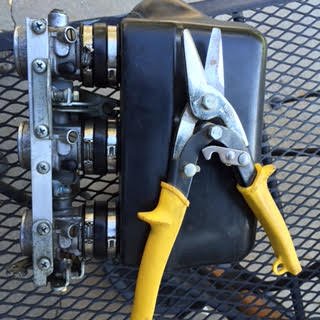
W83013 ARE the correct pliers for the BMW oetiker clamps used on your throttle bodies.
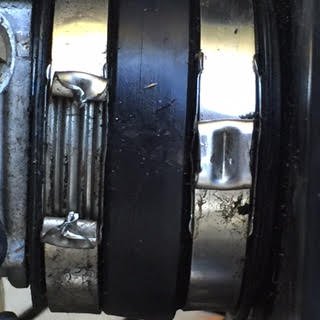
The old clamps need to be CUT off. I use a pair of 10" end cutters on the bump with some twisting. You need to use NEW clamps. They are a one time use. 11 61 1 460 900 CLAMP - D=48,5mm 3reqd. $2.67ea. 11 61 1 460 901 CLAMP - D=50mm 3reqd. $2.26ea.
Your photo is somewhat confusing as your hand is infront of the nipple on the block that should be plugged. The length of hose that is plugged only adds to the possible places for it to leak and the possibility of it getting into the fan. Cap it right at the nipple with a THICK vacuum cap that won't crack.
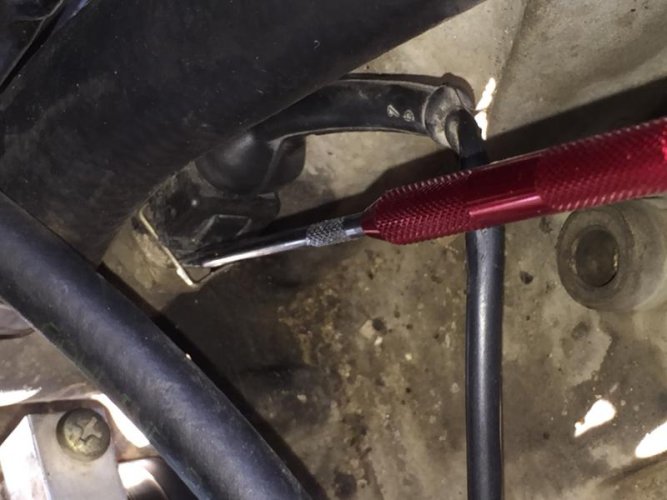
The reason the vacuum line from the #3 throttle body to the fuel pressure regulator is in a spring is so it won't kink or collapse. This is just bulk vacuum hose. Replace all three hoses to the fuel pressure regulator at this time due to the fact that you're already there and they're such a pain to get to (remember, FACTORY MOULDED hose from regulator to tank).
I would suggest that you do the full european style of venting your fuel tank:
Purchase "the CUP", or as BMW calls it: 16 13 2 307 467 AIR ACCUMULATOR $2.46
This is a plastic cup that clips to the frame rail just below the two nipples on the right rear of your tank. NOTHING attaches to the nipples, thereby making removal and replacement of the tank easier (Hoses attached to these nipples can kink during the last move of pushing the tank forward).
The front nipple is the tank vent. The rear nipple is the rain drain from the filler cap area (the hole at 9 o'clock on the filler neck when the cap is open. NEVER turn the filler cap so that it opens forward, as it will block this drain).
The hose that WAS connected to the rain drain nipple and runs down to the right peg plate should now be connected to the "cup" drain.
The Hose that WAS connected to the tank vent and runs through the check valve to the nipple on the front top of the block just below the fan can be discarded. The nipple on the block MUST be capped!
Now anything that comes out the rain drain OR the tank vent drops into the cup and is drained through the hose to the peg plate area like any older motorcycle. No fuel or fuel vapors in your tank. No kinked hoses preventing adequate tank venting. Easier tank removal and tank replacement. The cost: $2.46 plus a few more molecules of carbon products that go into the atmosphere instead of into your oil.
IF (and only if) you do the complete above modification, then you can also do a "flapperectomy":
Remove your gas cap assembly (four screws under cap).
Invert cap assembly and remove three screws that hold the "flapper" to the underside of the cap assembly. Remove flapper.
Reinstall cap.
This will allow you to:
more easily fill the bike
monitor the condition of the tank internals (pump, damper, dirt , water)
check the amount of the fuel in the tank
add about 1/4 gallon more fuel (NEVER fill more than about 3/8" from neck or it will just pour out into the "cup" and onto the ground as you accelerate away from the gas station).
Again, sorry for not checking in sooner on your thread. I'll try and keep up.

I'm sorry I didn't jump back in on this thread earlier. I've been dealing with a pinched nerve in my neck that affects my whole right side and typing does not help it.
Going back through this thread, my comments are as follows;
The air filter SHOULD have kept any debris caused by the mouse from affecting the air flow meter itself. But, if enough debris was present under the filter, it could affect running, but I would expect it to affect high rpm first just by virtue of reduced airflow capacity.
The fact that the motor runs poorly at low rpm, but fine at high rpm suggests good fuel and air flow and good spark (IF your spark plug gap is correct. Too large a gap will have trouble firing at low rpms). Another possibility is exhaust valves that are too tight.
If the plugs are good and gapped correctly, the exhaust valves are correctly adjusted, and the fuel pressure is correct, it suggests a vacuum leak, or more accurately, unmetered (unseen by the computer) air entering the intake tract. If more air is entering the cylinders than the computer knows about, the computer does not inject the appropriate fuel and the bike runs very lean. Since the excess air remains relatively constant throughout the rpm range, the proportion of excess air at low rpm is high and the proportion of excess air at high rpm is low. The bike will run poorly at low rpm and ok at high rpm.
The possible sources of this vacuum leak are (roughly in order of probability or ease/cost of correcting:
#1 crankcase breather hose 11 15 1 460 480 VENT HOSE $15.94 Use ONLY BMW original. Aftermarket ones are weaker than originals and originals can go bad in 1-2 years. They will crack just below the upper and just above the lower hose clamps.
#2 throttlebody vacuum caps on #1 and #2 cylinders (+#3 on K100s)
#3 an unplugged or cracked hose or plug to the nipple at the front top of the engine just below the fan. This is where the fuel tank was originally vented. In reventing, many previous owners either did this wrong or poorly so that a leak develops.
#4 the oil filler O-ring. This O-ring never gets any thought, but it hardens and then instead of o-ring to crank cover you get plastic cap to cover with some air leakage. Cheap insurance; if you feel the cap hit the crankcover when you tighten your oil filler cap, replace the O-ring. I use a thicker crosssection O-ring that gives me a lot longer life before it no longer seals.
Now we get to the things that take more work or $$$ to replace:
#5 the vacuum line between the #3 (or #4 on a K100) cylinder and the fuel pressure regulator. This is just bulk vacuum hose, nothing special.
#6 the 2 1/2" rubber elbow between the air flow meter and the intake plenum 13 31 1 460 563 HOSE ASSY $31.17 If this hose has ANY cracks, it will cause a MAJOR running problem.
#7 the throttle body upper and lower boots (manifolds). If anyone of the six (or 8 on a K100) are bad, replace them all because of the labor involved to get at them. 11 61 1 460 408 INTAKE MANIFOLD 3 required $55.41ea. plus 11 61 1 460 755 BUSHING 3 required $5.39 ea.
#8 a bad fuel pressure regulator. This can either cause a vacuum leak because of a bad diaphragm, or it can cause too high a fuel pressure which COULD cause the exact problems that you are experiencing. Too much fuel for the air at low rpm but liveable at higher rpm. This is not as likely as a vacuum leak, but IS possible. You can test with a gauge Tee'd into the return hose between the rear of the fuel rail and the fuel pressure regulator with the bike running. Should be about 38psi +/-.
RETURN hose between the Fuel Pressure Regulator and the tank MUST be the factory premolded hose, otherwise it WILL kink when the tank is moved forward into position. 13 31 1 461 011 HOSE $21.30
Hose from rear of fuel rail to fuel pressure regulator can be bulk INJECTION RATED hose.
W83013 ARE the correct pliers for the BMW oetiker clamps used on your throttle bodies.
The old clamps need to be CUT off. I use a pair of 10" end cutters on the bump with some twisting. You need to use NEW clamps. They are a one time use. 11 61 1 460 900 CLAMP - D=48,5mm 3reqd. $2.67ea. 11 61 1 460 901 CLAMP - D=50mm 3reqd. $2.26ea.
Your photo is somewhat confusing as your hand is infront of the nipple on the block that should be plugged. The length of hose that is plugged only adds to the possible places for it to leak and the possibility of it getting into the fan. Cap it right at the nipple with a THICK vacuum cap that won't crack.
The reason the vacuum line from the #3 throttle body to the fuel pressure regulator is in a spring is so it won't kink or collapse. This is just bulk vacuum hose. Replace all three hoses to the fuel pressure regulator at this time due to the fact that you're already there and they're such a pain to get to (remember, FACTORY MOULDED hose from regulator to tank).
I would suggest that you do the full european style of venting your fuel tank:
Purchase "the CUP", or as BMW calls it: 16 13 2 307 467 AIR ACCUMULATOR $2.46
This is a plastic cup that clips to the frame rail just below the two nipples on the right rear of your tank. NOTHING attaches to the nipples, thereby making removal and replacement of the tank easier (Hoses attached to these nipples can kink during the last move of pushing the tank forward).
The front nipple is the tank vent. The rear nipple is the rain drain from the filler cap area (the hole at 9 o'clock on the filler neck when the cap is open. NEVER turn the filler cap so that it opens forward, as it will block this drain).
The hose that WAS connected to the rain drain nipple and runs down to the right peg plate should now be connected to the "cup" drain.
The Hose that WAS connected to the tank vent and runs through the check valve to the nipple on the front top of the block just below the fan can be discarded. The nipple on the block MUST be capped!
Now anything that comes out the rain drain OR the tank vent drops into the cup and is drained through the hose to the peg plate area like any older motorcycle. No fuel or fuel vapors in your tank. No kinked hoses preventing adequate tank venting. Easier tank removal and tank replacement. The cost: $2.46 plus a few more molecules of carbon products that go into the atmosphere instead of into your oil.
IF (and only if) you do the complete above modification, then you can also do a "flapperectomy":
Remove your gas cap assembly (four screws under cap).
Invert cap assembly and remove three screws that hold the "flapper" to the underside of the cap assembly. Remove flapper.
Reinstall cap.
This will allow you to:
more easily fill the bike
monitor the condition of the tank internals (pump, damper, dirt , water)
check the amount of the fuel in the tank
add about 1/4 gallon more fuel (NEVER fill more than about 3/8" from neck or it will just pour out into the "cup" and onto the ground as you accelerate away from the gas station).
Again, sorry for not checking in sooner on your thread. I'll try and keep up.
Last edited: