• Welcome, Guest! We hope you enjoy the excellent technical knowledge, event information and discussions that the BMW MOA forum provides. Some forum content will be hidden from you if you remain logged out. If you want to view all content, please click the 'Log in' button above and enter your BMW MOA username and password.

    If you are not an MOA member, why not take the time to join the club, so you can enjoy posting on the forum, the BMW Owners News magazine, and all of the discounts and benefits the BMW MOA offers?

  • Beginning April 1st, and running through April 30th, there is a new 2024 BMW MOA Election discussion area within The Club section of the forum. Within this forum area is also a sticky post that provides the ground rules for participating in the Election forum area. Also, the candidates statements are provided. Please read before joining the conversation, because the rules are very specific to maintain civility.

    The Election forum is here: Election Forum

R75/6 rear wheel bearing stack.

Jeff488

Aspiring Profligate
Having discovered that all the wheel bearings need replacement, I have, with the help of Mr. Ausherman's website, removed the rear bearings.
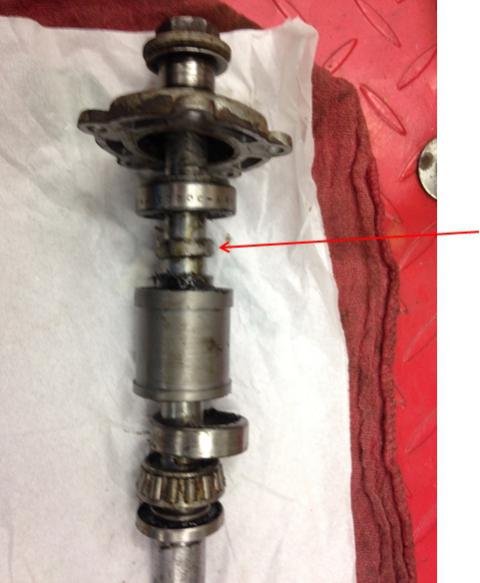
I arranged the bits per the photograph on his site and find that the bearing cone is kept from seating into its cup by the wedding ring.

I don't see how the preload can be done in this configuration.

Here are pix of my problem. I obviously haven't cleaned anything yet and apologize for the slightly fuzzy photo, but the parts can be seen well enough, I think.


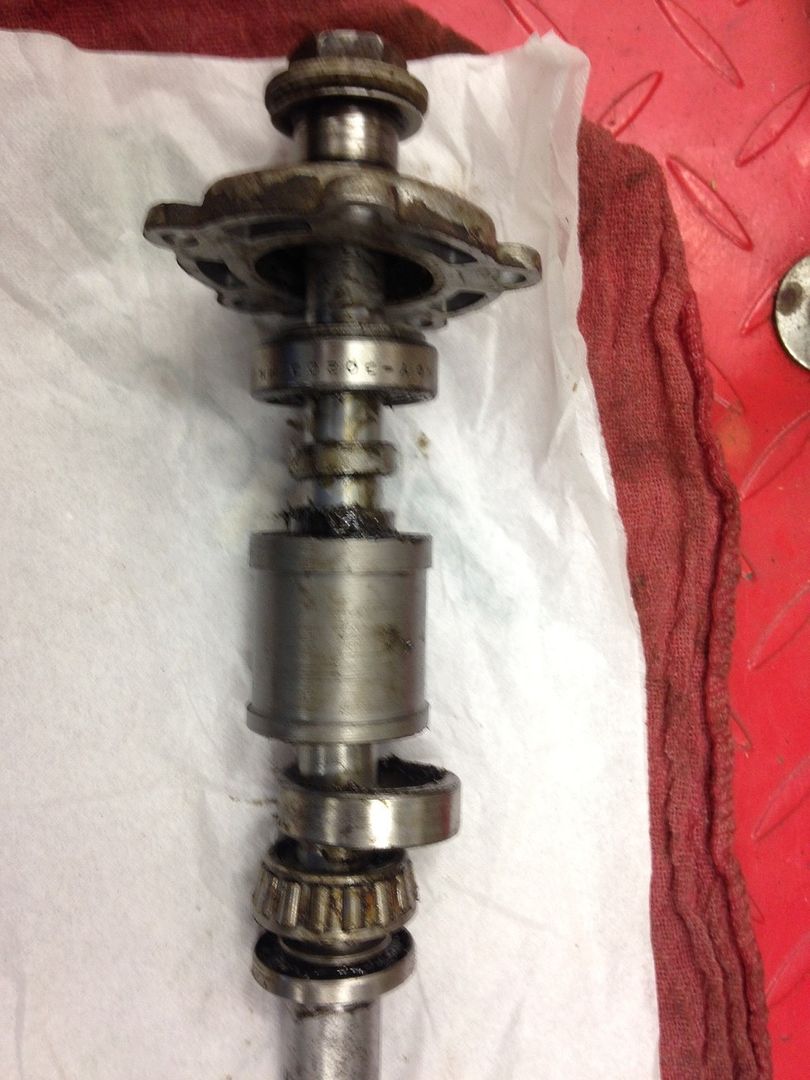
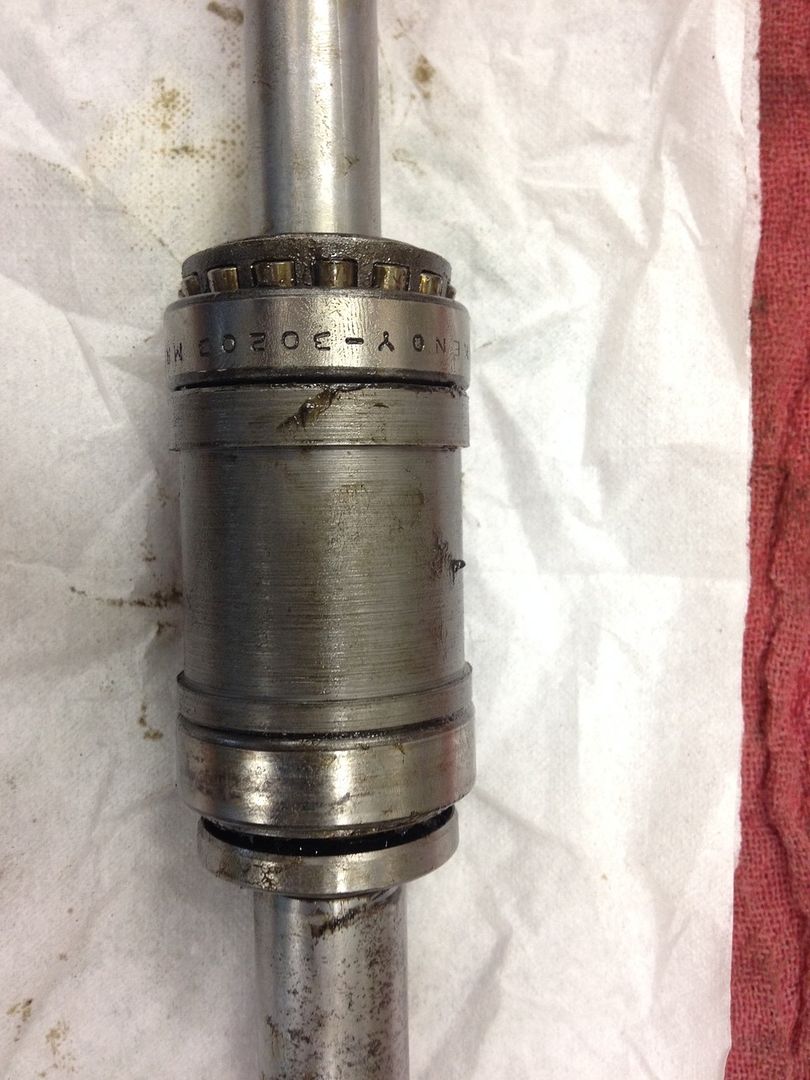
I noted that moving the wedding band to the other side of the bearing cone allowed the bearings to be preloaded, but that is not the way the stack is shown on Duane's site.

Help, please.
Thanks,
Jeff
 
I've highlight what I think is the wedding band...there is another part that is inside the large outer spacer...it is the inner spacer and is what the wedding band engages. I don't see the inner spacer in your pictures.
 

Attachments

  • BearingStack.jpg
    BearingStack.jpg
    31.6 KB · Views: 84
Jeff,

Kurt's red arrow is pointing to the wedding band. I think I can see the "inner spacer" peeking out of the outer spacer in your first photo. Let's first distinguish "right" and "left" for clarity. Left and right is as you are sitting on the bike in a riding position looking ahead. The top of your first photo would be the left side of the bearing stack. The wedding band should be on the left side as it is shown in your photo for easy access and removal in regards to maintenance and preload adjustment. When your bearing stack is installed into the wheel hub the right side bearing cage and race is captured into the hub and can not be removed without heat.

Get things cleaned up and we'll go from there. A static preload can be accomplished with the stack outside the wheel hub. But it will require a take-up collar of some sort to replace the space of the swingarm and axle spacer. With cleaned stack assembled (with wedding band) lightly oiled new bearings and races, a spacer installed on the left side of the stack - seals, top hats and bearing hub cap removed torque the axle nut to ±25 ft-lbs. Moderate force with your thumbs on the outer spacer should make it move with some resistance. No movement of the outer spacer with your thumbs means your wedding band is too narrow. If the outer spacer flops around with no resistance means your wedding band is too thick and needs to be reduced. This is not the preferred preload method of measuring the rolling resistance in in-ounces of rotational force with a spring scale and quality take-up spacers but can be accomplished successfully outside the hub. Never exceed 35 Ft-lb on the axle nut. Front or rear.

A word about your inner spacer ... you may have the older style inner spacer with metal rings. If so you may want to reduce the diameter of the rings so it will slide out of the inner diameter of the outer bearing race. Just makes maintenance easier when that time comes around next time.

http://s428.photobucket.com/user/gr...Snowflake/07-19-10BMWRearBearings017.jpg.html

http://s428.photobucket.com/user/gr...Snowflake/07-25-10BMWRearBearings008.jpg.html
 
Yes, Mike, the inner spacer is there and is the type with two small rings. I plan to take a bit off them later.

I looked at your photos(more than the 2 links you posted) and the only difference between my layout and yours is that mine had the left tophat with the flange outside the seal.
Dunno what difference that makes.
There were no shims when it came apart.

What really puzzles me is that when I try to fit the bearings and spacers,etc together like this photo of yours:

http://s428.photobucket.com/user/gr...Snowflake/07-19-10BMWRearBearings019.jpg.html

The wedding band will not allow the left bearing cone to seat in the outer race, as is shown in my first photo.

You won't be surprised to know that I have not yet figured out the pre-load and reinstallation procedures yet and am counting on help from guys like you.
Either that or a miracle.

I will go to Napa tomorrow to get bearings and have it cleaned up for my next installment.

Thanks,
Jeff
 
Jeff,

Don't worry about the brim of the top-hat, It can go either way. Personally ... I like the brim outside, that way it's easily removed and adds just a little more coverage protection on the seal. BY the way - be sure to order new seals and closely inspect your top-hats for wear grooves by the seal wipers. If you see pitting or grooves on the top-hats, replace them.

This bearing stuff is always difficult to explain without using visual aids and my hands.

Not sure why you're having trouble, are you using a spacer so you can collapse the stack?

Don't let this frustrate you too much. The entire application, design, and operation of the bearings is more simple than you may think. I'll do everything I can to turn that light bulb on for you. Let me try to explain what's going on inside the wheel hub ...

The outer bearing races are fixed in space inside the hub. They do not move. They are fixed inside the hub; by the hub itself and the outer spacer. The bearing cages need to collapse or move towards the outer races. But we need to limit (or stop) that amount of movement towards the outer races to the correct amount of force, or preload. What limits this space or movement while we torque the axle nut is the inner spacer and the thickness of the wedding band. If the wedding band is too thick - the bearing cages will not be able to force themselves onto the outer races machined surface. in other words a wedding band that is too thick will prevent the cages from reaching the outer race surface when the axle nut is torqued. On the other hand; if the wedding band is too thin - the cages will travel more towards the races causing the preload to be too great. It's about matching the lateral spacing of the cages to match the fixed position of the outer races under torque.

We'll get this. I would recommend experimenting with the stack, with and without the wedding band. Remember this will all be futile without a spacer as shown in my photos.
 
Jeff,

Are both ends of your inner spacer flat? Or is one end inset?

Another thing ... I no longer use shims. I should probably amend my Photobucket site regarding that. I've changed my procedure to do preload with the wedding band only, no 0.05mm shims.
 
Well, Duh!
My story is that if I had cleaned the stuff up I would have noticed the inset part of the inner spacer.
Honest. I would have.
That's my story and I'm sticking to it.

I don't mind these head slapper moments if I finally understand what's going on.
Oh well. This project is a learning experience, But why is it necessary to have the band sit in a recess?
Why not just against the end of the inner spacer?
Some kind of nefarious plot?

Aside from that, I think I now understand why the torque applied when pre-loading is about the same as the axle nut.

Ingenious.

Anyway, the good guys at NAPA will have my new bearings Friday.

The hubs are yet to be cleaned, so reassembly is a bit down the road.

Instead of shims do you just use a thicker band if needed, or?
 
Jeff -

I'll jump in as I've been down this road. I've used shims on my R69S but didn't on my /7. As I recall, if you have a wedding band that is too thin, your only recourse is to buy the next size up, or at least one that ends up being too thick. Then, on a flat surface with some fine sandpaper (maybe 600 grit??) along with something like WD-40, you must begin to thin the spacer. You do this by sanding one surface of the space on the sandpaper in a figure-8 pattern. Have your calipers ready to check the width of the spacer at various spots around the circumference. Make a measure of the thickness to start with, then check after you've knocked it down say 0.001mm...maybe there's a better value. :dunno Anyway, you would try the fit again. Not good enough? Back to sanding. Always recheck the thickness...it's important you have both front a rear surfaces of the spacer parallel.
 
Hi Kurt.

That procedure is what I have read about and it seems reasonably easy if a bit tedious.
No worse than buying different bands though, I guess.

Probably should get the new bearings, set the pre-load and if shims are needed they can be ordered with the new seals.

Thanks,
Jeff
 
It's all good Jeff. Don't beat yourself up. You can't be expected to understand all this the first time through the gate.

Yes, you can order multiple sizes of wedding bands. Get yourself a decent digital 6" caliper. I have several - HF sells them at a reasonable price and they work just fine in my opinion. While you're waiting for your bearings this would be a good time to start making some notes on your wedding band thickness. When you get your new bearings do a trial preload. If the preload is light and you need a narrower band you can just do some hand milling (figure-8) on a flat surface with some fine grit lubricated paper. I don't remember any mention of how you removed the stack, but I'm assuming you used heat ... yes? You'll need to repeat that process and freezing the bearing stack to reassemble. The cold assembled bearing stack will literally drop into the heated wheel hub.

My personal preference is not to use the shims. You can decide on your own. Your decision.

Get everything prepped and cleaned. The inside of your aluminum hub should be clean and dry. Clean up your axle and lightly coat it with grease to prevent any rust. You may want to do some reading on Snowbum's website. He's gone to great efforts to explain the entire procedure. It may give you some background and answer some questions you may have.

Keep us informed on your progress.
 
Actually, this learning thing is enjoyable.
I did use heat to remove the stack. Used the axle for one side and just tapped around the other one. Both came out quite easily.

I have read Snowbum's articles until my eyes cross. Lot's of good info there, but a bit hard for me to get in order in my head, sometimes.
I just go back after looking at the bike for a bit and most of the time it comes clear.

I like the idea of the milling method and will probably do that.

The bike sat for about 12 years and the hubs are corroded, so that little chore needs doing yet. The rims need buffing and spokes cleaned,etc.

It's a good feeling, getting this bike back on the road.

Also grateful for the help here.

Jerff
 
this whole thread dealing with pre-loading the bearing stack should be stickied and made a permanent, easy-to-find reference.
 
Back
Top