Navigation
Install the app
How to install the app on iOS
Follow along with the video below to see how to install our site as a web app on your home screen.
Note: This feature may not be available in some browsers.
More options
-
Welcome, Guest! We hope you enjoy the excellent technical knowledge, event information and discussions that the BMW MOA forum provides. Some forum content will be hidden from you if you remain logged out. If you want to view all content, please click the 'Log in' button above and enter your BMW MOA username and password. If you are not an MOA member, why not take the time to join the club, so you can enjoy posting on the forum, the BMW Owners News magazine, and all of the discounts and benefits the BMW MOA offers?
-
Beginning April 1st, and running through April 30th, there is a new 2024 BMW MOA Election discussion area within The Club section of the forum. Within this forum area is also a sticky post that provides the ground rules for participating in the Election forum area. Also, the candidates statements are provided. Please read before joining the conversation, because the rules are very specific to maintain civility.
The Election forum is here: Election Forum
You are using an out of date browser. It may not display this or other websites correctly.
You should upgrade or use an alternative browser.
You should upgrade or use an alternative browser.
What Homemade Accessories, Gear, Tools, Improvements, Clothing Have You Made ?
- Thread starter 72r60/7
- Start date
elgin mary
New member
MotorradMike
Lucky
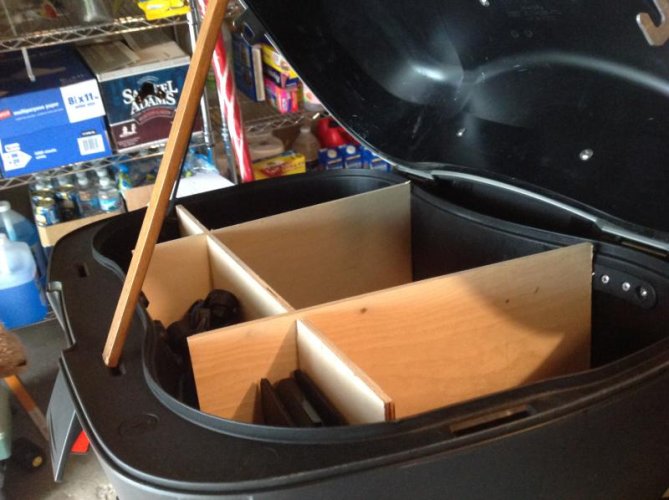
I like the stick that holds it open!
Also, good taste in beer.
Also, good taste in beer.
Homemade
1"x 1" aluminium angle used to mount $20 Aux Lights from auto parts store. Cheap light bar. Lights were 20+ years old and hooked up to high beam only and though not the best type of light, they provide 110 more watts. Total of 170 watts helps spot Bambi quicker.
Flat lexan (scrap) headlight protector also reflects light backward just enough to tell instantly, to the rider, that the headlight bulb has not burned out. I looked for a piece of flexible light rod to mount on top of the lens, but didn't find one. First thing I think when I discover a burned out bulb is "wonder how long that has been out". No, I don't check all lighting before each ride.
Last edited:
globalrider
Alps Adventurer
Perhaps some day I will look at getting a TIG, but for my needs, the MIG is well suited (I also have an oxy/acetylene setup that sees little use).
I've had my oxy-acetylene outfit for over 20 years. You can't beat them for all around use (heating, cutting, welding) and since you feed a filler rod when welding, it is one of the reasons for going with a TIG.
I always hated two post lifts (unless they were in ground columns) since the posts are always in the way to get in or out of the vehicle.
I planned my installation. I installed my columns further into the garage so that when I park closer to the garage door, the columns do not get in the way.
Don't know what to recommend for the media cabinet.
I'll probably be going with a TP Tools 960 Pro Blaster Abrasive Blasting Cabinet. I want one that is 48 inches wide and large enough for a motorcycle frame and car rims.
I like the volt meter, where did you find the LCD unit? I've only been able to find LED ones which are less aesthetically pleasing.
All the info (part numbers, sources and how-to) is on my Surface Mount Datel LCD Voltmeter Install page.
I wanted a voltmeter that I could connect directly to my battery without having to switch it and you can only do that with an LCD display.
globalrider
Alps Adventurer
The RAM ball may not be "homemade" but the modifications to it are. I came up with this installation that gave me the OEM look I was after.


clowry
Active member
I wasn't happy with the enormous, strap on tank bag the dealer gave me with my F800GT. Found a small one that I liked, but it's magnetic, and my 'tank' is tupperware. We took off the centre panel and used clear silicone to stick some rare earth magnets to the underside. They hold my little tank bag on nicely!
Homemade Improvements
Well, that's smart.
I wasn't happy with the enormous, strap on tank bag the dealer gave me with my F800GT. Found a small one that I liked, but it's magnetic, and my 'tank' is tupperware. We took off the centre panel and used clear silicone to stick some rare earth magnets to the underside. They hold my little tank bag on nicely!
Well, that's smart.
Moto316
Member
I wasn't happy with the enormous, strap on tank bag the dealer gave me with my F800GT. Found a small one that I liked, but it's magnetic, and my 'tank' is tupperware. We took off the centre panel and used clear silicone to stick some rare earth magnets to the underside. They hold my little tank bag on nicely!
Got a picture of it?
Homemade bags
Just finished soft prototype bags. Seems like everything I make are prototypes. It's a good out.
Frames are Aluminum treadplate. .062" - .073" hung on hard luggage frames
Bag material is 1000 d Codura, used double thickness w/ 1/32 " Lexan between layers for form/stiffness.
Codura and reflective material are from Seattle Fabrics.
Straps and YKK buckles are from Amazon.
Size is 8" x 20 " x 12"/16"+ high. 12" high in photograph.
I'm pleased with outcome so far, though time (a season or two) will tell a lot.
$350 +- and a lot of time


Photograph rotation is correct on an iPad but not on a desktop.
Just finished soft prototype bags. Seems like everything I make are prototypes. It's a good out.
Frames are Aluminum treadplate. .062" - .073" hung on hard luggage frames
Bag material is 1000 d Codura, used double thickness w/ 1/32 " Lexan between layers for form/stiffness.
Codura and reflective material are from Seattle Fabrics.
Straps and YKK buckles are from Amazon.
Size is 8" x 20 " x 12"/16"+ high. 12" high in photograph.
I'm pleased with outcome so far, though time (a season or two) will tell a lot.
$350 +- and a lot of time
Photograph rotation is correct on an iPad but not on a desktop.
Last edited:
Great machine that will run forever. I have an old table model here but wanted reverse for what I have coming up.I inherited a 1951 singer. Had to give a little help sometimes on 4 thickness areas.
OM
elgin mary
New member
Platform
Using a previous post as a model, I made a platform for the back of my bike to carry my camping gear. I made it so that I can put legs on the platform for a table while camping. Now that I've used it for one trip to the Georgia Mountain Rally, I'm going to work on an improved version.

Using a previous post as a model, I made a platform for the back of my bike to carry my camping gear. I made it so that I can put legs on the platform for a table while camping. Now that I've used it for one trip to the Georgia Mountain Rally, I'm going to work on an improved version.
2wheeledfaith
New member
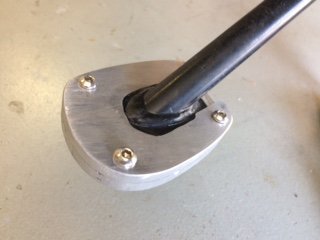
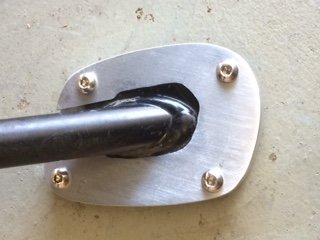
Kickstand foot
Kickstand foot made from 1/4" aluminum.
Milled out the underside of the top aluminum plate to fit around the factory side stand leg and foot.
Drill and tapped holes for 6mm stainless steel allen cap screws.
Used a fine grit sanding belt to give it a brushed finished.
Kickstand foot made from 1/4" aluminum.
Milled out the underside of the top aluminum plate to fit around the factory side stand leg and foot.
Drill and tapped holes for 6mm stainless steel allen cap screws.
Used a fine grit sanding belt to give it a brushed finished.
Attachments
Homemade
Just finished a Heated Seat Pad and it works great. Too great. Gets way too hot. Have had heated grips on 3 different bikes and none of them ever got this hot.
I used a Heated Grip Kit and left over seat material. I put the supplied resistor in the pad, which was the wrong place. It gets so hot it started to melt the covering right at the resistor.
Initial testing revealed, what should have been obvious, that it needed a controller. I would rather not buy a $45 +- controller and then adaptors when I should be able to find a less expensive controller and hard wire it to my system.
I have looked online and only found a few options and not comfortable buying electronics that I know nothing about. As I've said many times: "What I know about electricity will shock you (and me). "
Anybody have suggestions for adjustable controllers available for hobbyist/tinkerers ? 12v- Max. 3 amps
Appreciate any advice.
Charlie

Sorry about rotated photograph
Just finished a Heated Seat Pad and it works great. Too great. Gets way too hot. Have had heated grips on 3 different bikes and none of them ever got this hot.
I used a Heated Grip Kit and left over seat material. I put the supplied resistor in the pad, which was the wrong place. It gets so hot it started to melt the covering right at the resistor.
Initial testing revealed, what should have been obvious, that it needed a controller. I would rather not buy a $45 +- controller and then adaptors when I should be able to find a less expensive controller and hard wire it to my system.
I have looked online and only found a few options and not comfortable buying electronics that I know nothing about. As I've said many times: "What I know about electricity will shock you (and me). "
Anybody have suggestions for adjustable controllers available for hobbyist/tinkerers ? 12v- Max. 3 amps
Appreciate any advice.
Charlie
Sorry about rotated photograph

The purchase of a controller is the easiest way Charlie. The controllers work by turning the power off and on- the longer the "pulse" on the more heat. I suspect that your sitting on it really insulates the pad letting it get hotter than it normally would "out in the air".Just finished a Heated Seat Pad and it works great. Too great. Gets way too hot. Have had heated grips on 3 different bikes and none of them ever got this hot.
I used a Heated Grip Kit and left over seat material. I put the supplied resistor in the pad, which was the wrong place. It gets so hot it started to melt the covering right at the resistor.
Initial testing revealed, what should have been obvious, that it needed a controller. I would rather not buy a $45 +- controller and then adaptors when I should be able to find a less expensive controller and hard wire it to my system.
I have looked online and only found a few options and not comfortable buying electronics that I know nothing about. As I've said many times: "What I know about electricity will shock you (and me). "
Anybody have suggestions for adjustable controllers available for hobbyist/tinkerers ? 12v- Max. 3 amps
Appreciate any advice.
Charlie
View attachment 54160
Sorry about rotated photograph
Good for you putting this all together.
Gary
snookers
DBLUPPR
Anybody have suggestions for adjustable controllers available for hobbyist/tinkerers ? 12v- Max. 3 amps
Appreciate any advice.
Charlie
https://www.warmnsafe.com/heat-trollers/
Charlie.....check out the many options on this site. I used the "Single Portable Heat-troller Coax" as a replacement for my heated jacket, works like a charm.
Similar threads
- Replies
- 1
- Views
- 272