• Welcome, Guest! We hope you enjoy the excellent technical knowledge, event information and discussions that the BMW MOA forum provides. Some forum content will be hidden from you if you remain logged out. If you want to view all content, please click the 'Log in' button above and enter your BMW MOA username and password.

    If you are not an MOA member, why not take the time to join the club, so you can enjoy posting on the forum, the BMW Owners News magazine, and all of the discounts and benefits the BMW MOA offers?

  • Beginning April 1st, and running through April 30th, there is a new 2024 BMW MOA Election discussion area within The Club section of the forum. Within this forum area is also a sticky post that provides the ground rules for participating in the Election forum area. Also, the candidates statements are provided. Please read before joining the conversation, because the rules are very specific to maintain civility.

    The Election forum is here: Election Forum

Bing Type 53 Carb Question(s)

kentuvman

New member
Thanks to James for suggesting disassembling the jet stack - with an ultrasonic cleaner & compressed air bike is now running very decent.

Not quite sure about the adjustment screws but will delve a bit more into it - at least both sides are now adjustable.

Needle position - I read online if my carb is #2/36/222 or 112 that needle should be in position #2 - that's where it is now.

If I move needles to position #3 what will change - understand the mixture is a leaner at #3 - how will this affect the adjustment screws?
 
Ken -

Might be a typo, but the Bing book shows 1/26/111-112 or possibly 123-124 carbs for the R60/5. If the former numbers, the book suggests clip position 2 while position 3 for the 123-124 carbs. Bing shows that the positions are measured from the top or blunt end of the needle. There are 3 circuits in the carb, and to some degree they overlap. You have the idle circuit (controlled by the idle mixture screws), the mid-range (controlled by needle and its jet), and the wide open range (controlled by the main jet). Idle is up to 0-25% throttle, needle 15-80%, and main jet 60%-100%...notice the overlap. The needle is a taper so if it is moved from position 2 to 3, you have pulled the needle farther out, opening the area through which gas can flow...this makes the mid-range richer.

It would be recommended that if you make any adjustment to one of the ranges on the carb (less of an issue with the main jet probably), you should go back and readjust the other ranges.
 
Ken -

The needle is a taper so if it is moved from position 2 to 3, you have pulled the needle farther out, opening the area through which gas can flow...this makes the mid-range richer.

Thanks Kurt - put another way, if needle is moved from position 2 (upper position) down to 3, and increases gas flow, will this affect the idle on the bike? Right now it seems to be idling faster than I'd like.

I am going to take a step back and check the valves - the bike ran good when I picked her up and had been recently tuned - after the valves, I'll also use my timing light to check that bike is properly timed - aware that carb adjustment is the last one to do.

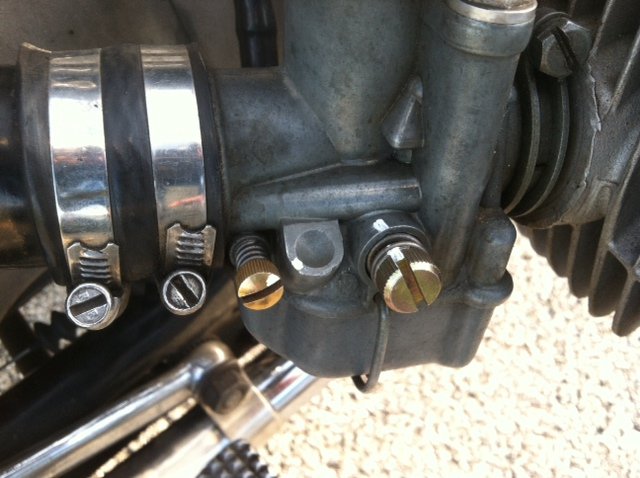
Still unclear or inexperienced regarding the relationship between the large screw & smaller screw - my understanding on the Type 53 is larger screw is used for idle adjustment and smaller is air/fuel mixture screw. From what I've read 1.5 turns out from close for this screw is a good baseline. I'll get there - just may take some time.

Thanks as always!
 
Ken -

I would say that it has some effect...sounds like it did from what you're saying. I'd definitely go back and recheck the idle setting.

Not totally family with the Type 53...but should be similar to the slide carbs on my /2. I think you have the two screws figured out...the big one for idle speed, the small one for mixture. On the 53s, the small screw controls an air circuit, so turning it CW shuts off air, making it richer. Same thing on my /2 which has slide carbs.

Edit to correct what I wrote...I was thinking about CV carbs.
 
Screw position

Ken -

I would say that it has some effect...sounds like it did from what you're saying. I'd definitely go back and recheck the idle setting.

Not totally family with the Type 53...but should be similar to the slide carbs on my /2. I think you have the two screws figured out...the big one for idle speed, the small one for mixture. On the 53s, the small screw controls a gas circuit, so turning it CW shuts off gas, making it leaner. On my /2, the screw controls an air circuit...it does the opposite when I turn it CW.

On the carb, if the mixture screw is between the slide and the head, then it controls fuel. If it is on the other end, then it controls air.
 
... snip ...

Still unclear or inexperienced regarding the relationship between the large screw & smaller screw - my understanding on the Type 53 is larger screw is used for idle adjustment and smaller is air/fuel mixture screw. From what I've read 1.5 turns out from close for this screw is a good baseline. I'll get there - just may take some time.

Here is a write-up for balancing a type 53 carb - on an R60/6: Note that this write-up describes grounding each side of the engine by laying the plug on the engine so it grounds. Most folks, including me, would use a method that was more secure to make sure that the plugs don't get free and you destroy the ignition coils. You can take a large clip and hook the plug to a cylinder fin; or you can use a piece of copper wire or spoke and run that from the spark plug to the plug wire and then use a screwdriver to ground the plug which will shut down that side.

-------------------------------------------------------
To set and sync the carbs do the following. Be aware that the large
screw on the side of each carb is the idle speed, in is faster out is
slower. The small screw is the idle air mixture; turning the idle mixture screw INwards
reduces the AIR flow, hence the mixture gets RICHER
.

Warm up the bike by riding a few miles. Take the caps off of the
plugs on one side (doesn't matter which) put a spark plug into each
cap and put the plug on the engine metal so that the plug sparks.
This will keep from frying your coils if the spark has no where to
go. Start the engine with the throttle shut fully, you will have to
turn the idle set screw (the big one) in a half turn to keep the cycle
running. Set the rpm for 500. Then turn the smaller air bleed screw
in and out to get the highest rpm. A starting point is to turn it in
fully, gently, and start at 1/2 turn CCW. Keep adjusting the rpm to
500 and playing with the air mixture till you get the highest rpm and
set for 500.

Stop the bike. Replace the caps on one side and remove the other side
and put the plugs in and ground them. Do the same procedure. When
you are happy with the idle at 500 on this side tighten the throttle
holding screw on the bottom of the throttle grip at the handlebar so
the throttle is hard to turn and set the rpm to 1,250. When it's set
kill the engine and do not touch the throttle. Put the spark plug caps
back on the side you first adjusted and pull them from the side you
just finished adjusting and install the plugs grounded to the engine.
Start the engine, do not touch the throttle! If the rpm on the hooked
up side is not 1,250 then loosen the nut that holds the throttle cable
adjustment on the carb on the hooked up side of the engine and adjust
the cable in to lower rpm or out to raise rpm. When your at 1,250
tighten the nut and stop the engine.

Loosen the throttle holding screw so that the throttle can close
fully, hook up all of the spark plugs properly and start the engine.
Your rpm will be way too high so turn the idle speed screws out
equally 1/4 turn at a time till you get to 1,000 rpm.

Go for a ride.
 
"my understanding on the Type 53 is larger screw is used for idle adjustment and smaller is air/fuel mixture screw. From what I've read 1.5 turns out from close for this screw is a good baseline."

That is correct.

Do you have a shorting device? If not, you should make some and always have them handy. Much better setup and easier to go from one side to the other quickly (which you will need to do). You probably already know this but you need to be able to listen to each cylinder individually to properly sync them.

That said, once you have it running and warmed up hook up your shorting tools and try this:

1. The first step is to get the mixture (smaller screw) in the ballpark.
First, turn it in until that cylinder starts to bog. Make a mental note of approx. where that was. Then, slowly turn it out until the engine starts to pick up speed. You'll notice that if you just keep turning it out after that there will be no additional change. That is as lean as it is going to get. Turn it back in until it starts to bog again. Try to find the middle between these two points and leave it there. Repeat for the other side.

2. Next, short one side. Listen. Then, short the other side. Listen. Using the big screw, make the sound/speed match. Remember you will be working on the OPPPOSITE side because you are essentially killing the cylinder that is right in front of you in order listen to the other. Turning it in will INCREASE the speed. Turning it out will DECREASE the speed. Once you get them closely matching, leave it there. Blip the throttle between adjustments. How is the idle? Probably a little high at this point. Turn both big screws the same amount to get it to idle around 1000RPM

All good?

3. Now, go back to the small screw (both sides running for this one--no shorting required) and using SMALL increments, get it to where it sounds the smoothest. Repeat for the other side.


TIP:
At this point I like to take some kind of paint (I use a paint Sharpie) and mark those settings. See below...

photo.JPG

The marks you made will make tweaking and experimenting much easier in the future. Want to try a little richer? Turn both small screws IN the same amount. A little leaner? Turn them OUT. Use the marks as a guide. Leave the big screw alone.

4. That is basically it. Make sure the cables are picking up at the same time when you give it gas. To do that, hold the throttle so it runs just above idle (about 1500RPM) and quickly short one side then the other. Is one side faster than the other? Make them match adjusting the cable lengths.

With practice you'll do this pretty quickly. If it starts to take too long the first few times go for a ride or set up a fan because if the engine gets too hot your settings will be off.

Good luck!

Oh, and leave the needle clip in the stock position.
 
Photorider - I can get my arms around your technique - I do have the shorting spokes for both cylinders. Before going back to carbs, will double check valves & timing just to make sure my baseline is accurate when going to the carbs. Appreciate the idea of marking the screws - a good suggestion.
 
2. Next, short one side. Listen. Then, short the other side. Listen.

Maybe listening is useful if you have to do this on the road, but wouldn't it be wise at this point to look at the tach and see what the running cylinder is pulling? That's you target when you switch sides. Sound could be deceiving, especially if you're not positioned correctly or the same to hear each side.
 
It can't hurt to look at the tach, but remember, tachs can be deceiving!
It's quite easy to just remember the rate of the pulses as you listen.
I like to tap my foot along with them. Sorta like keeping time in music.
Pop...pop...pop...pop..pop...stall. Is usually how it goes.

Like almost everything else on these engines...repeat for the other side.
 
Regardless if it's reading 100 too high or 200 too low...it's the value that can be used to make equal both sides. In the end, I agree that setting the idle is usually done to what kind of sounds right.
 
It's cool that he made that video but not the best procedure I've seen. He doesn't even mention the mix screw or syncing the cables. You also really need to be able to let the engine run on one cylinder for a few revolutions. Good demonstration on how to short cylinders, though.
 
It's cool that he made that video but not the best procedure I've seen. He doesn't even mention the mix screw or syncing the cables. You also really need to be able to let the engine run on one cylinder for a few revolutions. Good demonstration on how to short cylinders, though.

You're correct - I did email Chris and ask him about the air screw - he's a really nice guy and obviously pretty busy trying to make a living working on motorcycles - I'm amazed he has the energy to make the videos - he's a good marketer for sure and what's really cool is that he's putting up videos sharing his knowledge about working on BMW motorcycles. He's quite animated!
 
Valves were tight

Good thing not leaving any stones unturned - a receipt shows the bike was "tuned" last summer.

Both exhaust & intake valves were very tight. Will check timing tomorrow & then attempt to dial in the carbs . . .
 
Making Good Progress!!!!

Sitting down finishing lunch with my good MOA pal, Niel Petersen, retired engineer who knows his s**t.

First off, throttles were pulling, thus I had a fast idle - we disassembled the throttle assembly - AGAIN - hate doing this - but the linkage was off. Once re-adjusted, there was good slack in the cables.

Followed the steps outlined in this thread and we dialed her in pretty good - good by my standards but not Niel - it has to be absolutely perfect but that's not happening today.

Love the shorting procedure - worked great - when we thought we had the throttle tension equal, I suggested to Niel we try shorting the plugs on each side and lo and behold, one side was really off. So now cables are in "synch" and bike is running better than good.

Only question and if no answers here, will start a new thread - how come, with a new battery, the starter button is intermittently working? Could this be a bad relay? (just installed new control wires and I believe everything to be correct).

As always, thanks so much!!! :coffee
 
NICE!
Glad to hear you got her running well. Now that you've done it once future adjustments will be a breeze. I usually tweak mine at least once a season.
I bet your starter problem is corrosion at the relay. It is located under the tank on the left side. Unplug everything, inspect the wires, clean everything well until you see shiny metal and plug everything back in. You might want to take a cell phone pic or something before you unplug things to make sure you put it all back how it was. That should take care of it. But if you really want to be thorough, remove the starter cover and clean those connections as well.

Good luck and happy riding!
 
Back
Top