2005R1200RT Headlight Connector Modification
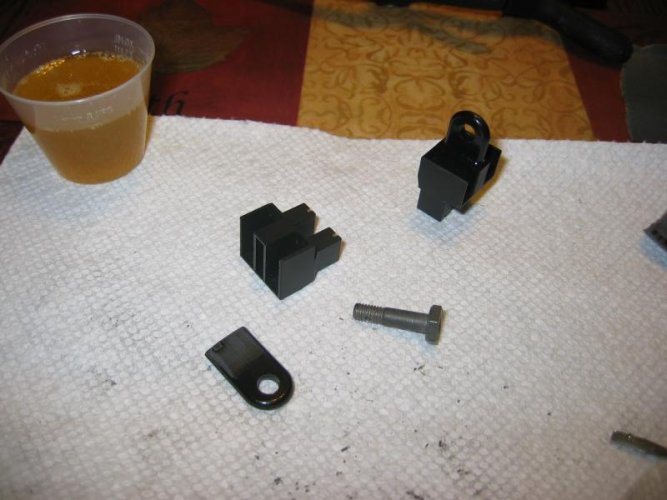
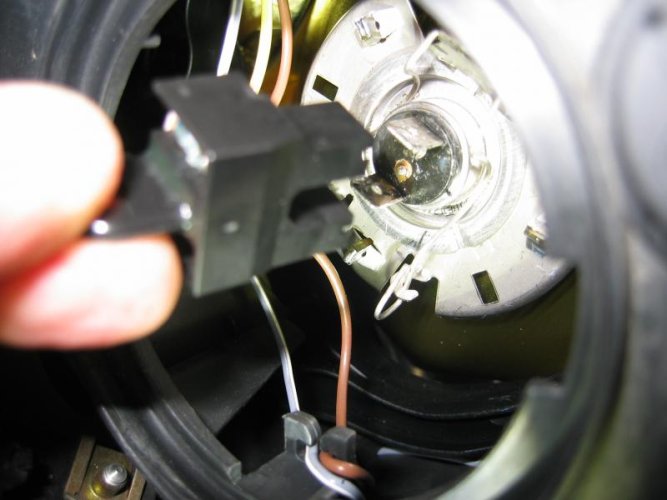
I recently had the immense pleasure of replacing the head light bulbs on my 05 r1200rt. The left side was almost a no brainer. The right hand side was a different story. Plain and simple it is not made for quick replacement and is a contortionists delight. 10 to 15 minutes of anxiety, huffing and puffing, and numerous obscenities directed at sadistic engineers. The connector shell itself disintegrated in my fingers while attempting to pull it off the bulb, and I am not a heavy handed gorilla. Now I was left with 2 metal tabs on the end of some wiring and a lot of very small pieces of brittle black plastic in my palm. No way to glue this mess back together. Fortunately the wires and blade type ends were in good condition, no corrosion, burns, melted insulation or broken strands of wire. All that was left to do was to unclip the bulb (easier said than done), pop a new one in, re-clip it (also lots of fun) and then reattach the wires (even more fun). I rode like this for an additional 3000 miles last season, but I was not happy with the arrangement of not having the connector shell to protect the wires from making contact with each other from vibration plus the added challenge of removing and installing the wires separately to the bulb. Sparks and smoke are not good with wiring. Having read previous posts on difficulties with replacement of the headlight bulbs particularily on the right hand side, I decided it was an opportunity to make a better mouse trap. I actually made a junkyard purchase of a complete headlight assembly to allow myself the convenience of experimenting on the bench before destroying my own bike. Amazingly the junkyard purchase provided me with a pristine piece of equipment except for our friends the headlight bulb connectors. These were totally fried and by merely touching them, pulverized and turned them to dust. Trying to locate replacement connectors was interesting. Initially a search through BMW online parts catalogs provided a replacement connector shell for $51.00 (unbelievable) and could only be installed by the dealer. Such a deal! Who knows how much the dealer would charge for labor. Recently I have seen them again in a BMW online parts catalog selling ÔÇ£on sale for $36.39ÔÇØ and still only available for dealer installation. This was not only unacceptable but crazy. I was finally able to procure a number of connector shells (AMP is the OEM) and fabricated a small nylon tab with a hole that I epoxied into a cavity in the center of the connector shell. Installing the wiring tabs into the connector shell is fairly straightforward and they lock in with a very positive snap, so far I have not been able to undo the lock without destroying the connector shell. The nylon tab itself allows installation with relative ease and the hole is for hooking when removing the connector. This merely eases the pain of stuffing your hand into that medieval instrument of torture one less time. Since the nylon tab is significantly stronger than the connector it can also be safely handled with an extra long pair of bent needle nose pliers for your removal and installation pleasure. My personal thoughts are that BMW should come out with a new connector of better quality material and make it a service bulletin. I believe that there is too much heat and vibration in the area for the material being used. But in the mean time, my modification for ease of removal and installation will help the less dexterous and is a fairly easy fix. I did pull the instrument panel shroud on my bike to gain better access, and considering that this is a fix, pulling off whatever you need to, to get a better handle on things and make it easier to work is acceptable.
I recently had the immense pleasure of replacing the head light bulbs on my 05 r1200rt. The left side was almost a no brainer. The right hand side was a different story. Plain and simple it is not made for quick replacement and is a contortionists delight. 10 to 15 minutes of anxiety, huffing and puffing, and numerous obscenities directed at sadistic engineers. The connector shell itself disintegrated in my fingers while attempting to pull it off the bulb, and I am not a heavy handed gorilla. Now I was left with 2 metal tabs on the end of some wiring and a lot of very small pieces of brittle black plastic in my palm. No way to glue this mess back together. Fortunately the wires and blade type ends were in good condition, no corrosion, burns, melted insulation or broken strands of wire. All that was left to do was to unclip the bulb (easier said than done), pop a new one in, re-clip it (also lots of fun) and then reattach the wires (even more fun). I rode like this for an additional 3000 miles last season, but I was not happy with the arrangement of not having the connector shell to protect the wires from making contact with each other from vibration plus the added challenge of removing and installing the wires separately to the bulb. Sparks and smoke are not good with wiring. Having read previous posts on difficulties with replacement of the headlight bulbs particularily on the right hand side, I decided it was an opportunity to make a better mouse trap. I actually made a junkyard purchase of a complete headlight assembly to allow myself the convenience of experimenting on the bench before destroying my own bike. Amazingly the junkyard purchase provided me with a pristine piece of equipment except for our friends the headlight bulb connectors. These were totally fried and by merely touching them, pulverized and turned them to dust. Trying to locate replacement connectors was interesting. Initially a search through BMW online parts catalogs provided a replacement connector shell for $51.00 (unbelievable) and could only be installed by the dealer. Such a deal! Who knows how much the dealer would charge for labor. Recently I have seen them again in a BMW online parts catalog selling ÔÇ£on sale for $36.39ÔÇØ and still only available for dealer installation. This was not only unacceptable but crazy. I was finally able to procure a number of connector shells (AMP is the OEM) and fabricated a small nylon tab with a hole that I epoxied into a cavity in the center of the connector shell. Installing the wiring tabs into the connector shell is fairly straightforward and they lock in with a very positive snap, so far I have not been able to undo the lock without destroying the connector shell. The nylon tab itself allows installation with relative ease and the hole is for hooking when removing the connector. This merely eases the pain of stuffing your hand into that medieval instrument of torture one less time. Since the nylon tab is significantly stronger than the connector it can also be safely handled with an extra long pair of bent needle nose pliers for your removal and installation pleasure. My personal thoughts are that BMW should come out with a new connector of better quality material and make it a service bulletin. I believe that there is too much heat and vibration in the area for the material being used. But in the mean time, my modification for ease of removal and installation will help the less dexterous and is a fairly easy fix. I did pull the instrument panel shroud on my bike to gain better access, and considering that this is a fix, pulling off whatever you need to, to get a better handle on things and make it easier to work is acceptable.
Attachments
Last edited:

