• Welcome, Guest! We hope you enjoy the excellent technical knowledge, event information and discussions that the BMW MOA forum provides. Some forum content will be hidden from you if you remain logged out. If you want to view all content, please click the 'Log in' button above and enter your BMW MOA username and password.

    If you are not an MOA member, why not take the time to join the club, so you can enjoy posting on the forum, the BMW Owners News magazine, and all of the discounts and benefits the BMW MOA offers?

  • Beginning April 1st, and running through April 30th, there is a new 2024 BMW MOA Election discussion area within The Club section of the forum. Within this forum area is also a sticky post that provides the ground rules for participating in the Election forum area. Also, the candidates statements are provided. Please read before joining the conversation, because the rules are very specific to maintain civility.

    The Election forum is here: Election Forum

Shock Sleeves

pandry1

New member
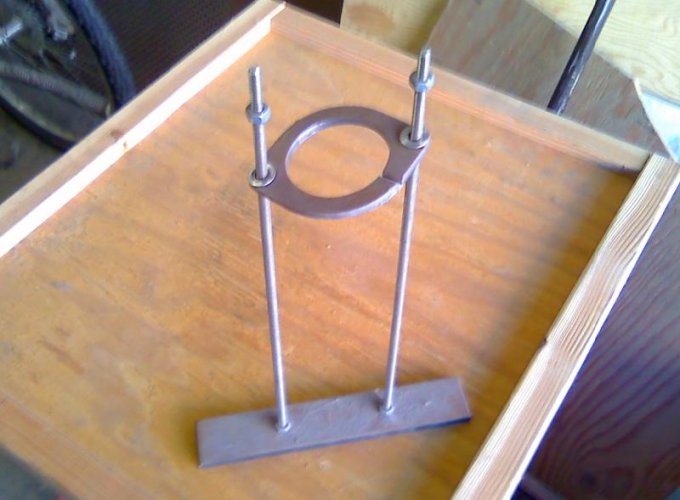
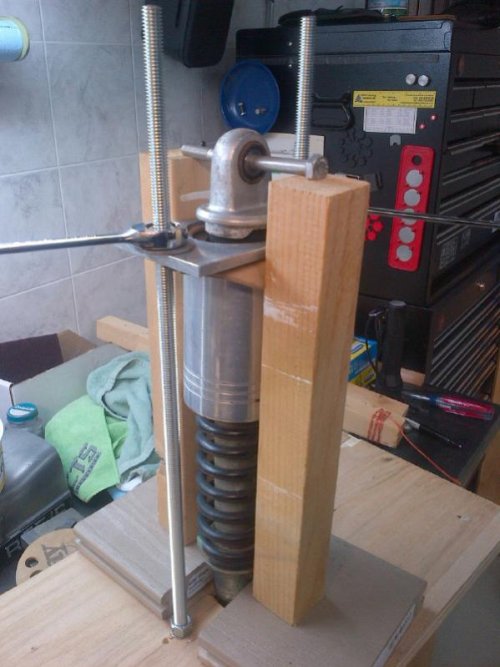
I'm replacing the leaking shocks on my 1974 R75/6. I purchased a second hand set of non-leaking, stock shocks from eBay that do not have sleeves. Does anyone have instructions or advice on how to disassemble / reassemble these shocks? I would like to install the sleeves on the replacements. From the diagram, it looks like the top unscrews, however I hesitate grabbing the piston with vice grips - yikes! Also - does one need a spring compressor? Any advice would be appreciated. Thanks!
 
The "sleeve" needs to be placed in a fixture and compressed... something like 3/4" if I recall. When it's compresses a "flat" is uncovered that allows you to put a 10mm wrench on the piston to keep it from rotoating ... then it's just a matter of unscrewing the "eyelet" casting. Which, by the way, you will want to make sure is securely torques when you reassemble the shock.

CycleWorks makes a tool. I made my own.

*The plate with the retangular opening is to stabilze the lower end of the shock;
*The plate with the circular opening fits over the top of the "sleeve"; the O-ring cushions the metal-to-metal contact with the sleeve
*both are connected with the threaded rods
*the slit-blocks are for... I haven't clue

IMG_3995.JPG


This is a Ural shock, but the concept of compressing the spring is the same.
The tool I made is similar and fabricated out of steel, but a piece of good multi-lam hardwood plywood would work as well. I'll take a shot if it this afternoon and post later.

It takes a few minutes to alternately snug down the nuts to compress the spring, but it works great.

A word of WARNING: you want to make sure that the bottom of the shock is "controlled"... build something to keep it from slipping out of vertical... which would immediately attempt to launch it across the shop.

Shock%20Service,%20Leading%20Link%20014.jpg


edit -

Even better, from snobum's

the little "goal post" at the bottom controls the lower end of the shock.

ShockAbsorberTool.jpg


edit edit -

this one is basically what I built, although mine only uses two studs.
DSCN0817.jpg
 
Last edited:
and, ta-da.... the one I built. A little tricky with out a device to hold the bottom of the shock, but it works.
 

Attachments

  • 0828111643a.jpg
    0828111643a.jpg
    50.1 KB · Views: 274
and, ta-da.... the one I built. A little tricky with out a device to hold the bottom of the shock, but it works.

Thought I would follow up on this subject matter, as I revisited the disassembly of my shocks on my R-75/6. Good friend let me use his shock disassembly tool but it would not separate the top shock retainer part # 33 53 2 301 595. Primary reason being is that when you force down the shock, the sleeve pulls itself as well as the whole assembly with it.

Sat in the shop for about an hour trying to visualize what was I missing as this is not rocket science? Then it hit me, in that you have to somehow hold the top of the shock eyelet and press the sleeve downward.

Went to the wood scrape pile and found a pieces of 3/4" plywood, cut out the notch for the bottom eyelet to hold it in place so that it will not slip. Bought some body washers, threaded rod and nuts and built it so that I could separate the sleeve from the upper shock retainer. The trick was to place the 2 x 2 in place so that the long bolt would hold the eyelet up, while the sleeve was pressed down. I know it looks crude in the picture but it worked like a charm.

The shocks are now totally apart with no damage to anything. Thought I would share the picture. Later this winter I will fabricate a proper tool that is not so crude!
 

Attachments

  • IMG-20131107-00145.jpg
    IMG-20131107-00145.jpg
    59.3 KB · Views: 84
Wow! these are all fancy shock compressors!

However, I did it by simply purchasing 4 fairly small "S" hooks (small, about 1/8" cross section, and about 1-1/4" overall length) at my local hardware store, and 2 hose clamps (as narrow ones as you can find, however most are about 1/2" wide). Hose clamp size could be for around 1-1/2" hose.

Hook the "S" hooks as high and as low as you can, and then put the hose clamp on the part of the hooks sticking out. These hooks can easily be bent to accommodate. Be sure to have the spring tension adjuster adjusted so the spring is at its weakest setting.

Do a 2-hooks-and-1-hose-clamp-set - 1 set on each side of the spring - 180 Deg. apart. Then screw the hose clamps equally on each side until the spring is compressed enough to expose the flat on the rod that needs to be unscrewed from the upper mount. I used a little propane torch to help heat the upper mount to allow it to expand, allowing the rod to unscrew more easily. Not too much heat though.

It was surprising how easy this was. I expected a lot of spring tension, but at that setting, with the lower mount in a vice, I could actually compress the spring (and cover) down enough to insert the wrench for the rod flats. I just needed an extra hand, so I went the spring compression route described above.

Worked like a charm, and wasn't expensive.
 
It was surprising how easy this was. I expected a lot of spring tension, but at that setting, with the lower mount in a vice, I could actually compress the spring (and cover) down enough to insert the wrench for the rod flats.

This resonated for me. Between 1973 and 1984, I had four Slash 2 bikes, and sometimes wanted to disassemble the shocks. I had a friend weld up a simple tool for this job: a length of steel rod the length of the shock, bent 90˚ at one end (that end fit into the lower shock eye); at the other end, a u-shaped section of rod was welded at 90˚to the first long piece; the two ends were parallel to each other, and parallel to the single end at the bottom; they were far enough apart to hold the shock sleeve against the compressed spring while providing clearance to fit the 10mm open end wrench around the shock shaft.

By putting the shock eye on the floor, standing above it and squeezing the sleeve with my hands while pressing down, I could manually compress the spring enough to insert the tool. Wasn't too challenging, even with only two hands.
 
Back
Top