• Welcome, Guest! We hope you enjoy the excellent technical knowledge, event information and discussions that the BMW MOA forum provides. Some forum content will be hidden from you if you remain logged out. If you want to view all content, please click the 'Log in' button above and enter your BMW MOA username and password.

    If you are not an MOA member, why not take the time to join the club, so you can enjoy posting on the forum, the BMW Owners News magazine, and all of the discounts and benefits the BMW MOA offers?

  • Beginning April 1st, and running through April 30th, there is a new 2024 BMW MOA Election discussion area within The Club section of the forum. Within this forum area is also a sticky post that provides the ground rules for participating in the Election forum area. Also, the candidates statements are provided. Please read before joining the conversation, because the rules are very specific to maintain civility.

    The Election forum is here: Election Forum

Denali D2 Install 2008 K1200GT

petemiko

Member
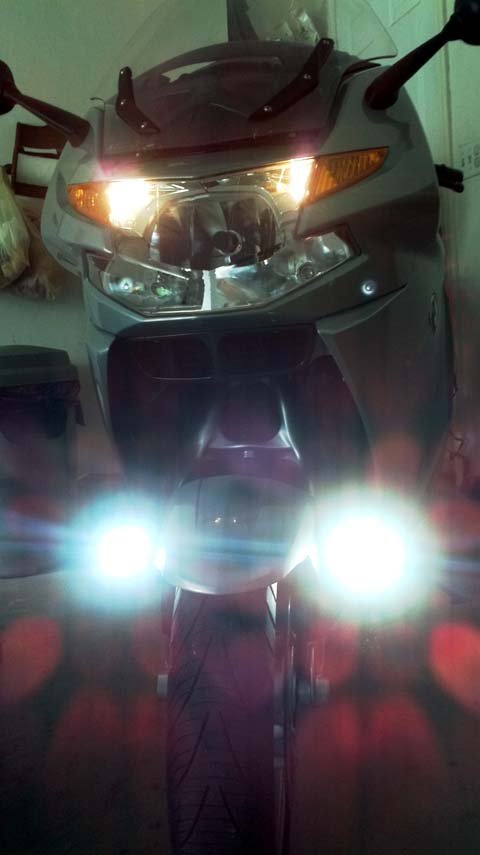
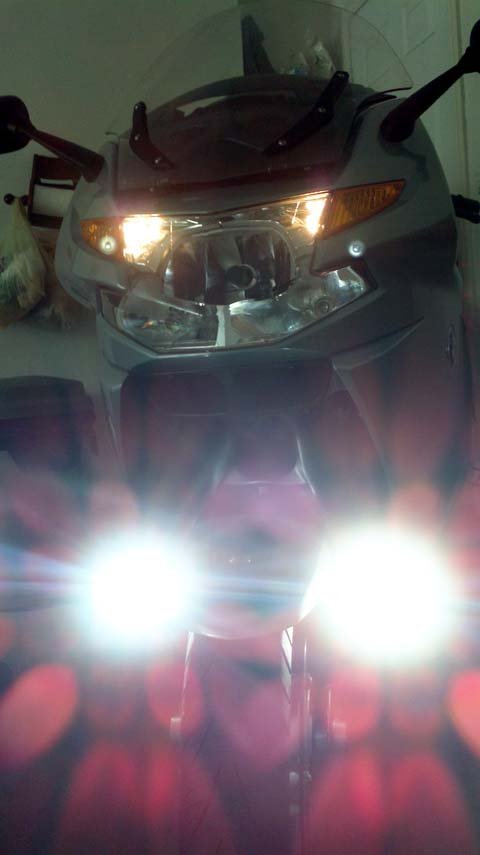
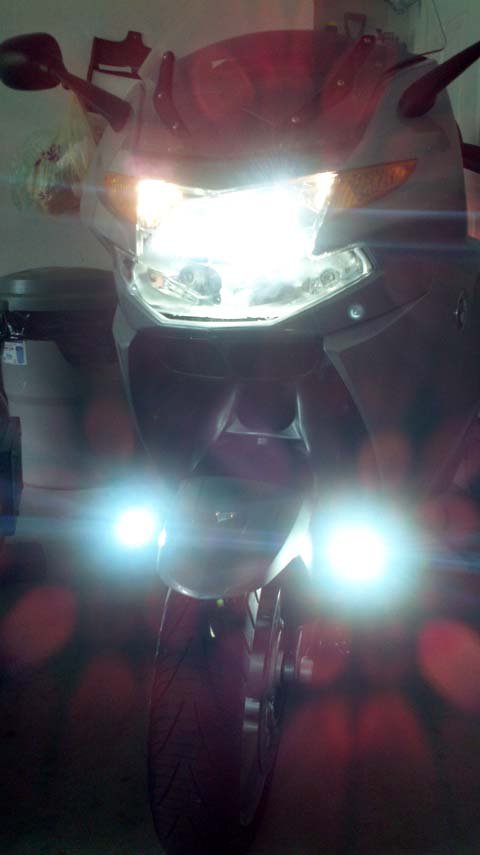
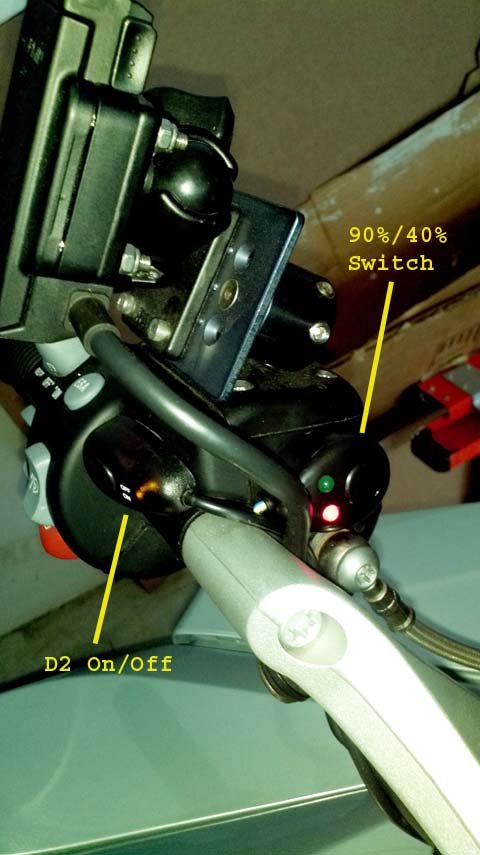
I picked up a set of the new Denali D2 Led lights at Saturday's Twisted Throttle open house. You can read the performance claims on their web site.
My quick assessment is that they are brighter than any other small led lights, and may be close to the larger Clearwaters.

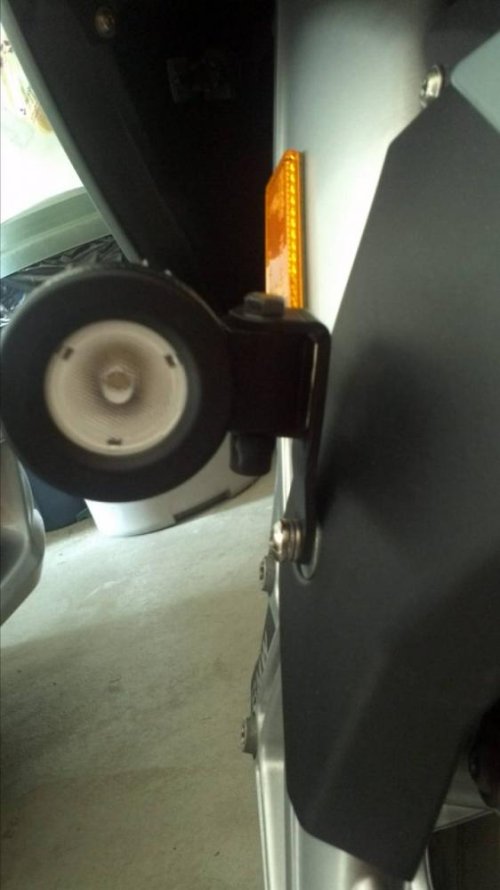
The only "trick" in getting these to work, is that the "switched voltage" input for the Denali relay must be close to full battery voltage (13+vdc) to work. The usual parking light or tail light posi-tap input will not work.

Will post pictures of the lights enabled later
 

Attachments

  • Denali_D2_K1200GT.jpg
    Denali_D2_K1200GT.jpg
    54.8 KB · Views: 516
I was at TT also. Those lights look great. I'd be interested in how they work out-how you like them. Looking forward to the rest of your review. Gary
 
Denali D2 more pictures

I need to modify my initial post. The Denali D2 intensity is controlled by a pulse modulation system, so there most likely no relay in the system. This allows these lights to have different intensity outputs. Never the less, my original comment about needing 13vdc on the "sense" input still stands.
Below is a picture of the Denali's at 40% intensity. On the rider's right (photo left) the D2 has the "fog" lens installed, the other side has the "euro" driving beam.
 

Attachments

  • D2_40%_Fog_RT.jpg
    D2_40%_Fog_RT.jpg
    45.4 KB · Views: 513
D2s at 90%

Below are the D2s at 90% intensity. Sorry for the picture quality. The lights overpower my cell phone cam.
 

Attachments

  • D2_90%.jpg
    D2_90%.jpg
    41.2 KB · Views: 509
Those look great.
I've got a million questions, of course...
I can't wait to see more pics. Do you have any from the side, showing how they mount?
Thanks,
R.
 
Those look great.
I've got a million questions, of course...
I can't wait to see more pics. Do you have any from the side, showing how they mount?
Thanks,
R.

I used the optional M6 mounting kit from Twisted Throttle, mounting to the lower fender mounting hole. I used my own washer to offset the indent in the fender mounting position, and used my own M6 bolts (instead of the supplied M6 bolts and standoffs in theTwisted Throttle kit) because I thought it looked better.
 

Attachments

  • d2_mount.jpg
    d2_mount.jpg
    40.7 KB · Views: 487
wire routing

Hi

I am about to install these on my 2009K1300GT. How did you route the wires up trom the fender? I'm assuming you used a fuse block to power these lights. Did you have to cut the wire harness to shorten it to get rid of all teh extra wire in the harness?

Where did you mount the on-off switch?

I'm also thinking about using one fog and one clear lense on these lights. What is your driving experience4 with this set-up in terms of road illumination?

Nice job. thanks for sharing it here.

Francis
I routed the wires from the lights (lightly) tie wrapped to the hydraulic lines from the brake calipers, making sure that nothing would hang up or stretch tight when the front wheel moves left or right, or the front suspension moves up and down.

I thought about triming the harness to length, but I was in a hurry to get the lights mounted before Americade, so I found a empty spot behind the left front fairing that was large enough to accept all the extra length (bundled up) along with the Denali control box.

From there it was easy to snake up the power wires to the Centec fuse box that I had prevoiusly mounted behind the battery. The on/off switch wires and the high/low enable wires are also routed up the left side (tie wrapped to the clutch cable).

For the enables, I posi-tapped into the red/white in 3 wire Aux plug (hidden behing the metal cross brace in front of the battery) This wire gives you power when the key is turned on, and a delayed turn off when the key is turned off.
You can order a BMW part that is the mate for this plug (# 83300413585) that allows a cleaner looking installation if you don't want to use a posi-tap.

I mounted the on/off switch on the left side handle bar control assembly, and I also used a second switch to enable the high (90%) output (instead of trying to tap into the HID high beam control.

I am happy with the light output as a fill in to the HID at night, but my primary purpose for these lights is to increase my daylight visibility to the cage drivers.

Good luck with your install.
 

Attachments

  • D2_Controls.jpg
    D2_Controls.jpg
    69.1 KB · Views: 454
90-40 Switch

Hi

What is the switch you used for the 90%-40% power settings and where could I buy one?

Francis
 
Hi

What is the switch you used for the 90%-40% power settings and where could I buy one?

Francis

I had a lighted switch left over from a set of Hella automotive driving lights. You might be able to pick up a waterproof switch at a marine supply store.
 
night results

Do you have the night results?
Why is bright at 90% rather than 100%?
Would you buy these again?
 
Do you have the night results?
Why is bright at 90% rather than 100%?
Would you buy these again?

I am happy with the night results, fills in the edges where the HID misses.

As I understand the implementation, the D2s use pulse modulation of the voltage to control the light intensity (think of switching a light switch off and on, but very quickly). This method would cause a normal bulb to fail quickly, but is OK for LEDs. I believe that Denali only runs at 90% to help keep the control electronics cool, which extends the life of the unit.

Yes I would buy these again.
 
Denali D-2 Installation

I installed these lights last weekend using the instructions above. Instead of putting the wiring on the left side of the bike I routed everything up the right side because of the way the brake lines lay out on a 2009 K1300GT.

I connected the lights directly to the battery and then connected both the high and low beam wires to the fuse block. I did not want to cut into the bikes lighting harness to get power for the lights. The low beam light must be on before the high beam can come on based upon the instructions in the kit. With both lights connected to the fuse block the lights operate at the high beam intensity. If I can find an appropriate switch I will mount the switch so the lights can be switched from low to high.

The intensity of these LED's will remind you of the bluish white light from HID's.

If you mount these lights you will be noticed.
 
OK got the Denali's installed.Wired in for the dual light. When low beam is on lights are at 40%. lights work great. Turn on the high beams and the Denali's come up up full power but they are what I would call palusing. Any idea why they would do this? Have Fuzeblock installed for trigger. Tapped into high beam at the plug where it plugs into the headlight assm.:confused:
 
Running an led harder means you need better heat sinking or lifespan rapidly diminishes. Within a given design you can only shed so much heat and still have any margin.
Also of importance is the exact nature of the pwm pulses. Some designs are better than others.
The needed heatr sink is what makes he multiple led clearwaters so heavy..
 
LED dimming.

I expect the pulsing you see is the method they use to reduce brightness. Rather than dimming the LEDs they turn them on and off. 60% on time and 40% off time is probably how they get 60% brightness. The secret would would be in the distribution of the on/off portions. On for 6/10 of a second and off for 4/10 would produce a definite pulsing/strobing. On for 3/1000 then off for 2/1000 - repeat 200 times per second would probably produce no noticeable flicker/pulse but may show a strobe effect on some moving parts (eg hub caps of a car beside you going the same direction).

By pulsing rather than dimming you get less light (ie less blinding) without changing the colour/whiteness of the light the way an incandescent bulb does.

The on/off pulsing is the way my dimmable florescent lights work in my house as well as my LED miner's headlamp.

The Clearwater LEDs use a rapid pulse to hide the pulse/flicker from the human eye.

Lights like the Clearwater also use the pulsing to reduce the amount of on time to reduce the heat if the sensor says that heat is getting critical.
 
Last edited:
Back
Top