• Welcome, Guest! We hope you enjoy the excellent technical knowledge, event information and discussions that the BMW MOA forum provides. Some forum content will be hidden from you if you remain logged out. If you want to view all content, please click the 'Log in' button above and enter your BMW MOA username and password.

    If you are not an MOA member, why not take the time to join the club, so you can enjoy posting on the forum, the BMW Owners News magazine, and all of the discounts and benefits the BMW MOA offers?

  • Beginning April 1st, and running through April 30th, there is a new 2024 BMW MOA Election discussion area within The Club section of the forum. Within this forum area is also a sticky post that provides the ground rules for participating in the Election forum area. Also, the candidates statements are provided. Please read before joining the conversation, because the rules are very specific to maintain civility.

    The Election forum is here: Election Forum

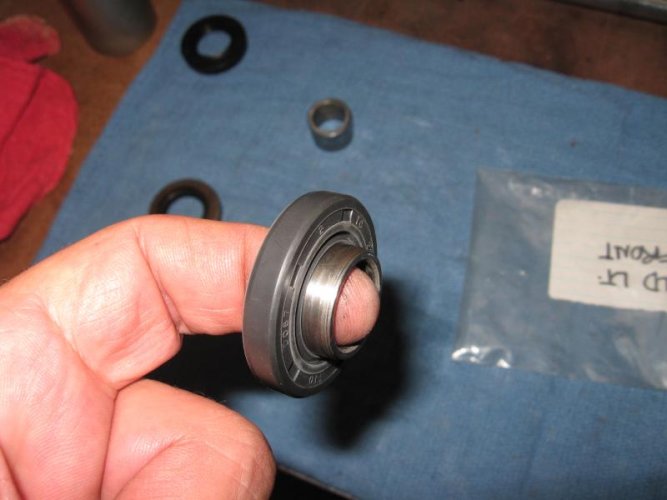
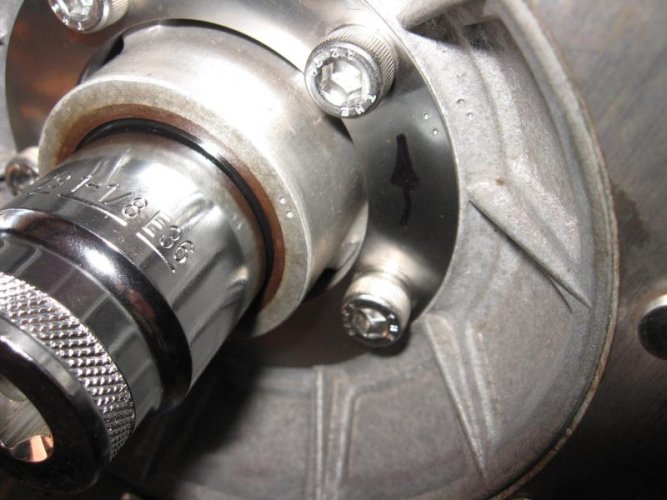
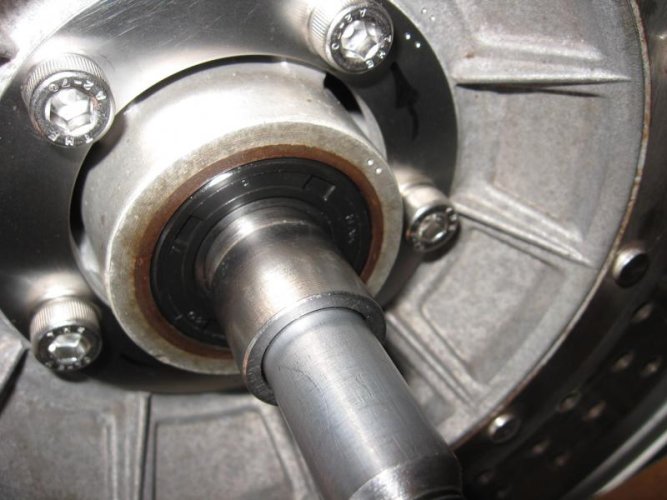
Wheel Bearing Replacement - Snowflakes

Front 78 Snowflake

insert the top hat into the new grease seal.
 

Attachments

  • 08-14-10 BMW Front Bearings 034.jpg
    08-14-10 BMW Front Bearings 034.jpg
    41.9 KB · Views: 274
Front 78 Snowflake

Insert the seal into the hub carefully. I was able to start the seals with my thumbs and finish with an appropriate sized socket. Careful, not too deep. I usually go no more than 1/16th inch inside the face or just flush.
 

Attachments

  • 08-14-10 BMW Front Bearings 049.jpg
    08-14-10 BMW Front Bearings 049.jpg
    61.3 KB · Views: 275
Front 78 Snowflake

And we're ready to mount (after attaching the rotor) and do the wiggle test...that's it.
 

Attachments

  • 08-14-10 BMW Front Bearings 050.jpg
    08-14-10 BMW Front Bearings 050.jpg
    58 KB · Views: 274
Here is Robert Fleischer's info about snowflake recall:

" k. 19" FRONT snowflake wheels were recalled if the casting is stamp-marked BEFORE 10/82. http://bmwmotorcycletech.info/19inchrecall.htm "

I hope your wheels are post recall so you do not lose the fine work you've done!

My question to you is how did you settle on the method of measuring the actual preload? Where did you get the values and the technique? If I read your notes correctly you have assembled the axle into the wheel and used the torque wrench to measure the turning force?

Have you considered using the "pull scales" method? It seems that using the torque wrench (you measured to get the range to 21-42 INCH-OUNCES, right?) on the nut is a far easier way to obtain measurement, but then why would Fleischer not suggest that approach? Just curious about your reasoning here.

--
Michael Stoic
1960 /2 Conversion Rig

Mike,

Good questions, let me try to explain my procedure. First of all, my front wheel is in fine shape and shows no signs of fracture or failure. I purchased this bike new in 1978 and have never seen a failed wheel and even discussed it with Bum, but to be clear I will look into the replacement procedure this winter. I think the wheel subject will be best suited for another thread since my intent here was to outline this often mysterious procedure of bearing pre-load and replacement but always appreciate all of your fine-tuned eyes.

The target here is to find that combination of tension (or width) on the inner races (cage) from the inside by way of the inner spacer and the tension of the cage rollers on the outer races of the bearings without slop (or lash) or excess rolling friction while the wheel is under a load. The inner spacer, wedding band and cage (bearings) are all connected under tension by way of the axle nut and the length of that unit is adjusted until it matches the width of the surface of the outer races as they are fixed inside the hub. I was looking for the correct pre-load while the axle was under 20 to 30 Ft-lbs of torque. In other words; I'm trying to find that condition where I did not feel any wiggle in the axle in-between those torque values while maintaining a smooth rotating axle.

Adding space (shims) to the inner spacer will give you a loose condition or pull the bearings outward away from the corresponding races in the hub. Decreasing the inner space (milling the wedding band or removing shims) will force the rollers inward with more pressure against the races under axle tension.

This procedure was described to me by a Guru. I considered the pull method but did not have the adequate tools, and, keep in mind the final test is the "wiggle test" with the wheel installed on the bike, and the axle inserted under tension. So any amount of quantitative measurement although usefull may need to be amended in the end. Grab the wheel at the 3 o'clock and 9 o'clock position and shake back & forth in a twisting type of fashion, push-pull with opposite hands. You don't want to feel any slop once you get past ??20 Ft-lb., on the axle nut. I had to remove one 0.05mm shim from the rear wheel after the "wiggle test". So, even though the excercise is started with the wheel removed from the bike, the final check and test is done with the wheel installed.

You can develop a feel of the axle friction after a while, I spent hours and hours experimenting and trying different combinations. I feel there's some latitude in either direction but my intent was to get the setting as close to perfect as possible. I can tell you...0.05mm in a shim thickness can make the difference between a slight wiggle in the wheel and not.

You may want to review the picture of the entire bearing assembly at post #64 on page 5 of this thread to study. As you look at the outer races; keep in mind they are fixed in position and the cages or inner races are adjusted inwards and outwards to match those outer races.


The bike is running and rolling quite well, better than ever.
 
Last edited:
Shim Changes?

Assuming your pre-load was adjusted properly during the last cleaning and packing of the bearings, should the need ever arise for different shims and the expectation be correct that what you had on hand is all you should need for the current procedure?

thanks,

Michael
 
I would say "no". With the fitment of new races and bearings I would not expect the preload to be the same as the old bearings, unless you get lucky. Tolerences are pretty critical. I don't usually check the preload of the old bearings if they appear damaged or in need of replacement. To check the existing preload correctly you would have to wash all the old grease off the old bearings, reassemble the stack and apply the correct sized take-up collars. A close inspection of the old rollers and races for brinelling and discoloration should tell you what's been going on. I've adjusted my procedure a bit and tried to eliminate the use of the small 0.05mm shims alltogether and now rely on the correct fitment of the wedding band either by purchasing larger ones or hand milling the existing band to acquire the correct preload. Just my personal preference. My reasoning is; if an unknowing future owner or wrench is to get inside the bearing stack and overlook the small shims during reassembly - it can cause problems. I've acquired numerous different sized wedding bands so I can negotiate future bearing jobs easily.

My personal recommendation would be to closely inspect the existing bearings, races and preload. If the existing bearings are toast install the new races and bearings, lightly oiled (no grease) and procede with the preload procedure with a pull scale if you're not familiar with the correct "feel". Remember to always replace your grease seals.

Check your PM..
 
Here's another shot of the entire rear bearing pack (rt to lt) new packed bearing, wedding band, 0.05mm shim, inner spacer and outer spacer, less the outer 2 top-hats at the outboard seals.

How did you ensure that the outer spacer wasn’t floating between the two races? mine is completely loose and that’s with the shims and bearing wedding ring?
 
Here's another shot of the entire rear bearing pack (rt to lt) new packed bearing, wedding band, 0.05mm shim, inner spacer and outer spacer, less the outer 2 top-hats at the outboard seals.


This was incredibly helpful.. thank you
 
Back
Top