• Welcome, Guest! We hope you enjoy the excellent technical knowledge, event information and discussions that the BMW MOA forum provides. Some forum content will be hidden from you if you remain logged out. If you want to view all content, please click the 'Log in' button above and enter your BMW MOA username and password.

    If you are not an MOA member, why not take the time to join the club, so you can enjoy posting on the forum, the BMW Owners News magazine, and all of the discounts and benefits the BMW MOA offers?

  • Beginning April 1st, and running through April 30th, there is a new 2024 BMW MOA Election discussion area within The Club section of the forum. Within this forum area is also a sticky post that provides the ground rules for participating in the Election forum area. Also, the candidates statements are provided. Please read before joining the conversation, because the rules are very specific to maintain civility.

    The Election forum is here: Election Forum

Wheel Bearing Replacement - Snowflakes

30064

Mike V. #30064
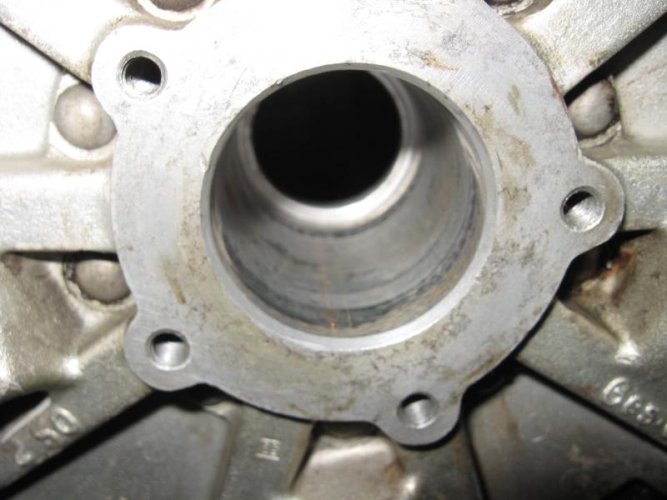
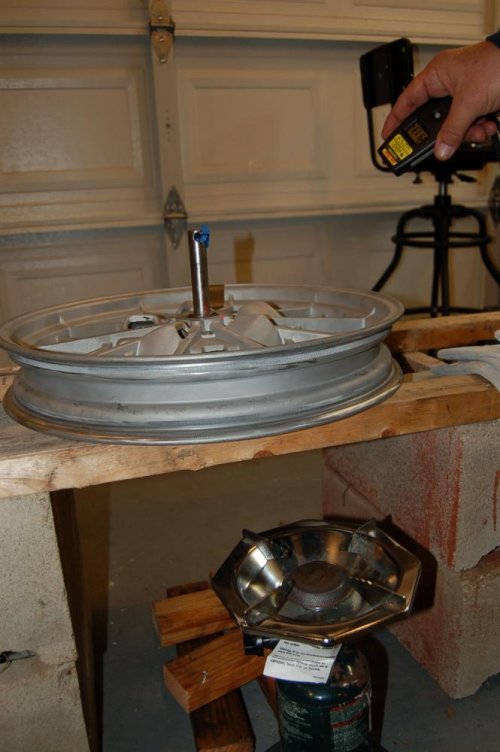
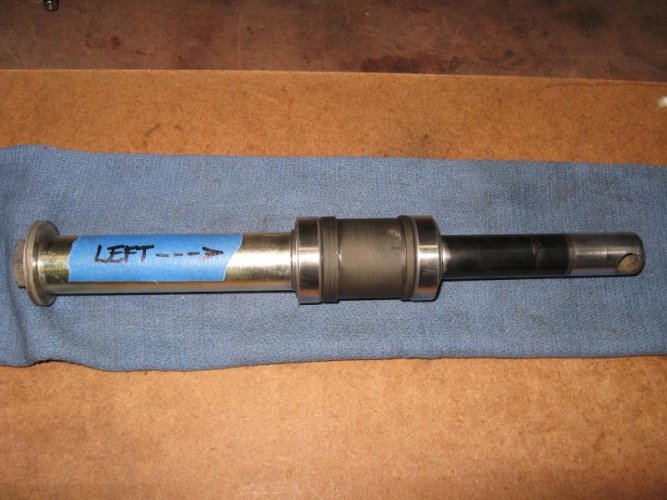
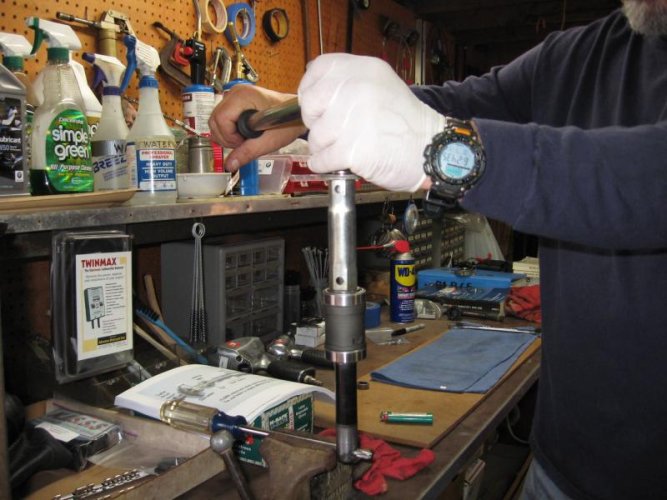
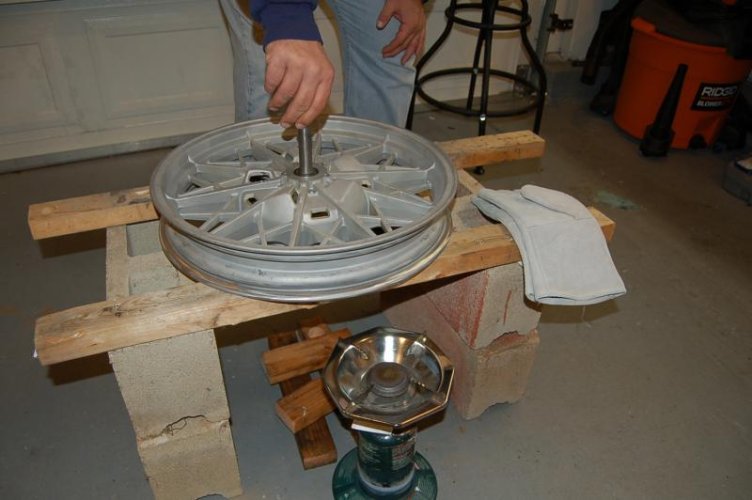
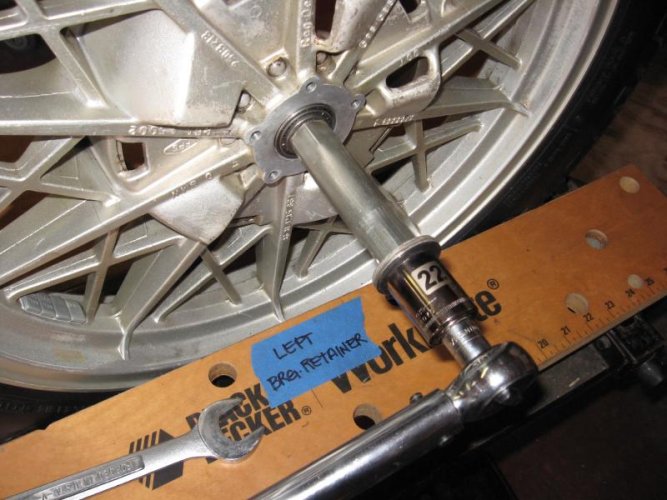
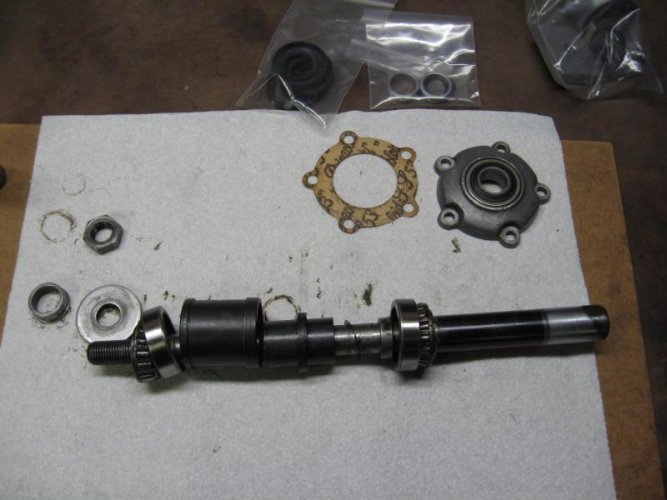
I'm getting ready to do a complete (Fr & Rr) wheel bearing and seal replacememnt on my 78 R100/7 with snowflakes. A quick search found no pictorial links unless I missed it. Does anyone have a photo/tutorial series of the procedure outside of Bum and Duane's instruction?

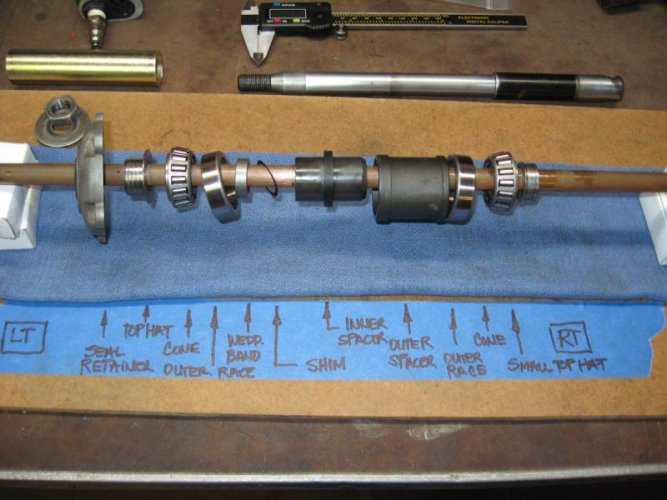
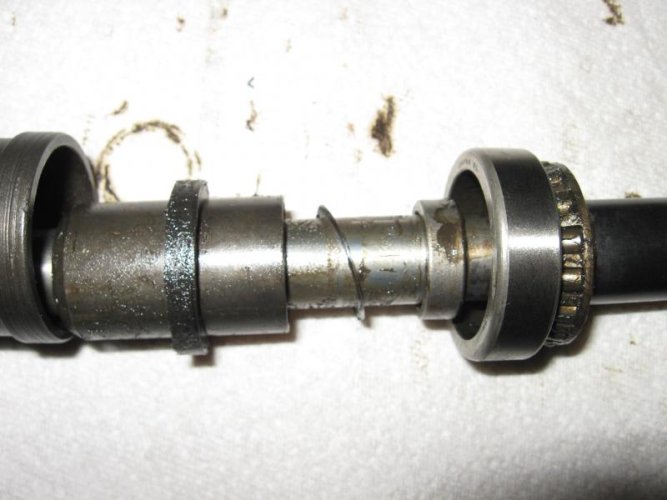
Edit 11-09-14: I wanted to add a global edit to the following pages of this thread in regards to the 0.05mm shims shown and mentioned. My personal procedure has changed since this thread was created. I no longer use the 0.05mm shims, my final preload determination is done with WEDDING BAND ONLY. Your decision is your own to use or not use them. My reason for omitting these small thin spacers is my concern for another wrench entering the bearing stack not knowing how many or misplacing - loosing them. If the preload is near the light or heavy limits 0.05mm can make a difference.

If you choose to use the 0.05mm shims I would recommend making notes of the precise number of shims in your records so they can be retrieved during future servicing.
 
Last edited:
I've not seen any pictorial. The 'bum did a wheel bearing seminar at the 2004 National in Spokane which was informative.

I have spoke wheels on my /7. It took proper application of heat with a torch and some judicious pounding to get the bearing stack out. We set the preload, greased the bearings, and put them in the freezer. Afterwards, with more heat, the bearing stack basically dropped in with some light tapping.

Frankly, I don't think I'll ever attempt that by myself. It's critical to get the hub uniformly heated so that the bearing surfaces aren't destroyed upon removal. I'll need to see it a few more times to feel any kind of comfortable with that.

Other year's bearing surfaces in the hub are steel lined so this is not a concern...like my /2. But for a short period of time, might be '77 and '78, the spoked wheels are aluminum. Not sure about the snowflakes.

I would add, that if you do this, document what you do and take plenty of pictures. Maybe you could make the first DIY for Airheads!!
 
I don't have snowflake wheels but also struggled with how to heat the hub evenly when I replaced my bearings. What I came up with may not be very orthodox but I thought worked quite well. Others may disapprove of my technique but I've done 4 wheels since and I think it works. Disclaimer: I'm no expert, I'm just on a budget.
What I do is remove the wheel and bring it into the kitchen. Hold the wheel centered over the small/medium gas burner on the stove. The "ring" of heat will keep the center relatively cool and heat the edges. Flip the wheel over a few times and you're good to go!
 
Kurt,
Agree with your cautions on your post. This will be my first time but I have an Airhead friend with experience that will be assiting. This has always been a no-fly zone for me along with transmission rebuilds. But I've learned if you want it done right...do it yourself (with obvious caveats). My intention is to put a photobucket tutorial together and get some constructive feedback from those with experience. I'm told by many it's not as tough as a lot think. I find this true many times and the experience is priceless in my opinion. I'm hoping to educate myself to the point of being helpful for others contemplating the same procedure.

Wish me luck...I'm going in!

More to follow.
 
I have snowflakes also. They have been pictured in my '78 R100RS Rebuild thread. Fortunately, my snowflakes are from an '83 R100/T, and the hub insert is steel.

Use a magnet and check which ones you have. I have read several tech articles warning about bearing/race replacements in the early snowflakes. You have to use the Hot hub/cold race method.

Good luck.
 
Things went pretty well today, the bearing pack came out with little effort after plenty of heat. Original bearings / races were in pretty poor shape with brinelling, discoloration and roller corosion-pitting. I'm in pre-load mode now. I'll try to report back if you guys are interested when I'm completed. I wish I would have taken more pictures but got so involved it passed my mind. This is a picture of the rear bearing pack and new packed bearings showing wedding band 0.05mm spacer, inner spacer and portion of outer spacer at the left. Still trying to determine what the correct feeling is for loose and tight of the outer spacer at 25 Ft-lbs. I think I'm there...I can move the outer spacer with both thumbs with moderate force. Any hints, advice regarding preload out there?
 

Attachments

  • 07-17-10 BMW Rear Bearings 009.jpg
    07-17-10 BMW Rear Bearings 009.jpg
    47.4 KB · Views: 882
Last edited:
Here's another shot of the entire rear bearing pack (rt to lt) new packed bearing, wedding band, 0.05mm shim, inner spacer and outer spacer, less the outer 2 top-hats at the outboard seals.
 

Attachments

  • 07-17-10 BMW Rear Bearings 011.jpg
    07-17-10 BMW Rear Bearings 011.jpg
    54.7 KB · Views: 876
Last edited:
Mike-
You were supposed to contemplate doing this for the next couple years or so...not to dive right in. :) Go slower next time and please take more pics. A pictorial on this, on the Valenti level of pictorial detail and narrative quality, would be helpful to lots of people...like me, for example. This is an area that hasn't really been addressed in pictorial richness since Ausherman created his page back in either the "space age" or the "information age." Allow me to further suggest that you consider adding all of your pictorials to the Airhead Wiki. http://wiki.airheads.org/index.php?title=Main_Page

Meanwhile, when you get around to doing a great pictorial of the whole wheel bearing process, could you do me a favor and take pictures of the bearing stack as I would look at the stack (left to right as viewed from the rear of the bike)? I'm too simpleminded to make the transition of reading right to left. Cheers.
 
Bill,

You're a confidence builder - thanks for the kind words. As much as I contemplated the procedure; come to find out as a lot of these projects go, it's been easier than expected ... so far. I can do some retroactive photography I think to show how the stack comes out of the hub. Generous but gradual heat (??225??) monitored with either a welding wax crayon or digital thermometer and the bearing stack will easily come out. Everything comes out as one piece from the left side of the hub as you're facing the tail light from behind the bike. I have some messages out now trying to determine what the correct feel of the outer spacer should have with ??25 Ft-lbs of torque. The pre-load operation is where my main concern lies and I want to make sure what I'm feeling is correct. This is a very critical portion of the work and I was amazed yesterday at the difference a single 0.5mm shim made for the pre-load. I may spend some time just cleaning, organizing and photographing some things today to try and put a tutorial together at a later date when I'm done ... and the bike rolls correctly! :thumb
 

Attachments

  • 07-17-10 BMW Rear Bearings 004.jpg
    07-17-10 BMW Rear Bearings 004.jpg
    52 KB · Views: 818
Last edited:
Mike -

Snowbum discusses the measurement of the preload using a spacer, string, and a fishscale. When I had help doing my wheel bearings, we used such a device to measure what the exact preload in terms of drag that the bearing stack had. Duane Ausherman mentions the "feel" of pushing the spacer tube to the side. I've done that too on my R69S. In the end, I think there's a pretty wide margin for preload. It's not enough if the space just falls to the side on its own. It's too much if you "break a nail" pushing the spacer. It's hard to describe "firm", but it's somewhere in the middle of that.
 
Kurt...

Very helpful, thanks. I may direct my attention to the axel drag including the force of the spacer movement. I may have one too many shims in the stack and need to remove one of the two that I have installed. Is the final pre-load suppose to be done with packed bearings or lightly oiled?

I've read so much material at this point - I'm suffering with information overload in combination of the coffee.
 
Mike -

I'm certain that the stack should just be lightly oiled. With grease, you would have additional resistance if you did the fishscale test. I don't think grease would have much of an impact if you were just using your thumbs to feel the resistance in pressing the spacer sideways.

I seem to recall we did the fishscale tests on my stack and found them to not have enough preload. I used the figure-8 method of sanding the wedding band spacer and using a set of calipers to check the change in thickness as I went. Once the preload was right, the bearings were greased, stack reassembled, and the entire assembly was put into the freezer.
 
Mike -

I don't think grease would have much of an impact if you were just using your thumbs to feel the resistance in pressing the spacer sideways.

That pretty much supports what I discovered yesterday Kurt. I think I'll acquire a scale, clean up the bearings and use both methods for final determination. Good feedback, thanks.
 
Change in procedure. After discussing with Oak, I'll be inserting the clean bearing stack back into the heated wheel with no pre-load and only a scant of oil, allow the stack to cool, then adjust pre-load in the wheel. Then use a grease needle to thoroughly lube the right side bearing and pack the left bearing by hand. Insert the right side seal, and the left side seal into the 5-bolt bearing retainer and connect loosly to wheel making sure it is aligned with axle before securing.
 
Last edited:
I'm feeling pretty good about the installation so far - I underestimated the heat that is needed to re-insert the bearing stack. I also discovered the snowflake acts as a big heat-sink or heat exchanger if you will with a lot of heat being transferred along the solid spokes. The wheel needs to be heated slowly and thoroughly to about 225??. I'm using a digital infrared thermometer here, welding wax sticks are preferred but my experience with the thermometer is adequate when used cautiously.
 

Attachments

  • DSC_0055.jpg
    DSC_0055.jpg
    72 KB · Views: 412
Last edited:
The entire stack was assembled beforehand and put in the freezer for 2 hours.
 

Attachments

  • 07-25-10 BMW Rear Bearings 003.jpg
    07-25-10 BMW Rear Bearings 003.jpg
    68 KB · Views: 475
Initial pre-load was done and will be done finally in the wheel...

A helpful excercise to understand the operation of the stack as a unit.
 

Attachments

  • 07-19-10 BMW Rear Bearings 017.jpg
    07-19-10 BMW Rear Bearings 017.jpg
    72.3 KB · Views: 322
Last edited:
With a heated wheel and frozen bearing stack the bearings should fall into place with ease.
 

Attachments

  • DSC_0053.jpg
    DSC_0053.jpg
    49.4 KB · Views: 188
Last edited:
Now, after cooling to adjust final pre-load
 

Attachments

  • 07-25-10 BMW Rear Bearings 018.jpg
    07-25-10 BMW Rear Bearings 018.jpg
    74.9 KB · Views: 319
Back
Top