• Welcome, Guest! We hope you enjoy the excellent technical knowledge, event information and discussions that the BMW MOA forum provides. Some forum content will be hidden from you if you remain logged out. If you want to view all content, please click the 'Log in' button above and enter your BMW MOA username and password.

    If you are not an MOA member, why not take the time to join the club, so you can enjoy posting on the forum, the BMW Owners News magazine, and all of the discounts and benefits the BMW MOA offers?

  • Beginning April 1st, and running through April 30th, there is a new 2024 BMW MOA Election discussion area within The Club section of the forum. Within this forum area is also a sticky post that provides the ground rules for participating in the Election forum area. Also, the candidates statements are provided. Please read before joining the conversation, because the rules are very specific to maintain civility.

    The Election forum is here: Election Forum

Doofus replaces R100RT handlebars...

basketcase

What's that noise...?
So I took the afternoon off and among other things carved out time to install the OEM handlebars. After reading up on the chore in the Clymer’s manual I dove in. First item in all BMW Airhead procedures beyond checking the oil – disconnect the battery cable. Done.

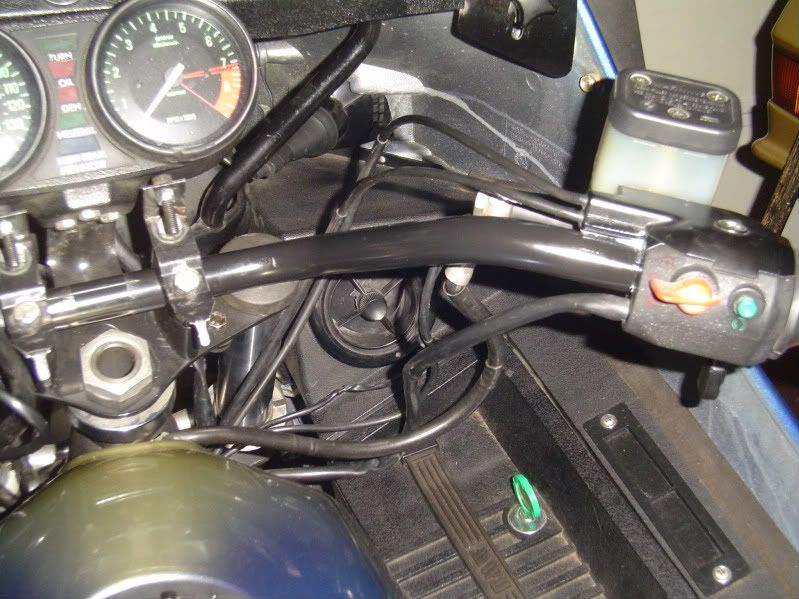
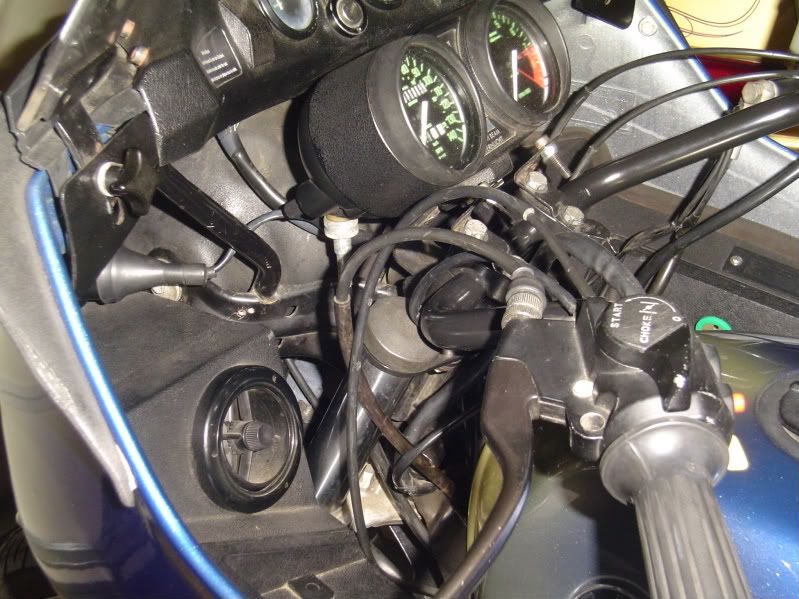
So with the juice off removing the set that was on the bike was not too bad. I still don’t know anything about those bars except that they were definitely aftermarket and something of a midget version of ape-hangers that left the brake reservoir cocked at a 45 degree angle, and left me leaning too far forward for my comfort.

For the removal everything went according to the book and was straightforward. When I removed the right side I noticed the handlebar under the throttle grip was greasy and made a mental note to grease the throttle side on the reinstallation.

When I get the new handlebars into position and started remounting controls, I grabbed a container of general purpose lithium grease off the shelf and lubed up the handlebar. The controls slid on no problem as a unit.

But now I have a question: Do the handlebars/controls need to be “clean” underneath the part where the switches bolt up?

My initial thought is that the controls are grounded elsewhere in the system, but I thought I would ask.

Next, the cables at present do not run out from under the tank and between the fork tubes on each side of the head tube. Instead they come out from under the tank and it appears to me that at a full lock turn they would get pinched.

Is that the correct run for the cables?

Finally, the hose from the brake reservoir seems out of position.

I am certain all of this being slightly out of position is related to the old handlebars. A picture of a bike in stock form would be helpful.

Summary – two questions.
1. Do the handlebars/controls need to be “clean” for grounding purposes underneath the part where the switches bolt up to the throttle and clutch controls?

2. What is the correct running position for the cables as they come out from under the fuel tank?

Thanks in advance,
Rick

Right Side –
CablesRight.jpg


Left Side –
CablesLeft.jpg
 
Except for a /5 horn, the control switches don't ground at the bars - they pass current from one wire over to another wire, which takes it where it needs to go - usually.
 
The wire harnesses and throttle and choke cables all pass in *front* of their respective fork tubes.

On my '88 RT, the brake hose is behind the right fork tube.

The clutch cable passes *over* the top/front of the upper plate, then passes downward between the steering head and the right fork tube to follow along the right frame downtube.

Your speedo cable is correctly routed.

HTH,
Mark
 
Hmm. Something told me not to reconnect that battery yet... :nono

And why do they make that transmission vent bolt so long? :scratch

And of course the tank is full -- because I religiosly refill at the end of every ride at the Chevron station about a half-mile from where I live. :bluduh

I'll drain the tank and re-route the cables while I am this far into the handlebars chore. I am assuming I will need to drain both sides to fully empty it. Is there anything in particular to know before removing the tank?

Insights on the cable routing will also be appreciated. Likewise if it is a straightforward ritual it will be helpful to know.

Thanks again.
 
And why do they make that transmission vent bolt so long?

I made removing my battery connection easier by cutting out part of the ring terminal. Then, I only have to slightly loosen the bolt and slide the cable connector out. Been doing that for over 25 years. Hasn't diminished the grounding capacity of the cable as far as I can tell.
 
I'll drain the tank and re-route the cables while I am this far into the handlebars chore. I am assuming I will need to drain both sides to fully empty it. Is there anything in particular to know before removing the tank?
No need to drain the tank, unless you don't want to deal with the ~40 additional pounds of gasoline -- never been a problem for me.

Assuming you have a later tank (I didn't catch the year of your RT):

The bike left the factory with a cross-bar under the tank at about the half-way point (sometimes left off by previous owners). The bar is secured with a 10 mm bolt on each side. After disconnecting the hoses at each petcock and removing the two retaining clips at the rear mounting pins, the tank can be slightly lifted up and to the rear so that you can disconnect two hoses under the tank -- one from the rain water drain collar around the filler cap, and one from the vapor capture plumbing (the latter is short, and usually comes free on its own). Once free, lift the tank up and back at a bit of a diagonal to slide the nose mount back away from its horizontal rubber bumper (watch and make sure the rubber does not come off/get lost). Be careful as you lift up -- as the tank pivots up around the front bolt, the top front edge can contact the steering head and chip the tank's paint. Set the tank aside -- I usually place my tank on stacks of lumber so that it is supported on the metal edges in front of and behind the petcocks to keep the weight of the tank off the petcock hose nipples.

Insights on the cable routing will also be appreciated. Likewise if it is a straightforward ritual it will be helpful to know.
Unfortunately, I'll be away from home for a couple days -- if you still need advice on cable routing when I get back, I'll post a few pics.

Basically, the throttle cables pass in front of the right fork tube, through the gap between the right frame downtube and the triangular steering head reinforcing plate, above the small crossbar immediately below the frame downtubes' junction, and back toward their respective Bings.

The choke cable is routed similar to the throttle cables, through the gap above the left triangular reinforcing plate and over the small cross bar.

The clutch cable was described above.

Mark
 
p.s. -- fill out some more of your profile :) That would let us know what vintage RT we're dealing with, and you may find that there's a fellow airhead within range that would be willing to give eyes-/hands-on guidance to ya. :thumb
 
p.s. -- fill out some more of your profile :) That would let us know what vintage RT we're dealing with, and you may find that there's a fellow airhead within range that would be willing to give eyes-/hands-on guidance to ya. :thumb
Roger that. I was on the phone with Jeff at MOA taking care of a forum username change and then updating profile details when you posted. :thumb

Via edit -- thanks also for the feedback on the tank removal and safe "storage." This first time I will drain it so I can work the R & R moves with the least amount of hassle.
 
-- I usually place my tank on stacks of lumber so that it is supported on the metal edges in front of and behind the petcocks to keep the weight of the tank off the petcock hose nipples.

Hey, you know those folding canvas chairs? If you have a good sturdy one with arms, those make the most perfect tank holder. Soft fabric that won't scratch paint and really sturdy. Works good for holding fairings or luggage etc.
 
I have built several paint stands/small portable work benches out of PVC pipe... one of them is holding my tank...if I get a chance, I'll take a pic and send it along
 
Hmm. Something told me not to reconnect that battery yet... :nono

And why do they make that transmission vent bolt so long? :scratch

That's a special breather bolt for the transmission and easily stripped. You may want to consider removing the negative battery cable at the battery instead of the transmission.

I'm nearing the end of a conversion from a Vetter Windjammer III to an RT fairing. Part of that fun :scratch aside from making a color coded wiring harness, untangling 20+ years of electrical additions, etc. from the PO is then routing said cabling. I took pictures of a fellow Airhead's RT and check back with him frequently as I progress. If you can find a local, that's a big help (assuming they haven't customized anything).

If I can help with pictures, please let me know.
 
"Well, the throttle side needs grease under the twist handle...eh?"

In general older cycles (any brand) with metal throttle sleeve inner used grease
between the twisting part and the handlebar

Newer cycles with nylon or other plasitc throttle sleeve inner use no grease
since the nylon is self lubricating

It is important to make sure that the throttle/brake lever mounting assbly
on airheads has its little triangular grooved hanldebar gripping piece in place
so that one cannot pull the assembly off the bar by accident and rip the
cables and wires off - quite easy if grease is used and some macho buddy
helps you pick up your dropped bike
 
This is getting rediculous.................the only grease on the throttle assembly is inside on the cam/chain gear mechanism. It is under the plate with the screw on the top of the throttle itself. GREASE NO PLACE ELSE................What is this?.....blind leading the blind on something?.........Good luck......Dennis
 
Grip glue?

So I believe I have everything sorted out except that the left side grip has some movement in it.

I have an unopened tube of grip glue. The price tag is naturally over the instructions so that when I try to peel it it tears off a layer of paper...

Next, I've heard of at least one instance where someone coated the inside of the grip with alcohol and slapped it on. When it dried (per the story) the grip was stuck tight. Would that technique call for a naked bar, grip tape, or grip glue?

Finally, what is the deal with hair spray? I have also heard of people spraying hair spray inside the grip to slide it on. Does that work only with tape? Or is it in addition to glue, or as a substitute for it?

I use hair spray or mousse. It is basically laquer. Spray a good shot inside the grip, spread it around with your finger, and very fast, before it dries slide it on the bar. Sort of squeeze the grip to ensure good contact and then walk away for a little while.
 
The last pair of grips I installed on my /7 I used Agua Net hairspray. Bar, cleaned bars. Went on slick and has remained stuck for quite some time now. Don't need anything more fancy than that.
 
:bow Thanks to both of you for the quick feedback. I knew there was a simple fix!

A clandestine look at my wife's vanity reveals no aerosols but two options for hair spray. Getting it from the master bath to the carport past where she is in the kitchen might be a trick. But hey -- I have faced and overcome tougher hurdles ... for example, a cheese spreader makes the perfect implement for certain needs in Gold Wing maintenance. :brow
 
Back
Top